Difference between revisions of "ATC/Current/WDEPlugin/Configure GenAdmin"
DannaShirley (talk | contribs) (Published) |
DannaShirley (talk | contribs) (Published) |
||
| Line 1: | Line 1: | ||
{{ArticleUnstructured | {{ArticleUnstructured | ||
| − | |DisplayName=Configure the | + | |DisplayName=Configure the {{MINTYDOCSPRODUCT}} Plugin for Workspace Desktop Edition |
|Platform=PureEngage | |Platform=PureEngage | ||
|TocName=Configure the plugin | |TocName=Configure the plugin | ||
| − | |Context=Configure the | + | |Context=Configure the {{MINTYDOCSPRODUCT}} Plugin for Workspace Desktop Edition. |
}} | }} | ||
| − | =Configure the | + | =Configure the {{MINTYDOCSPRODUCT}} Plugin for Workspace Desktop Edition= |
| − | {{NoteFormat|'''Prerequisite''': To configure the | + | {{NoteFormat|'''Prerequisite''': To configure the {{MINTYDOCSPRODUCT}} Plugin for Workspace Desktop Edition, you need the {{MINTYDOCSPRODUCT}} Plugin Installation Package. The installation package contains the application template files that Genesys Administrator uses to create the configuration.}} |
| − | To configure the | + | To configure the {{MINTYDOCSPRODUCT}} Plugin with Genesys Administrator: |
| − | # [[#create_template_ga|Create the | + | # [[#create_template_ga|Create the {{MINTYDOCSPRODUCT}} Plugin application template]] |
| − | # [[#config_options_ga|Set | + | # [[#config_options_ga|Set {{MINTYDOCSPRODUCT}} configuration options]] |
| − | # [[#role_priv_ga|Set | + | # [[#role_priv_ga|Set {{MINTYDOCSPRODUCT}} role privileges for Interaction Workspace users]] |
{{AnchorDiv|create_template_ga}} | {{AnchorDiv|create_template_ga}} | ||
| − | ==1. Create the | + | ==1. Create the {{MINTYDOCSPRODUCT}} Plugin application template== |
| − | The | + | The {{MINTYDOCSPRODUCT}} Plugin application template allows you to associate PureEngage users to the new roles and permissions that are specific to the {{MINTYDOCSPRODUCT}} Plugin for Workspace Desktop Edition. |
| − | In Genesys Administrator, import the | + | In Genesys Administrator, import the {{MINTYDOCSPRODUCT}} Plugin application template from the {{MINTYDOCSPRODUCT}} Installation Package. The {{MINTYDOCSPRODUCT}} Installation Package provides the following: |
* Altocloud_plugin_Workspace_Desktop_Edition_900.apd. This is the application template file. | * Altocloud_plugin_Workspace_Desktop_Edition_900.apd. This is the application template file. | ||
* Altocloud_plugin_Workspace_Desktop_Edition_900.xml. This is the metadata file. | * Altocloud_plugin_Workspace_Desktop_Edition_900.xml. This is the metadata file. | ||
| Line 24: | Line 24: | ||
{{AnchorDiv|config_options_ga}} | {{AnchorDiv|config_options_ga}} | ||
| − | ==2. Set | + | ==2. Set {{MINTYDOCSPRODUCT}} configuration options for Workspace Desktop Edition== |
| − | When you imported the application template, application options were also imported. Each application option has a default value that you need to set for your organization. These options allow the | + | When you imported the application template, application options were also imported. Each application option has a default value that you need to set for your organization. These options allow the {{MINTYDOCSPRODUCT}} Plugin to authenticate with {{MINTYDOCSPRODUCT}} servers to display customer journey data in Workspace Desktop Edition. |
| − | To configure Workspace Desktop Edition to work with | + | To configure Workspace Desktop Edition to work with {{MINTYDOCSPRODUCT}}, set the {{MINTYDOCSPRODUCT}} options within the Workspace Desktop Edition application options. The quickest way to do this is to export the {{MINTYDOCSPRODUCT}} option and then import them into the Workspace Desktop Edition options. |
| − | {{NoteFormat|'''Prerequisite''': Before you set the following options, create an OAuth application in | + | {{NoteFormat|'''Prerequisite''': Before you set the following options, create an OAuth application in {{MINTYDOCSPRODUCT}} that grants PureEngage access to {{MINTYDOCSPRODUCT}} data. For information on how to create an OAuth application, see {{#mintydocs_link:manual=AdminGuide|topic=OAuth_Client_settings|link text=Create an OAuth client}}.|1}} |
===Export application options=== | ===Export application options=== | ||
| − | # In the | + | # In the {{MINTYDOCSPRODUCT}} application template, click the '''Options''' tab. |
#: [[File:Options.png|large|]] | #: [[File:Options.png|large|]] | ||
# Click '''Export'''. | # Click '''Export'''. | ||
| Line 38: | Line 38: | ||
#: [[File:Export options.png|large]] | #: [[File:Export options.png|large]] | ||
| − | ===Import the | + | ===Import the {{MINTYDOCSPRODUCT}} options into Workspace Desktop Edition=== |
# Open Environment -> Applications. Open Workspace Desktop Edition. | # Open Environment -> Applications. Open Workspace Desktop Edition. | ||
# Click the '''Options''' tab. | # Click the '''Options''' tab. | ||
# Click '''Choose File'''. | # Click '''Choose File'''. | ||
#: [[File:Choose file options.png|large]] | #: [[File:Choose file options.png|large]] | ||
| − | # At the prompt, click '''Yes''' to overwrite pre-existing | + | # At the prompt, click '''Yes''' to overwrite pre-existing {{MINTYDOCSPRODUCT}} options. |
#: [[File:Import prompt.png|large]] | #: [[File:Import prompt.png|large]] | ||
# In the Configuration Options Import dialog box, click '''Add'''. | # In the Configuration Options Import dialog box, click '''Add'''. | ||
#: [[File:Uploader.png|large]] | #: [[File:Uploader.png|large]] | ||
| − | # Select the file that was created when you exported the | + | # Select the file that was created when you exported the {{MINTYDOCSPRODUCT}} options. |
| − | # Type "altocloud" into the options name filter to display the newly added | + | # Type "altocloud" into the options name filter to display the newly added {{MINTYDOCSPRODUCT}} options. |
| − | # Configure the imported | + | # Configure the imported {{MINTYDOCSPRODUCT}} options with your organization credentials. For information on each option, see [[#ConfigOptionsDefined|Configuration options]]. |
{{AnchorDiv|ConfigOptionsDefined}} | {{AnchorDiv|ConfigOptionsDefined}} | ||
| Line 61: | Line 61: | ||
| altocloud.client-id | | altocloud.client-id | ||
| Use the Client ID value of the OAuth application {{#mintydocs_link:manual=AdminGuide|topic=OAuth_Client_settings|link text=that you created for PureEngage}}. | | Use the Client ID value of the OAuth application {{#mintydocs_link:manual=AdminGuide|topic=OAuth_Client_settings|link text=that you created for PureEngage}}. | ||
| − | | This allows the client to be authenticated to the | + | | This allows the client to be authenticated to the {{MINTYDOCSPRODUCT}} server. |
|- | |- | ||
| altocloud.client-secret | | altocloud.client-secret | ||
| Use the Client Secret value of the OAuth application {{#mintydocs_link:manual=AdminGuide|topic=OAuth_Client_settings|link text=that you created for PureEngage}}. | | Use the Client Secret value of the OAuth application {{#mintydocs_link:manual=AdminGuide|topic=OAuth_Client_settings|link text=that you created for PureEngage}}. | ||
| − | | This allows the client to be authenticated to the | + | | This allows the client to be authenticated to the {{MINTYDOCSPRODUCT}} server. |
|- | |- | ||
| altocloud.region | | altocloud.region | ||
| − | | The region of the | + | | The region of the {{MINTYDOCSPRODUCT}} Organization |
| | | | | | ||
* United States: use2 | * United States: use2 | ||
| Line 77: | Line 77: | ||
|- | |- | ||
| altocloud.gadget-uri | | altocloud.gadget-uri | ||
| − | | This is where the | + | | This is where the {{MINTYDOCSPRODUCT}} gadgets are hosted. This has a default value within the options template that will work for any configuration |
| | | | ||
| Line 88: | Line 88: | ||
| altocloud.proxy-address | | altocloud.proxy-address | ||
| Set this option accordingly if you require the use of proxy server to access Internet resources. | | Set this option accordingly if you require the use of proxy server to access Internet resources. | ||
| − | | This is optional setting for organizations who need a proxy to access the | + | | This is optional setting for organizations who need a proxy to access the {{MINTYDOCSPRODUCT}} functionality. |
|- | |- | ||
| altocloud.proxy-username | | altocloud.proxy-username | ||
| User name used to access the proxy (if applicable) | | User name used to access the proxy (if applicable) | ||
| − | | This is optional setting for organizations who need a proxy to access the | + | | This is optional setting for organizations who need a proxy to access the {{MINTYDOCSPRODUCT}} functionality. |
|- | |- | ||
| altocloud.proxy-password | | altocloud.proxy-password | ||
| Password of the proxy, if applicable | | Password of the proxy, if applicable | ||
| − | | This is optional setting for organizations who need a proxy to access the | + | | This is optional setting for organizations who need a proxy to access the {{MINTYDOCSPRODUCT}} functionality. |
|} | |} | ||
{{AnchorDiv|role_priv_ga}} | {{AnchorDiv|role_priv_ga}} | ||
| − | ==3. Set | + | ==3. Set {{MINTYDOCSPRODUCT}} role privileges for Workspace Desktop Edition users== |
| − | + | {{MINTYDOCSPRODUCT}} role privileges allow agents to use the {{MINTYDOCSPRODUCT}} Plugin based on their assigned roles within Genesys Administrator. After you create the application template, you see the {{MINTYDOCSPRODUCT}} role privileges when you configure a role in Genesys Administrator. They appear under the "''Workspace''" product. | |
[[File:ATCRoles.png|large|]] | [[File:ATCRoles.png|large|]] | ||
| Line 109: | Line 109: | ||
To configure your Workspace Desktop Edition with roles and privileges for agents, see [https://docs.genesys.com/Documentation/IW/latest/Dep/SettingUpAgentsOnTheSystem Creating a Role and allowing a Workspace privilege and assigning a Role to an agent or agent group]. | To configure your Workspace Desktop Edition with roles and privileges for agents, see [https://docs.genesys.com/Documentation/IW/latest/Dep/SettingUpAgentsOnTheSystem Creating a Role and allowing a Workspace privilege and assigning a Role to an agent or agent group]. | ||
| − | After you successfully create the | + | After you successfully create the {{MINTYDOCSPRODUCT}} application template, {{MINTYDOCSPRODUCT}} role privileges appear under "'''{{MINTYDOCSPRODUCT}} Plug-in Case Gadgets Privileges'''". To see the description of a role, click the arrow to the left of its row. |
Revision as of 17:46, January 30, 2019
Configure the Genesys Predictive Engagement Plugin for Workspace Desktop Edition.
Configure the Genesys Predictive Engagement Plugin for Workspace Desktop Edition
To configure the Genesys Predictive Engagement Plugin with Genesys Administrator:
- Create the Genesys Predictive Engagement Plugin application template
- Set Genesys Predictive Engagement configuration options
- Set Genesys Predictive Engagement role privileges for Interaction Workspace users
1. Create the Genesys Predictive Engagement Plugin application template
The Genesys Predictive Engagement Plugin application template allows you to associate PureEngage users to the new roles and permissions that are specific to the Genesys Predictive Engagement Plugin for Workspace Desktop Edition.
In Genesys Administrator, import the Genesys Predictive Engagement Plugin application template from the Genesys Predictive Engagement Installation Package. The Genesys Predictive Engagement Installation Package provides the following:
- Altocloud_plugin_Workspace_Desktop_Edition_900.apd. This is the application template file.
- Altocloud_plugin_Workspace_Desktop_Edition_900.xml. This is the metadata file.
For more information, see Importing Application Templates and Importing Application Metadata in Application Templates.
2. Set Genesys Predictive Engagement configuration options for Workspace Desktop Edition
When you imported the application template, application options were also imported. Each application option has a default value that you need to set for your organization. These options allow the Genesys Predictive Engagement Plugin to authenticate with Genesys Predictive Engagement servers to display customer journey data in Workspace Desktop Edition.
To configure Workspace Desktop Edition to work with Genesys Predictive Engagement, set the Genesys Predictive Engagement options within the Workspace Desktop Edition application options. The quickest way to do this is to export the Genesys Predictive Engagement option and then import them into the Workspace Desktop Edition options.
Export application options
- In the Genesys Predictive Engagement application template, click the Options tab.
- Click Export.
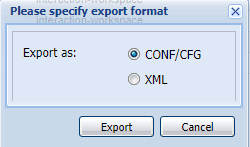
- Click Conf/Cfg and then click Export.
Import the Genesys Predictive Engagement options into Workspace Desktop Edition
- Open Environment -> Applications. Open Workspace Desktop Edition.
- Click the Options tab.
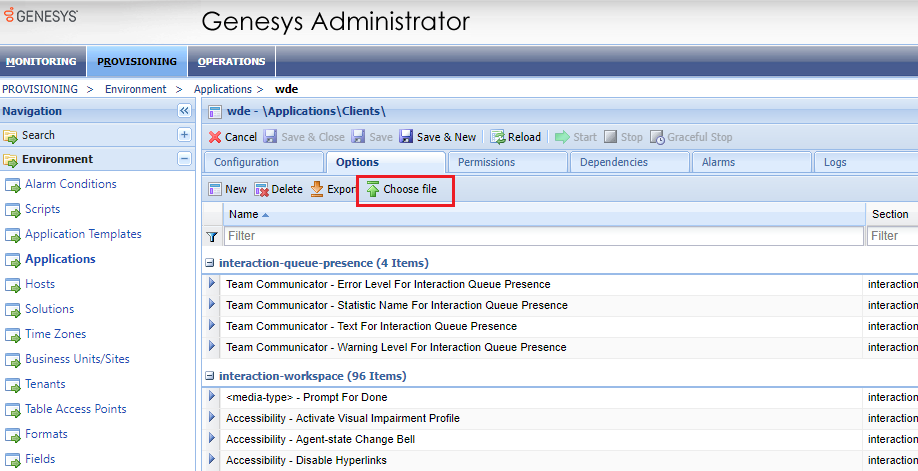
- Click Choose File.
- At the prompt, click Yes to overwrite pre-existing Genesys Predictive Engagement options.
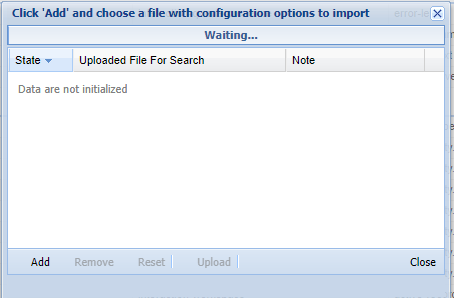
- In the Configuration Options Import dialog box, click Add.
- Select the file that was created when you exported the Genesys Predictive Engagement options.
- Type "altocloud" into the options name filter to display the newly added Genesys Predictive Engagement options.
- Configure the imported Genesys Predictive Engagement options with your organization credentials. For information on each option, see Configuration options.
Configuration options
| Option | Description | Notes |
|---|---|---|
| altocloud.client-id | Use the Client ID value of the OAuth application that you created for PureEngage. | This allows the client to be authenticated to the Genesys Predictive Engagement server. |
| altocloud.client-secret | Use the Client Secret value of the OAuth application that you created for PureEngage. | This allows the client to be authenticated to the Genesys Predictive Engagement server. |
| altocloud.region | The region of the Genesys Predictive Engagement Organization |
|
| altocloud.gadget-uri | This is where the Genesys Predictive Engagement gadgets are hosted. This has a default value within the options template that will work for any configuration | |
| altocloud.organization-id | This is a unique ID assigned by Genesys. | If you do not know your organization ID, contact customercare@genesys.com. |
| altocloud.proxy-address | Set this option accordingly if you require the use of proxy server to access Internet resources. | This is optional setting for organizations who need a proxy to access the Genesys Predictive Engagement functionality. |
| altocloud.proxy-username | User name used to access the proxy (if applicable) | This is optional setting for organizations who need a proxy to access the Genesys Predictive Engagement functionality. |
| altocloud.proxy-password | Password of the proxy, if applicable | This is optional setting for organizations who need a proxy to access the Genesys Predictive Engagement functionality. |
3. Set Genesys Predictive Engagement role privileges for Workspace Desktop Edition users
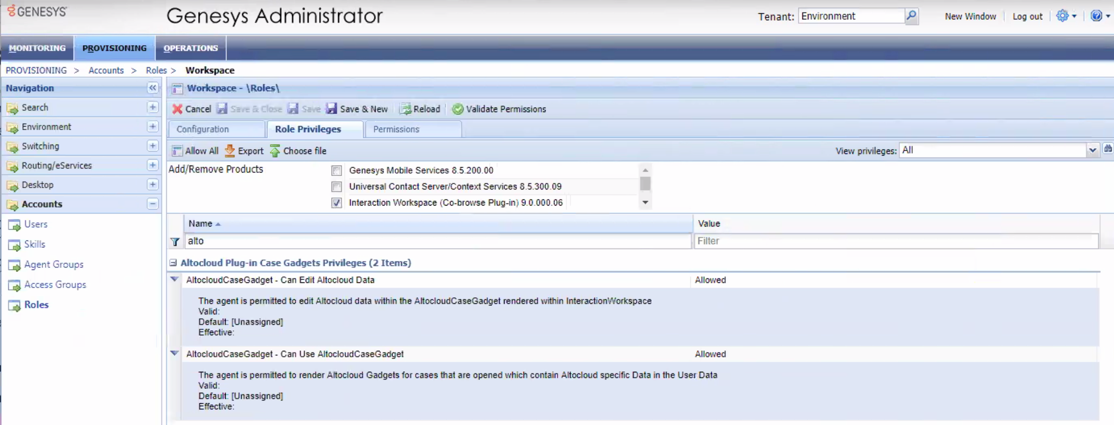
Genesys Predictive Engagement role privileges allow agents to use the Genesys Predictive Engagement Plugin based on their assigned roles within Genesys Administrator. After you create the application template, you see the Genesys Predictive Engagement role privileges when you configure a role in Genesys Administrator. They appear under the "Workspace" product.
To configure your Workspace Desktop Edition with roles and privileges for agents, see Creating a Role and allowing a Workspace privilege and assigning a Role to an agent or agent group.
After you successfully create the Genesys Predictive Engagement application template, Genesys Predictive Engagement role privileges appear under "Genesys Predictive Engagement Plug-in Case Gadgets Privileges". To see the description of a role, click the arrow to the left of its row.


