
Difference between revisions of "Draft: PEC-Hybrid/Current/Admin/About"
m (Text replacement - "Genesys Cloud C([^X])" to "Genesys Cloud CX C$1") |
m (Text replacement - "Genesys Cloud" to "Genesys Cloud CX") |
||
| Line 3: | Line 3: | ||
|DisplayName=Provisioning Genesys Multicloud CX Hybrid Integrations | |DisplayName=Provisioning Genesys Multicloud CX Hybrid Integrations | ||
|TocName=Provisioning | |TocName=Provisioning | ||
| − | |Context=This article describes the essential provisioning steps to enable a hybrid integration between Genesys Engage on-premises deployments and Genesys Cloud CX services. This enables you to access many of the great Genesys Cloud CX Services in your On-Premises deployments. | + | |Context=This article describes the essential provisioning steps to enable a hybrid integration between Genesys Engage on-premises deployments and Genesys Cloud CX CX services. This enables you to access many of the great Genesys Cloud CX CX Services in your On-Premises deployments. |
|ComingSoon=No | |ComingSoon=No | ||
|Platform=GenesysEngage-cloud | |Platform=GenesysEngage-cloud | ||
| Line 10: | Line 10: | ||
|anchor=SupportedServices | |anchor=SupportedServices | ||
|alignment=Vertical | |alignment=Vertical | ||
| − | |structuredtext=The following [https://help.mypurecloud.com Genesys Cloud CX services] are supported and have supplementary documentation: | + | |structuredtext=The following [https://help.mypurecloud.com Genesys Cloud CX CX services] are supported and have supplementary documentation: |
*{{Link-AnywhereElse|product=ATC|display text=Genesys Predictive Engagement}} (formerly Predictive Engagement) | *{{Link-AnywhereElse|product=ATC|display text=Genesys Predictive Engagement}} (formerly Predictive Engagement) | ||
| Line 23: | Line 23: | ||
|structuredtext=Before proceeding with the information in this article you should consult with the Genesys Professional Services team that you are working with to obtain the information needed to complete the provisioning. | |structuredtext=Before proceeding with the information in this article you should consult with the Genesys Professional Services team that you are working with to obtain the information needed to complete the provisioning. | ||
| − | To support the different authentication mechanisms in Genesys Cloud CX Integration, you must create a transaction object in Genesys Multicloud CX Configuration Server. Genesys Engage on-premises Services, Components, and UIs will use this information to authenticate with the Genesys Cloud CX Common Services and UIs. | + | To support the different authentication mechanisms in Genesys Cloud CX CX Integration, you must create a transaction object in Genesys Multicloud CX Configuration Server. Genesys Engage on-premises Services, Components, and UIs will use this information to authenticate with the Genesys Cloud CX CX Common Services and UIs. |
| − | Use Genesys Administrator Extension to manually create all of the Genesys Cloud CX Common Service–related configuration information in Configuration Server at the Tenant level. | + | Use Genesys Administrator Extension to manually create all of the Genesys Cloud CX CX Common Service–related configuration information in Configuration Server at the Tenant level. |
| − | After you purchase a common cloud service, a Genesys Cloud CX Organization is created for you and you will receive a welcome email to activate your admin accounts with Genesys Cloud CX. | + | After you purchase a common cloud service, a Genesys Cloud CX CX Organization is created for you and you will receive a welcome email to activate your admin accounts with Genesys Cloud CX CX. |
| − | A '''Genesys Cloud CX organization''' has been created for you to support your hybrid integration. This organization has been provisioned with the following: | + | A '''Genesys Cloud CX CX organization''' has been created for you to support your hybrid integration. This organization has been provisioned with the following: |
*The base functionality required for your Common Cloud integration. | *The base functionality required for your Common Cloud integration. | ||
*An '''Admin console''' that you may use to configure your Common Cloud integration. | *An '''Admin console''' that you may use to configure your Common Cloud integration. | ||
| − | *A user with the '''Genesys Cloud CX Admin''' role, which includes default admin permissions as well as Single Sign-On and any integration-specific permissions. | + | *A user with the '''Genesys Cloud CX CX Admin''' role, which includes default admin permissions as well as Single Sign-On and any integration-specific permissions. |
*A default '''AI Agent''' role (if required by your integration) that provides agent access to AI services, such as Genesys Predictive Engagement. | *A default '''AI Agent''' role (if required by your integration) that provides agent access to AI services, such as Genesys Predictive Engagement. | ||
| − | As an administrator, you may access your Genesys Cloud CX organization by logging in at https://login.mypurecloud.com (or a [https://developer.genesys.cloud/api/rest/index.html region specific login] URL; The Genesys Cloud CX welcome email directs you to the appropriate application URL for your region) with the credentials you set when you activate your Genesys Cloud CX account from the welcome email you received. | + | As an administrator, you may access your Genesys Cloud CX CX organization by logging in at https://login.mypurecloud.com (or a [https://developer.genesys.cloud/api/rest/index.html region specific login] URL; The Genesys Cloud CX CX welcome email directs you to the appropriate application URL for your region) with the credentials you set when you activate your Genesys Cloud CX CX account from the welcome email you received. |
| − | Upon activation of your Genesys Cloud CX account, perform the steps in the Genesys Cloud CX Provisioning Steps section below using the Genesys Cloud CX Admin UI or the [https://developer.genesys.cloud/api/rest/v2/ Genesys Cloud CX API]. | + | Upon activation of your Genesys Cloud CX CX account, perform the steps in the Genesys Cloud CX CX Provisioning Steps section below using the Genesys Cloud CX CX Admin UI or the [https://developer.genesys.cloud/api/rest/v2/ Genesys Cloud CX CX API]. |
| − | With the credentials provided in the Welcome email, you can log in to the '''Genesys Cloud CX Admin''' UI for [https://developer.genesys.cloud/api/rest/index.html your region] to perform the provisioning steps described in the next section. | + | With the credentials provided in the Welcome email, you can log in to the '''Genesys Cloud CX CX Admin''' UI for [https://developer.genesys.cloud/api/rest/index.html your region] to perform the provisioning steps described in the next section. |
| − | #In the '''Genesys Cloud CX Admin''' UI, select '''Account Settings'''. | + | #In the '''Genesys Cloud CX CX Admin''' UI, select '''Account Settings'''. |
#Open '''Organization Settings'''. | #Open '''Organization Settings'''. | ||
#In the '''Organization Details''' tab, open '''Advanced'''. | #In the '''Organization Details''' tab, open '''Advanced'''. | ||
#Copy the Company Name, Short Name, and Organization ID — you will need these values to complete your account configuration in the '''Genesys Multicloud CX On Premises: Transaction object for hybrid integrations''' section. For example:<br>[[File:Hybrid_Organization_Name_And_ID.png|500px]] | #Copy the Company Name, Short Name, and Organization ID — you will need these values to complete your account configuration in the '''Genesys Multicloud CX On Premises: Transaction object for hybrid integrations''' section. For example:<br>[[File:Hybrid_Organization_Name_And_ID.png|500px]] | ||
| − | The following diagram provides an overview of how Genesys Multicloud CX utilizes Genesys Cloud CX services such as Genesys Predictive Engagement:<br>[[File:Hybrid_Genesys Multicloud CX_Premise_Integration_Phase_1.png|500px]] | + | The following diagram provides an overview of how Genesys Multicloud CX utilizes Genesys Cloud CX CX services such as Genesys Predictive Engagement:<br>[[File:Hybrid_Genesys Multicloud CX_Premise_Integration_Phase_1.png|500px]] |
|Status=No | |Status=No | ||
}}{{Section | }}{{Section | ||
| − | |sectionHeading=Genesys Cloud CX Provisioning Steps | + | |sectionHeading=Genesys Cloud CX CX Provisioning Steps |
|alignment=Vertical | |alignment=Vertical | ||
| − | |structuredtext=For ''each'' Genesys Cloud CX Organization that is created for each of your tenants (for environments with multiple Genesys Multicloud CX tenants), perform the following steps using the Genesys Cloud CX Admin UI or the Genesys Cloud CX API. | + | |structuredtext=For ''each'' Genesys Cloud CX CX Organization that is created for each of your tenants (for environments with multiple Genesys Multicloud CX tenants), perform the following steps using the Genesys Cloud CX CX Admin UI or the Genesys Cloud CX CX API. |
<ol> | <ol> | ||
| − | <li><p>For each Genesys Multicloud CX Service that uses a common service you must create an OAuth client to allow for better control and monitoring of the components using the Genesys Cloud CX Services and for different rate limiting per client. (This does not mean that if you have ''n'' number of components on premises that are associated with one another, they cannot share a given client id.)</p> | + | <li><p>For each Genesys Multicloud CX Service that uses a common service you must create an OAuth client to allow for better control and monitoring of the components using the Genesys Cloud CX CX Services and for different rate limiting per client. (This does not mean that if you have ''n'' number of components on premises that are associated with one another, they cannot share a given client id.)</p> |
<p>Genesys recommends that you consult architecture before performing this step.</p> | <p>Genesys recommends that you consult architecture before performing this step.</p> | ||
| − | <p>Login to your [https://developer.genesys.cloud/api/rest/index.html Genesys Cloud CX Region], then follow these steps:</p> | + | <p>Login to your [https://developer.genesys.cloud/api/rest/index.html Genesys Cloud CX CX Region], then follow these steps:</p> |
<ol type="a"> | <ol type="a"> | ||
| − | <li>Create a Client Credential OAuth Client that is to based on the specific services you are using, such as the [https://all.docs.genesys.com/ATC/Current/PacingServiceDeployment/ProvisioningArticle Pacing Service]. It is required to create the Genesys Cloud CX Genesys Multicloud CX Identity Provider (IDP). In your Genesys Cloud CX Region, create a Client Credential Grant. Open '''Integrations''', select '''OAuth''', and enter '''PureEnagage Client Credentials''' as the App name in the '''Client Details''' tab. Select the '''Client Credentials''' grant type.<br> | + | <li>Create a Client Credential OAuth Client that is to based on the specific services you are using, such as the [https://all.docs.genesys.com/ATC/Current/PacingServiceDeployment/ProvisioningArticle Pacing Service]. It is required to create the Genesys Cloud CX CX Genesys Multicloud CX Identity Provider (IDP). In your Genesys Cloud CX CX Region, create a Client Credential Grant. Open '''Integrations''', select '''OAuth''', and enter '''PureEnagage Client Credentials''' as the App name in the '''Client Details''' tab. Select the '''Client Credentials''' grant type.<br> |
[[File:Hybrid_Client_Credential_OAuth_Grant.png|500px]]<br> | [[File:Hybrid_Client_Credential_OAuth_Grant.png|500px]]<br> | ||
In the '''Roles''' tab, assign the '''Admin''' role and set the division as '''Home'''.<br> | In the '''Roles''' tab, assign the '''Admin''' role and set the division as '''Home'''.<br> | ||
| Line 72: | Line 72: | ||
For more information about Permissions for Genesys Predictive Engagement, see the [https://help.mypurecloud.com/articles/altocloud-permissions-overview/ Predictive Engagement permissions overview]. | For more information about Permissions for Genesys Predictive Engagement, see the [https://help.mypurecloud.com/articles/altocloud-permissions-overview/ Predictive Engagement permissions overview]. | ||
</li> | </li> | ||
| − | <li>Create a SAML2 Bearer OAuth Client for the client, such as Genesys Multicloud CX Workspace Desktop Edition, that needs to send a SAMLResponse to exchange for a Genesys Cloud CX Access Token: | + | <li>Create a SAML2 Bearer OAuth Client for the client, such as Genesys Multicloud CX Workspace Desktop Edition, that needs to send a SAMLResponse to exchange for a Genesys Cloud CX CX Access Token: |
<ol type="i"> | <ol type="i"> | ||
| − | <li>In '''Genesys Cloud CX Admin''', select '''Integrations'''>'''OAuth''', then click '''Add Client'''.</li> | + | <li>In '''Genesys Cloud CX CX Admin''', select '''Integrations'''>'''OAuth''', then click '''Add Client'''.</li> |
<li>Name the Client and select '''SAML2 Bearer''' as the '''Grant Type'''.</li> | <li>Name the Client and select '''SAML2 Bearer''' as the '''Grant Type'''.</li> | ||
<li>Enter the Authorized redirect URI, for example: <nowiki>https://apps.mypurecloud.com</nowiki><br> | <li>Enter the Authorized redirect URI, for example: <nowiki>https://apps.mypurecloud.com</nowiki><br> | ||
| Line 93: | Line 93: | ||
Save the cert.pem (public key) and key.pem (private key) for use in the creation of the Transaction object described in the next section. | Save the cert.pem (public key) and key.pem (private key) for use in the creation of the Transaction object described in the next section. | ||
</li> | </li> | ||
| − | <li>Create a Genesys Multicloud CX Identity Provider (IDP). You can use the Identity Provider API via the [https://developer.genesys.cloud/developer-tools/#/api-explorer Genesys Cloud CX Developer Tools], [https://developer.genesys.cloud/api/rest/client-libraries/ SDKs], or [https://developer.genesys.cloud/api/rest/v2/identityprovider/ Platform APIs].<br> | + | <li>Create a Genesys Multicloud CX Identity Provider (IDP). You can use the Identity Provider API via the [https://developer.genesys.cloud/developer-tools/#/api-explorer Genesys Cloud CX CX Developer Tools], [https://developer.genesys.cloud/api/rest/client-libraries/ SDKs], or [https://developer.genesys.cloud/api/rest/v2/identityprovider/ Platform APIs].<br> |
Sample Request:<br> | Sample Request:<br> | ||
<source lang="text"> | <source lang="text"> | ||
| Line 108: | Line 108: | ||
</source> | </source> | ||
<p>'''issuerURI''': the URI set when you created the SAML certificate in Step 2 (above).</p> | <p>'''issuerURI''': the URI set when you created the SAML certificate in Step 2 (above).</p> | ||
| − | <p>'''ssoTargetURI''': the http redirect URL which should resolve to your Genesys Cloud CX domain. Example: https://app.mypurecloud.com (domain varies according to your region).</p> | + | <p>'''ssoTargetURI''': the http redirect URL which should resolve to your Genesys Cloud CX CX domain. Example: https://app.mypurecloud.com (domain varies according to your region).</p> |
'''Troubleshooting''': | '''Troubleshooting''': | ||
<ul> | <ul> | ||
| Line 124: | Line 124: | ||
|anchor=TransactionObjHybrid | |anchor=TransactionObjHybrid | ||
|alignment=Vertical | |alignment=Vertical | ||
| − | |structuredtext=A transaction object is needed for Genesys components to authenticate with Genesys Cloud CX. | + | |structuredtext=A transaction object is needed for Genesys components to authenticate with Genesys Cloud CX CX. |
<ol> | <ol> | ||
<li>Create a transaction object (and alias) of type '''list''' named '''hybrid_integration''' in the '''Transaction''' folder of the '''Environment''' tenant. | <li>Create a transaction object (and alias) of type '''list''' named '''hybrid_integration''' in the '''Transaction''' folder of the '''Environment''' tenant. | ||
| Line 131: | Line 131: | ||
<ul> | <ul> | ||
<li>'''Single tenant deployment''': If your Genesys Multicloud CX deployment is ''not'' multi-tenant, the transaction object should be in the '''Transaction''' folder in the '''Environment''' or '''Resources''' structure.</li> | <li>'''Single tenant deployment''': If your Genesys Multicloud CX deployment is ''not'' multi-tenant, the transaction object should be in the '''Transaction''' folder in the '''Environment''' or '''Resources''' structure.</li> | ||
| − | <li>'''Multi-tenant deployment''': If your Genesys Multicloud CX deployment is multi-tenant, there must be a separate transaction object under ''each'' of the tenant structures. The transaction objects represent the connectivity to the different Genesys Cloud CX Orgs representing these different tenants. You ''cannot'' place a transaction object in the Environment structure and share it across tenants because you need a separate Genesys Cloud CX Org for each tenant.<br> | + | <li>'''Multi-tenant deployment''': If your Genesys Multicloud CX deployment is multi-tenant, there must be a separate transaction object under ''each'' of the tenant structures. The transaction objects represent the connectivity to the different Genesys Cloud CX CX Orgs representing these different tenants. You ''cannot'' place a transaction object in the Environment structure and share it across tenants because you need a separate Genesys Cloud CX CX Org for each tenant.<br> |
'''WARNING''': If you are running Workspace Desktop Edition 8.5.133.02, you must ensure that the agents of a Tenant do ''not'' have READ access on the 'hybrid_integration' Transaction objects of the ''other'' tenants. | '''WARNING''': If you are running Workspace Desktop Edition 8.5.133.02, you must ensure that the agents of a Tenant do ''not'' have READ access on the 'hybrid_integration' Transaction objects of the ''other'' tenants. | ||
</li> | </li> | ||
| Line 140: | Line 140: | ||
<li>Create the following Object options in the '''general''' section: | <li>Create the following Object options in the '''general''' section: | ||
<ul> | <ul> | ||
| − | <li>'''organization_sname''': The Genesys Cloud CX organization short name for this tenant.</li> | + | <li>'''organization_sname''': The Genesys Cloud CX CX organization short name for this tenant.</li> |
| − | <li>'''organization_id''': The Genesys Cloud CX organization id for this tenant.</li> | + | <li>'''organization_id''': The Genesys Cloud CX CX organization id for this tenant.</li> |
| − | <li>'''default_agent_role_name''': The default Genesys Cloud CX agent role name for an '''AI Agent'''. This will always be '''employee'''. </li> | + | <li>'''default_agent_role_name''': The default Genesys Cloud CX CX agent role name for an '''AI Agent'''. This will always be '''employee'''. </li> |
| − | <li>'''default_admin_role_name''': The default Genesys Cloud CX admin role name. This is '''admin'''.</li> | + | <li>'''default_admin_role_name''': The default Genesys Cloud CX CX admin role name. This is '''admin'''.</li> |
| − | <li>'''base_auth_url''': The base auth URL that can be used for any Genesys Cloud CX service; for example: '''base_auth_url''' should be <nowiki>https://[region_host]/oauth/token</nowiki> (for example: <nowiki>"https://login.mypurecloud.com/oauth/token"</nowiki>). <nowiki>[region_host]</nowiki> is the authentication-based FQDN for the region; the regions are listed on [https://developer.genesys.cloud/api/rest/ this page].</li> | + | <li>'''base_auth_url''': The base auth URL that can be used for any Genesys Cloud CX CX service; for example: '''base_auth_url''' should be <nowiki>https://[region_host]/oauth/token</nowiki> (for example: <nowiki>"https://login.mypurecloud.com/oauth/token"</nowiki>). <nowiki>[region_host]</nowiki> is the authentication-based FQDN for the region; the regions are listed on [https://developer.genesys.cloud/api/rest/ this page].</li> |
| − | <li>'''base_service_url''': The base URL that can be used for any Genesys Cloud CX service; for example: '''base_service_url''' should be <nowiki>https://[region_host]/api/</nowiki>. <nowiki>[region_host]</nowiki> should be the API-based FQDN for the region; the regions are listed on [https://developer.genesys.cloud/api/rest/ this page]. The rest of the URL is Genesys Cloud CX service and version specific; for example: '''...v2/conversations'''. The '''base_service_url''' and the service specific portion is combined in your component code.</li> | + | <li>'''base_service_url''': The base URL that can be used for any Genesys Cloud CX CX service; for example: '''base_service_url''' should be <nowiki>https://[region_host]/api/</nowiki>. <nowiki>[region_host]</nowiki> should be the API-based FQDN for the region; the regions are listed on [https://developer.genesys.cloud/api/rest/ this page]. The rest of the URL is Genesys Cloud CX CX service and version specific; for example: '''...v2/conversations'''. The '''base_service_url''' and the service specific portion is combined in your component code.</li> |
| − | <li>'''organization_domain_suffix''': Create this option in the Annex of the "hybrid_integration" transaction object. If the username of the agent in the Genesys Multicloud CX system is not defined as an email address, this option is appended to the Genesys Cloud CX organization short name for this tenant ('''organization_sname''') to generate a username with valid email format. A valid value is a string representing a valid DNS top-domain. The default value is '''com'''.</li> | + | <li>'''organization_domain_suffix''': Create this option in the Annex of the "hybrid_integration" transaction object. If the username of the agent in the Genesys Multicloud CX system is not defined as an email address, this option is appended to the Genesys Cloud CX CX organization short name for this tenant ('''organization_sname''') to generate a username with valid email format. A valid value is a string representing a valid DNS top-domain. The default value is '''com'''.</li> |
</ul> | </ul> | ||
</li> | </li> | ||
| − | <li>Use the two PEM files that you created in the Genesys Cloud CX Provisioning section to perform the following steps. This example show you how to do it in an open source tool; check with your IT department to determine the best tool to use to meet your security requirements. | + | <li>Use the two PEM files that you created in the Genesys Cloud CX CX Provisioning section to perform the following steps. This example show you how to do it in an open source tool; check with your IT department to determine the best tool to use to meet your security requirements. |
<ul> | <ul> | ||
<li>Encode cert.pem into a base64 string (cert.pem.b64) using this command: | <li>Encode cert.pem into a base64 string (cert.pem.b64) using this command: | ||
| Line 170: | Line 170: | ||
<li>Create the following Object options in the '''saml''' section: | <li>Create the following Object options in the '''saml''' section: | ||
<ul> | <ul> | ||
| − | <li>'''issuer''': The SAML IDP URI that you created in the Genesys Cloud CX Provisioning steps above (for example: <nowiki>https://www.genesys.com/pureengage</nowiki>).</li> | + | <li>'''issuer''': The SAML IDP URI that you created in the Genesys Cloud CX CX Provisioning steps above (for example: <nowiki>https://www.genesys.com/pureengage</nowiki>).</li> |
<li>'''certificate''': The content of the public key of the SAML certificate encoded in base64; for example: cert.pem.b64 created in step 3.</li> | <li>'''certificate''': The content of the public key of the SAML certificate encoded in base64; for example: cert.pem.b64 created in step 3.</li> | ||
<li>'''pkey''': The content of the encrypted private key of the SAML related certificate encoded in base64; for example: key.pem.enc.b64 created in step 3.</li> | <li>'''pkey''': The content of the encrypted private key of the SAML related certificate encoded in base64; for example: key.pem.enc.b64 created in step 3.</li> | ||
| Line 177: | Line 177: | ||
</ul> | </ul> | ||
</li> | </li> | ||
| − | <li>For each Genesys Multicloud CX service that uses a Genesys Cloud CX common service (specified at step#1) you must create a dedicated section in the Transaction object: | + | <li>For each Genesys Multicloud CX service that uses a Genesys Cloud CX CX common service (specified at step#1) you must create a dedicated section in the Transaction object: |
<ul> | <ul> | ||
| − | <li>Create the following Object options in the '''saml_auth''' section for the OAuth client for SAML Authentication from the client (such as Workspace Desktop Edition) that you created in step 1b of the Genesys Cloud CX Provisioning section of type SAML2 Bearer: | + | <li>Create the following Object options in the '''saml_auth''' section for the OAuth client for SAML Authentication from the client (such as Workspace Desktop Edition) that you created in step 1b of the Genesys Cloud CX CX Provisioning section of type SAML2 Bearer: |
<ul> | <ul> | ||
| − | <li>'''client_id''': The SAML2 Bearer client ID created in step 1b of the Genesys Cloud CX Provisioning section.</li> | + | <li>'''client_id''': The SAML2 Bearer client ID created in step 1b of the Genesys Cloud CX CX Provisioning section.</li> |
| − | <li>'''password''': The SAML2 Bearer client secret created in step 1b of the Genesys Cloud CX Provisioning section.</li> | + | <li>'''password''': The SAML2 Bearer client secret created in step 1b of the Genesys Cloud CX CX Provisioning section.</li> |
</ul> | </ul> | ||
</li> | </li> | ||
| − | <li>For the Agent Pacing Service, create the following Object options in the '''ewt''' section for the pacing engine to connect to Genesys Cloud CX: | + | <li>For the Agent Pacing Service, create the following Object options in the '''ewt''' section for the pacing engine to connect to Genesys Cloud CX CX: |
<ul> | <ul> | ||
| − | <li>'''client_id''': The Client Credential Grant Client ID that you created in step 1c of the Genesys Cloud CX Provisioning section.</li> | + | <li>'''client_id''': The Client Credential Grant Client ID that you created in step 1c of the Genesys Cloud CX CX Provisioning section.</li> |
| − | <li>'''password''': The Client Credential Grant Client secret that you created in step 1c of the Genesys Cloud CX Provisioning section.</li> | + | <li>'''password''': The Client Credential Grant Client secret that you created in step 1c of the Genesys Cloud CX CX Provisioning section.</li> |
</ul> | </ul> | ||
</li> | </li> | ||
| Line 198: | Line 198: | ||
|sectionHeading=Opening Your Network | |sectionHeading=Opening Your Network | ||
|alignment=Vertical | |alignment=Vertical | ||
| − | |structuredtext=You must modify the permissions on our network to permit the Genesys Multicloud CX Components and UIs to access Genesys Cloud CX Common APIs over your network and into the Internet. To do this, you must create a set of new firewall rules for the Genesys Cloud CX Authentication and Common Services URLs. | + | |structuredtext=You must modify the permissions on our network to permit the Genesys Multicloud CX Components and UIs to access Genesys Cloud CX CX Common APIs over your network and into the Internet. To do this, you must create a set of new firewall rules for the Genesys Cloud CX CX Authentication and Common Services URLs. |
|Status=No | |Status=No | ||
}} | }} | ||
}} | }} | ||
Revision as of 22:30, November 9, 2021
Contents
This article describes the essential provisioning steps to enable a hybrid integration between Genesys Engage on-premises deployments and Genesys Cloud CX CX services. This enables you to access many of the great Genesys Cloud CX CX Services in your On-Premises deployments.
Supported Services
The following Genesys Cloud CX CX services are supported and have supplementary documentation:
- #mintydocs_link must be called from a MintyDocs-enabled page (Draft:PEC-Hybrid/Current/Admin/About).(formerly Predictive Engagement)
- #mintydocs_link must be called from a MintyDocs-enabled page (Draft:PEC-Hybrid/Current/Admin/About).(formerly Predictive Engagement). Refer to#mintydocs_link must be called from a MintyDocs-enabled page (Draft:PEC-Hybrid/Current/Admin/About).for more information on integrating Genesys Predictive Engagement into Genesys Engage on-premises.
- #mintydocs_link must be called from a MintyDocs-enabled page (Draft:PEC-Hybrid/Current/Admin/About).
About Provisioning
Before proceeding with the information in this article you should consult with the Genesys Professional Services team that you are working with to obtain the information needed to complete the provisioning.
To support the different authentication mechanisms in Genesys Cloud CX CX Integration, you must create a transaction object in Genesys Multicloud CX Configuration Server. Genesys Engage on-premises Services, Components, and UIs will use this information to authenticate with the Genesys Cloud CX CX Common Services and UIs.
Use Genesys Administrator Extension to manually create all of the Genesys Cloud CX CX Common Service–related configuration information in Configuration Server at the Tenant level.
After you purchase a common cloud service, a Genesys Cloud CX CX Organization is created for you and you will receive a welcome email to activate your admin accounts with Genesys Cloud CX CX.
A Genesys Cloud CX CX organization has been created for you to support your hybrid integration. This organization has been provisioned with the following:
- The base functionality required for your Common Cloud integration.
- An Admin console that you may use to configure your Common Cloud integration.
- A user with the Genesys Cloud CX CX Admin role, which includes default admin permissions as well as Single Sign-On and any integration-specific permissions.
- A default AI Agent role (if required by your integration) that provides agent access to AI services, such as Genesys Predictive Engagement.
As an administrator, you may access your Genesys Cloud CX CX organization by logging in at https://login.mypurecloud.com (or a region specific login URL; The Genesys Cloud CX CX welcome email directs you to the appropriate application URL for your region) with the credentials you set when you activate your Genesys Cloud CX CX account from the welcome email you received.
Upon activation of your Genesys Cloud CX CX account, perform the steps in the Genesys Cloud CX CX Provisioning Steps section below using the Genesys Cloud CX CX Admin UI or the Genesys Cloud CX CX API.
With the credentials provided in the Welcome email, you can log in to the Genesys Cloud CX CX Admin UI for your region to perform the provisioning steps described in the next section.
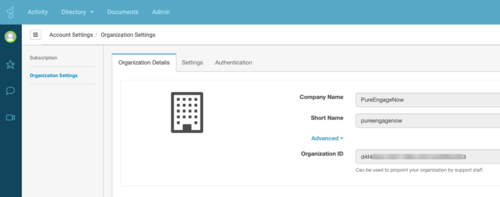
- In the Genesys Cloud CX CX Admin UI, select Account Settings.
- Open Organization Settings.
- In the Organization Details tab, open Advanced.
- Copy the Company Name, Short Name, and Organization ID — you will need these values to complete your account configuration in the Genesys Multicloud CX On Premises: Transaction object for hybrid integrations section. For example:

The following diagram provides an overview of how Genesys Multicloud CX utilizes Genesys Cloud CX CX services such as Genesys Predictive Engagement:
500px
Genesys Cloud CX CX Provisioning Steps
For each Genesys Cloud CX CX Organization that is created for each of your tenants (for environments with multiple Genesys Multicloud CX tenants), perform the following steps using the Genesys Cloud CX CX Admin UI or the Genesys Cloud CX CX API.
For each Genesys Multicloud CX Service that uses a common service you must create an OAuth client to allow for better control and monitoring of the components using the Genesys Cloud CX CX Services and for different rate limiting per client. (This does not mean that if you have n number of components on premises that are associated with one another, they cannot share a given client id.)
Genesys recommends that you consult architecture before performing this step.
Login to your Genesys Cloud CX CX Region, then follow these steps:
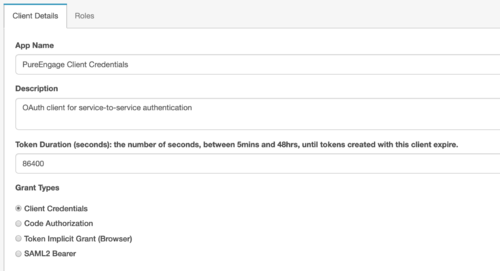
- Create a Client Credential OAuth Client that is to based on the specific services you are using, such as the Pacing Service. It is required to create the Genesys Cloud CX CX Genesys Multicloud CX Identity Provider (IDP). In your Genesys Cloud CX CX Region, create a Client Credential Grant. Open Integrations, select OAuth, and enter PureEnagage Client Credentials as the App name in the Client Details tab. Select the Client Credentials grant type.
In the Roles tab, assign the Admin role and set the division as Home.

As necessary, for each on-premises service, like the "Agent Pacing Service" (ewt), create OAuth Client Credentials grants:- Using the UI, follow these steps,
- Or using the API, reference these endpoints.
- Copy the client ID and Secret for later use.
For more information about Permissions for Genesys Predictive Engagement, see the Predictive Engagement permissions overview.
- Using the UI, follow these steps,
- Create a SAML2 Bearer OAuth Client for the client, such as Genesys Multicloud CX Workspace Desktop Edition, that needs to send a SAMLResponse to exchange for a Genesys Cloud CX CX Access Token:
- In Genesys Cloud CX CX Admin, select Integrations>OAuth, then click Add Client.
- Name the Client and select SAML2 Bearer as the Grant Type.
- Enter the Authorized redirect URI, for example: https://apps.mypurecloud.com

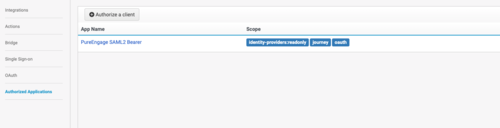
- Next, select Authorized Applications and include the scope(s) in the authorization.
- Copy the client ID and Secret for later use.
- Create a Client Credential OAuth Client that is to based on the specific services you are using, such as the Pacing Service. It is required to create the Genesys Cloud CX CX Genesys Multicloud CX Identity Provider (IDP). In your Genesys Cloud CX CX Region, create a Client Credential Grant. Open Integrations, select OAuth, and enter PureEnagage Client Credentials as the App name in the Client Details tab. Select the Client Credentials grant type.
- Create your SAML Certificate (public key) and private key. You can perform this task with open source tools or with the tools preferred by your IT department for security purposes. Whichever tools you use, you must produce both private and public keys in the form of a PEM file. For example:
openssl req -new -x509 -days 3652 -nodes -out cert.pem -keyout key.pem
Save the cert.pem (public key) and key.pem (private key) for use in the creation of the Transaction object described in the next section.
- Create a Genesys Multicloud CX Identity Provider (IDP). You can use the Identity Provider API via the Genesys Cloud CX CX Developer Tools, SDKs, or Platform APIs.
Sample Request:
PUT https://api.{{environment}}/api/v2/identityproviders/pureengage { "name": "Genesys Multicloud CX", "autoProvisionUsers": true, "certificate": "Content of the cert.pem file without the ---BEGIN CERTIFICATE— and ---END CERTIFICATE--- text blocks", "issuerURI": "https://www.genesys.com/pureengage", "ssoTargetURI": "http://example.com/target", "disabled": false }issuerURI: the URI set when you created the SAML certificate in Step 2 (above).
ssoTargetURI: the http redirect URL which should resolve to your Genesys Cloud CX CX domain. Example: https://app.mypurecloud.com (domain varies according to your region).
Troubleshooting:
- Ensure that the IDP is set with "autoProvisionUsers" = "true"
- Ensure an exact match with the saml/issuer option of the Transaction object described in the Genesys Multicloud CX configuration.
- Ensure that you don't have multiple issuers with the same URI.
- By default, Genesys Predictive Engagement permissions are included in the Admin and AI Agent roles (which includes all necessary permissions for using Genesys Predictive Engagement). As auto-provisioned users are created with the employee role, which does not include Genesys Predictive Engagement permissions. You must grant the Predictive Engagement permissions to the employee role. You may grant Genesys Predictive Engagement permissions to additional roles as needed. Copy these role names for the Genesys Multicloud CX On Premises: Transaction object for hybrid integrations steps below.
- (Optional as needed) Create additional Admin accounts by adding people to your organization and assigning them to the Admin role.


Genesys Multicloud CX On Premises: Transaction object for hybrid integrations
A transaction object is needed for Genesys components to authenticate with Genesys Cloud CX CX.
- Create a transaction object (and alias) of type list named hybrid_integration in the Transaction folder of the Environment tenant.
- Tenant characteristics:
- Single tenant deployment: If your Genesys Multicloud CX deployment is not multi-tenant, the transaction object should be in the Transaction folder in the Environment or Resources structure.
- Multi-tenant deployment: If your Genesys Multicloud CX deployment is multi-tenant, there must be a separate transaction object under each of the tenant structures. The transaction objects represent the connectivity to the different Genesys Cloud CX CX Orgs representing these different tenants. You cannot place a transaction object in the Environment structure and share it across tenants because you need a separate Genesys Cloud CX CX Org for each tenant.
WARNING: If you are running Workspace Desktop Edition 8.5.133.02, you must ensure that the agents of a Tenant do not have READ access on the 'hybrid_integration' Transaction objects of the other tenants.
- Tenant characteristics:
- Create the following Object options in the general section:
- organization_sname: The Genesys Cloud CX CX organization short name for this tenant.
- organization_id: The Genesys Cloud CX CX organization id for this tenant.
- default_agent_role_name: The default Genesys Cloud CX CX agent role name for an AI Agent. This will always be employee.
- default_admin_role_name: The default Genesys Cloud CX CX admin role name. This is admin.
- base_auth_url: The base auth URL that can be used for any Genesys Cloud CX CX service; for example: base_auth_url should be https://[region_host]/oauth/token (for example: "https://login.mypurecloud.com/oauth/token"). [region_host] is the authentication-based FQDN for the region; the regions are listed on this page.
- base_service_url: The base URL that can be used for any Genesys Cloud CX CX service; for example: base_service_url should be https://[region_host]/api/. [region_host] should be the API-based FQDN for the region; the regions are listed on this page. The rest of the URL is Genesys Cloud CX CX service and version specific; for example: ...v2/conversations. The base_service_url and the service specific portion is combined in your component code.
- organization_domain_suffix: Create this option in the Annex of the "hybrid_integration" transaction object. If the username of the agent in the Genesys Multicloud CX system is not defined as an email address, this option is appended to the Genesys Cloud CX CX organization short name for this tenant (organization_sname) to generate a username with valid email format. A valid value is a string representing a valid DNS top-domain. The default value is com.
- Use the two PEM files that you created in the Genesys Cloud CX CX Provisioning section to perform the following steps. This example show you how to do it in an open source tool; check with your IT department to determine the best tool to use to meet your security requirements.
- Encode cert.pem into a base64 string (cert.pem.b64) using this command:
openssl base64 -in cert.pem -out cert.pem.b64
- Encrypt the key.pem using a password that you specify
openssl rsa -in key.pem -out key.pem.enc -aes256
- Encode the resulting content into a base64 string (=>’key.pem.enc.b64’) using this command:
openssl base64 -in key.pem.enc -out key.pem.enc.b64
- Encode cert.pem into a base64 string (cert.pem.b64) using this command:
- Create the following Object options in the saml section:
- issuer: The SAML IDP URI that you created in the Genesys Cloud CX CX Provisioning steps above (for example: https://www.genesys.com/pureengage).
- certificate: The content of the public key of the SAML certificate encoded in base64; for example: cert.pem.b64 created in step 3.
- pkey: The content of the encrypted private key of the SAML related certificate encoded in base64; for example: key.pem.enc.b64 created in step 3.
- password: The password to decrypt the private key that you specified in step 3.
- expire_time: The expiration time (in hours) for the access token. The default is 24 hours. This might be overridden on the server side.
- For each Genesys Multicloud CX service that uses a Genesys Cloud CX CX common service (specified at step#1) you must create a dedicated section in the Transaction object:
- Create the following Object options in the saml_auth section for the OAuth client for SAML Authentication from the client (such as Workspace Desktop Edition) that you created in step 1b of the Genesys Cloud CX CX Provisioning section of type SAML2 Bearer:
- client_id: The SAML2 Bearer client ID created in step 1b of the Genesys Cloud CX CX Provisioning section.
- password: The SAML2 Bearer client secret created in step 1b of the Genesys Cloud CX CX Provisioning section.
- For the Agent Pacing Service, create the following Object options in the ewt section for the pacing engine to connect to Genesys Cloud CX CX:
- client_id: The Client Credential Grant Client ID that you created in step 1c of the Genesys Cloud CX CX Provisioning section.
- password: The Client Credential Grant Client secret that you created in step 1c of the Genesys Cloud CX CX Provisioning section.
- Create the following Object options in the saml_auth section for the OAuth client for SAML Authentication from the client (such as Workspace Desktop Edition) that you created in step 1b of the Genesys Cloud CX CX Provisioning section of type SAML2 Bearer:
Opening Your Network
You must modify the permissions on our network to permit the Genesys Multicloud CX Components and UIs to access Genesys Cloud CX CX Common APIs over your network and into the Internet. To do this, you must create a set of new firewall rules for the Genesys Cloud CX CX Authentication and Common Services URLs.