
User: Jdruker/PE Upgrade/PE DES SAMPLE
Contents
Upgrade strategies[ | edit source]
<service> supports the following upgrade strategies [templatizable plural and display]:
- Rolling Update
- Blue/Green
- Canary (used in combination with Blue/Green)
The upgrade or rollback process to follow for <service(s)> depends on how you deployed <it/them> initially. Based on the deployment strategy adopted during initial deployment, refer to the corresponding upgrade or rollback section on this page for related instructions.
For a conceptual overview of the upgrade strategies, refer to Upgrade strategies in the Private Edition guide.Placeholder for optional service-specific content.
Timing[ | edit source]
A regular upgrade schedule is necessary (link to info about the s/w versioning policy) but fixes might warrant an earlier upgrade.
Scheduling considerations[ | edit source]
When is the best/least disruptive time for actually performing the upgrade, and how long it’ll take. Are there any service dependencies?
Writer's note: The following paragraph was developed for GIM. Should it be included as suite-wide boilerplate?
Genesys recommends that you upgrade the services methodically and sequentially: Complete the upgrade for one service and verify it upgraded successfully; if necessary, roll back the upgrade or, in extreme cases, uninstall and then re-install the service, and verify successful rollback or installation. Then proceed to upgrade the next service. Do not attempt to upgrade a service unless all the <service> services are operating normally.
Monitoring[ | edit source]
Writer's note: Please especially consider if we want to include content like the following. Also consider if the following note on the Observability page is potentially confusing and should be reworded: "While you can use general third-party functionality to create rules to trigger alerts based on metrics values you specify, private edition does not enable you to create custom alerts, and Genesys does not provide support for custom alerting."
Monitor the upgrade process using standard Kubernetes and Helm metrics, as well as service-specific metrics that can identify failure or successful completion of the upgrade (see Observability).
Although Genesys does not provide support for custom alerts, Genesys recommends that you create custom alerts for key indicators of failure — for example, an alert that a pod is in pending state for longer than a timeout suitable for your environment. Consider including an alert for the absence of metrics, which is a situation that can occur if the docker image is not available.
Preparatory steps[ | edit source]
Each time you upgrade a service:
- Review the release note to identify changes.
- Download the new package.
- Ensure your previously customized values.yaml file is available and update it as required to implement changes.
Any other templatizable, generic preparatory steps?
- Recommended backups
- Any permissions-related changes
Rolling Update[ | edit source]
Rolling Update: Upgrade[ | edit source]
Execute the following command to upgrade the service: JD note: (1) Confirm the syntax. Shouldn't it be: "helm upgrade --install <service> -f <service>values.yaml <service package> -n <namespace>"? (2) TBD if "<service-helm-artifact>" is a better term to use than "<service package>." (3) Check which syntax order most services use and match with the majority -- cf. GIM (per PAT team instructions) has the values.yaml element after the Helm package.
helm upgrade --install <service> -f <service>values.yaml -n <service package>Tip: If the only update you need to make to your existing values.yaml is to update the image version, you can pass the image tag as an argument by using the --set flag in the command:
helm upgrade --install <service> -f <service>-values.yaml <service package> --set <service>.image.tag=<new service version>- Designer:
helm upgrade --install designer -f designer-values.yaml designer-100.0.112+1401.tgz --set designer.image.tag=100.0.112.11
- DAS:
helm upgrade --install designer-das -f designer-das-values.yaml designer-das-100.0.112+1401.tgz --set das.image.tag=9.0.111.05.5
Rolling Update: Verify the upgrade[ | edit source]
Follow usual Kubernetes best practices to verify that the new service version is deployed. See the information about initial deployment for additional functional validation that <service> has upgraded successfully.
Optional additional service-specific info.
Rolling Update: Rollback[ | edit source]
To roll back an upgrade, you re-install the previous package.
- Revert the image version in the <service>.image.tag option in the <service>-values.yaml file. If applicable, also revert any configuration changes you implemented for the new release.
- Execute the following command to roll back the upgrade:
helm upgrade --install <service> -f <service>-values.yaml <old service package>
- Tip: You can also directly pass the image tag as an argument by using the --set flag in the command:
helm upgrade --install <service> -f <service>-values.yaml <old service package> --set <service>.image.tag=<old service version>
- Designer:
helm upgrade --install designer -f designer-values.yaml designer-100.0.112+1401.tgz --set designer.image.tag=100.0.111.05.5
- DAS:
helm upgrade --install designer-das -f designer-das-values.yaml designer-das-100.0.112+1401.tgz --set das.image.tag=9.0.111.05.5
Verify the rollback[ | edit source]
Verify the rollback in the same way that you verified the upgrade (see Rolling Update: Verify the upgrade).Additional service-specific content.
Blue/Green[ | edit source]
Blue/Green: Upgrade Designer[ | edit source]
- Identify the current production color by checking the Designer ingress rules:
kubectl describe ingress designer-ingress- Green is the production color in the below example as the production host name points to the green service.
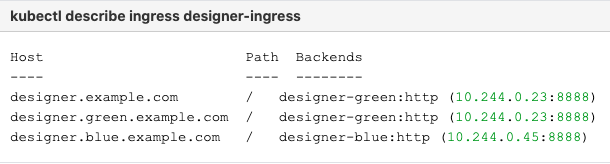
- Deploy the Designer service on to the non-production color (in this example, blue is the non-production color and assuming the service name is designer-blue):
helm upgrade --install designer-blue -f designer-values.yaml designer-100.0.112+1401.tgz --set designer.deployment.strategy=blue-green --set designer.image.tag=100.0.111.05.5 --set designer.deployment.color=blue

Use the non-production host name to access the non-production color. For example, designer.blue.example.com). You can use this URL for testing.
NodePort Service
The designer-green release creates a service called designer-green and the designer-blue release creates a service called designer-blue. If you are using NodePort services, ensure that the value of designer.service.nodePort is not the same for both the releases. In other words, you should assign dedicated node ports for the releases. The default value for designer.service.nodePort is 30180. If this was applied to designer-green, use a different value for designer-blue, for example, 30181. Use the below helm command to achieve this:
helm upgrade --install designer-blue -f designer-values.yaml designer-100.0.112+1401.tgz --set designer.deployment.strategy=blue-green --set designer.image.tag=100.0.111.05.5 --set designer.deployment.color=blue --set designer.service.nodePort=30181
Cutover[ | edit source]
- Update the Designer Ingress with the new deployment color by running the following command (in this case, blue is the new deployment color, that is, the non-production color):
helm upgrade --install designer-ingress -f designer-values.yaml designer-100.0.112+1401.tgz --set designer.deployment.strategy=blue-green-ingress --set designer.deployment.color=blue
Verify the upgrade[ | edit source]
- Verify the ingress rules by running the following command:
kubectl describe ingress designer-ingress
- The production host name must point to the new color service, that is,
blue.
- The production host name must point to the new color service, that is,
Blue/Green: Upgrade DAS[ | edit source]
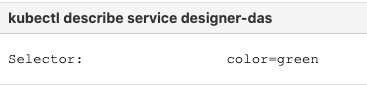
- Identify the current production color by checking the
designer-dasservice selector labels:- .
kubectl describe service designer-das</code>.
#:Green is the production color in the below example as the selector label is <code>color=green
- Deploy the DAS service on to the non-production color (in this example, blue is the non-production color and assuming the service name is
designer-das-blue):
helm upgrade --install designer-das-blue -f das-values.yaml designer-das-100.0.106+1401.tgz --set das.deployment.strategy=blue-green --set das.image.tag=9.0.111.05.5 --set das.deployment.color=blue

Use the non-production service name to access the non-production color.
Cutover[ | edit source]
Once testing is completed on the non-production color, move traffic to the new version by updating the designer-das service.
- Update the
designer-dasservice with the new deployment color (in this example, blue is the new deployment color, that is, non-production color)helm upgrade --install designer-das-service -f designer-das-values.yaml designer-das-100.0.106+1401.tgz --set das.deployment.strategy=blue-green-service --set das.deployment.color=blue
Verify the upgrade[ | edit source]
- Verify the service by executing the
kubectl describe service designer-dascommand.- The type label must have the active color's label, that is,
color=blue.
- The type label must have the active color's label, that is,
Blue/Green: Rollback Designer[ | edit source]
To roll back the upgrade, modify the ingress rules to point back to the old deployment pods (green, in this example) by performing a cutover again.
- Perform a cutover using the following command:
helm upgrade --install designer-ingress -f designer-values.yaml designer-100.0.112+1401.tgz --set designer.deployment.strategy=blue-green-ingress --set designer.deployment.color=green
Verify the rollback[ | edit source]
- Verify the rollback in the same way that you verified the upgrade (see Blue-Green: Verify the upgrade).
- The type label must have the active color's label, that is,
color=green.
Blue/Green: Rollback DAS[ | edit source]
To roll back the upgrade, perform a cutover again to point the service back to the old deployment (green).
- Perform a cutover using the following command:
helm upgrade --install designer-das-service -f designer-das-values.yaml designer-das-100.0.106+1401.tgz --set das.deployment.strategy=blue-green-service --set das.deployment.color=green
Verify the rollback[ | edit source]
- Verify the rollback in the same way that you verified the upgrade (see Blue-Green: Verify the upgrade).
- The type label must have the active color's label,
color=green.
Canary[ | edit source]
Canary is optional and is only used along with Blue-Green. It is recommended in production. Canary pods are generally used to test new versions of images with live traffic.
You will not use Canary pods when you are installing the Designer and DAS services for the first time. You will only use Canary pods for testing the new versions when upgrading the services after initial deployment.
For more information on this, see deployment instructions for Canary.
Post-upgrade procedures[ | edit source]
Upgrading the Designer workspace[ | edit source]
Workspace resources must be upgraded after cutover. Perform the following steps to upgrade the system resources in the Designer workspace:
- Log in to one of the Designer pods using the
kubectl exec -it <pod_name >bash command. - Execute the following migration command (this creates new directories/new files introduced in the new version):
node ./bin/cli.js workspace-upgrade -m -t <contact_center_id> - Execute the workspace resource upgrade command (this upgrades system resources, such as system service PHP files, internal audio files and callback resources):
node ./bin/cli.js workspace-upgrade -t <contact_center_id>
In the above command,contact_center_id, is the Contact Center ID created in GWS for this tenant (workspace resources are located under the Contact Center ID folder (/workspaces/<ccid>/workspace)).
Elasticsearch maintenance recommendations[ | edit source]
To help you better manage your indexes and snapshots, and to prevent too many indexes from creating an overflow of shards, Genesys recommends that you set up a scheduled execution of Elasticsearch Curator with the following two actions:
- Delete indexes older than the given threshold according to the index name and mask.
sdr-*(3 months)audit-*(12 months)
- Make a snapshot of each index:
sdr-*(yesterday and older)audit-*kibana-int-*
Uninstall[ | edit source]
In addition to this instruction, are there any boilerplate preparatory steps (e.g., processes to stop, data to save) and/or service dependencies?
Execute the following command to uninstall <service>:
JD note: Confirm the syntax. Shouldn't it be "uninstall <service>" and shouldn't it include the namespace argument?
helm uninstall <release-name>If you are uninstalling the service preparatory to re-installing it after a failed upgrade and/or rollback, you might need to perform additional steps to clear all Kubernetes resources.
Placeholder for service-specific additional content.