View table: KBArticle
Table structure:
- Title - String
- FirstPublished - Datetime
- LastPublished - Datetime
- ArticleNumber - String
- Audience - String
- Summary - Wikitext
- Overview - Wikitext
- Details - Wikitext
- Environment - Wikitext
- Supplemental - Wikitext
- RelatedArticles - List of URL
- Attachment - File
This table has 4 rows altogether.
| Page | Title | FirstPublished | LastPublished | ArticleNumber | Audience | Summary | Overview | Details | Environment | Supplemental | RelatedArticles | Attachment | ||||||||||||||||||||||||||||||||||||
|---|---|---|---|---|---|---|---|---|---|---|---|---|---|---|---|---|---|---|---|---|---|---|---|---|---|---|---|---|---|---|---|---|---|---|---|---|---|---|---|---|---|---|---|---|---|---|---|---|
| Draft:CustomerCare/Current/KB/393020 | Another test | October 6, 2021 8:13:41 PM | October 6, 2021 8:13:58 PM | 393020 | DB | test | test | |||||||||||||||||||||||||||||||||||||||||
| Draft:CustomerCare/Current/KB/661727 | Changing the Password or User NT/Domain Account Information for IWP | June 26, 2020 8:24:37 PM | July 20, 2020 4:21:35 PM | 661727 | Admin | This article goes through the needed steps to changing Domain Account information including user or password information with regards to IWP/LDAP use.Any Changes should be made in a maintenance window to limit the impact possible on service | Here are the steps to follow :
Note: If the domain account was changed, a CIC server restart could possibly be needed to propagate the changes in cached settings (though this is not always needed, so check web portal functionality before restarting CIC. If it is not functional, that restart may be needed to update Domain user.). Versions impacted: 4.0 to current |
Draft:KB/Current/Articles/124181 | ||||||||||||||||||||||||||||||||||||||||
| Draft:CustomerCare/Current/KB/844304 | Modify properties for the ININ QoS driver installation | July 20, 2020 4:22:57 PM | July 20, 2020 4:38:40 PM | 844304 | Admin | This article describes how to modify the default Interactive Intelligence QoS driver installation in IC 4.0 and covers the implications for server installs such as Interaction Center Server and Interaction Media Server, as well as IC User Applications installs with SIP Soft Phone and/or Interaction Screen Recorder Capture Client selected. | Solution:How to modify the default Interactive Intelligence QoS driver installationIn IC 4.0, Interactive Intelligence developed a new QoS driver to more closely integrate with the Interaction Center. It is the new default QoS driver for IC 4.0. It operates independently of the Windows QoS Packet Scheduler, which was the recommended QoS driver for IC 3.0. The following IC 4.0 GA installs use the QoS feature:
Note: Additional installs that use the QoS feature may be included in future IC 4.0 Service Updates. The default behavior for most of these installs is to silently install the Interactive Intelligence QoS driver and add the certificate to the Trusted Publishers list. (The IC User Applications installs are the exception.) Some sites may prefer to modify this default behavior for the following reasons:
IC Server and other server installs that use the QoS featureFor the IC Server and other server installs that use the QoS feature, the default is to silently install the Interactive Intelligence QoS driver and silently add the certificate to the Trusted Publishers list. If you want to modify the default Interactive Intelligence QoS driver installation, do not run the install in "full UI" mode (i.e. double-clicking the .msi). Instead, use one of the following methods to modify the QoS feature properties and run the install:
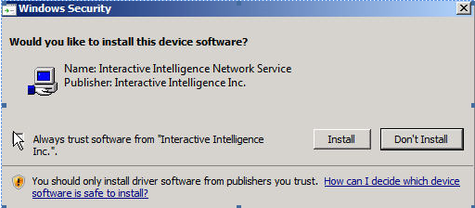
QoS feature propertiesDONOTINSTALL_ININQOSDRIVER If you do not want to install the Interactive Intelligence QoS driver, set the DONOTINSTALL_ININQOSDRIVER property to "1”. When the install runs, the Interactive Intelligence QoS driver is not installed and the certificate is not added to the Trusted Publishers list. DONOTADDCERTTOTRUSTEDPUBLIST If you want to install the Interactive Intelligence QoS driver, but do not want to add the certificate to the Trusted Publishers list, set the DONOTADDCERTTOTRUSTEDPUBLIST property to"1”. When the install runs, the following message appears:
Important notes about using Group Policy or startup/logon scriptsMachine-based Group Policy or startup script Because a machine group policy or startup script runs under the Local System account, the only QoS driver-related property that should be added is the “DONOTINSTALL_ININQOSDRIVER” to disable both the QoS driver installation and the adding of the certificate to the Trusted Publishers list. Specifying the “DONOTADDCERTTOTRUSTEDPUBLIST” property causes the Windows Security screen to display as noted above. This screen is invisible when the install is run under the Local System account and will cause the install to fail and roll back. User-based Group Policy or logon script It is possible to specify to disable both the “DONOTADDCERTTOTRUSTEDPUBLIST” and “DONOTINSTALL_ININQOSDRIVER” properties. If the “DONOTADDCERTTOTRUSTEDPUBLIST” property alone is added the user will be prompted with the Windows Security screen as noted above and must select “Install”. If the user does not select “Install” to complete this action, the install will fail and rollback. IC User Applications installs with SIP Soft Phone and/or Interaction Screen Recorder Capture Client selectedFor the IC User Applications installs with SIP Soft Phone and/or Interaction Screen Recorder Capture Client selected:
QoS-related prompts in IC User Applications installs when run in “full UI mode”When the IC User Applications installs are run in "Full UI mode" (via Setup.exe or double-clicking the .msi) and SIP Soft Phone and/or Interaction Screen Recorder Capture Client features are selected in the Custom Setup screen, the following screen appears: Interactive Intelligence QoS driver This is the default and recommended option. When this option is selected, the install will add the Interactive Intelligence certificate to the Trusted Publishers list, then install the driver. In most cases, adding the certificate to the Trusted Publishers list saves the user from being prompted by Windows Security to manually trust the certificate. If the system administrator does not allow the Trusted Publishers list to be modified, the user will be prompted with the Windows Security dialog. To make it easier for the user, the following message appears first, explaining what to do when the Windows Security dialog appears. Other If Other is selected in the QoS Requirement dialog, the Interactive Intelligence certificate is not added to the Trusted Publishers list and driver is not installed. We recommend that users do not select this option unless specified by the administrator. Selecting this option implies that another form of QoS is used at the site. Note for SIP Soft Phone sites: If Other is selected because another form of QoS is used, the administrator will need to set "QoS Enabled" to "No" in the Interaction Administrator Managed IP Phone Configuration Options tab before provisioning the phone. Otherwise the user will not be able to take calls. |
HT CIC EIC CIC EIC Install | Additional information
|
|||||||||||||||||||||||||||||||||||||||
| Draft:CustomerCare/Current/KB/982373 | Roger's Article | October 6, 2021 8:21:42 PM | October 6, 2021 8:21:57 PM | 982373 | Admin | test |


