Difference between revisions of "Draft: PEC-Hybrid/Current/Admin/About"
| Line 50: | Line 50: | ||
|freetext=Perform the following steps using the PureCloud Admin UI or the PureCloud API. | |freetext=Perform the following steps using the PureCloud Admin UI or the PureCloud API. | ||
<ol> | <ol> | ||
| − | <li>As necessary, for each on-premises service, create OAuth Client Credentials grants: | + | <li>To allow for better control and monitoring of the components using PureCloud Services, for each PureEngage Service that uses a common service you must create an OAuth client to allow for better control and monitoring of the components using the PureCloud Services and for different rate limiting per client. This does not mean that if you have n number of components on premises that are associated with one another, they cannot share a given client id. |
| + | |||
| + | Genesys recommends that you consult architecture before performing this step. | ||
| + | <ol type="a"> | ||
| + | <li>Create a SAML2 Bearer OAuth Client for the client, such as PureEngage Workspace Desktop Edition, that needs to send a SAMLResponse to exchange for a PureCloud Access Token: | ||
| + | <ol type="i"> | ||
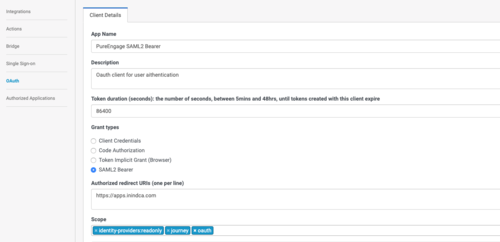
| + | <li>In '''PureCloud Admin''', select '''Integrations'''>'''OAuth''', then click '''Add Client'''.</li> | ||
| + | <li>Name the Client and select '''SAML2 Bearer''' as the '''Grant Type'''.</li> | ||
| + | <li>Enter the Authorized redirect URI, for example: <nowiki>https://apps.mypurecloud.com</nowiki><br> | ||
| + | [[File:Hybrid_SAML2Bearer_Creation.png|500px]] | ||
| + | </li> | ||
| + | </ol> | ||
| + | </li> | ||
| + | <li>As necessary, for each on-premises service, like the "Agent Pacing Service" ('''ewt'''), create OAuth Client Credentials grants: | ||
<ul> | <ul> | ||
<li>Using the UI, follow [https://help.mypurecloud.com/articles/create-an-oauth-client/ these steps],</li> | <li>Using the UI, follow [https://help.mypurecloud.com/articles/create-an-oauth-client/ these steps],</li> | ||
| Line 56: | Line 69: | ||
</ul> | </ul> | ||
For more information about Permissions for Altocloud, see the [https://help.mypurecloud.com/articles/altocloud-permissions-overview/ Altocloud permissions overview]. | For more information about Permissions for Altocloud, see the [https://help.mypurecloud.com/articles/altocloud-permissions-overview/ Altocloud permissions overview]. | ||
| − | |||
| − | |||
| − | |||
| − | |||
| − | |||
| − | |||
| − | |||
</li> | </li> | ||
</ol> | </ol> | ||
| Line 68: | Line 74: | ||
<li>Create your SAML Cert and key. Certificate is base64 string created from PEM file by using this command:<br> | <li>Create your SAML Cert and key. Certificate is base64 string created from PEM file by using this command:<br> | ||
<source lang="text"> | <source lang="text"> | ||
| − | openssl | + | openssl req -new -x509 -days 3652 -nodes -out saml.crt -keyout saml.pem |
</source> | </source> | ||
Pkey is also based64 string but requires additional command to create encrypted private key:<br> | Pkey is also based64 string but requires additional command to create encrypted private key:<br> | ||
<source lang="text"> | <source lang="text"> | ||
| − | openssl pkcs8 -topk8 -inform PEM -outform PEM -in saml.pem -out | + | openssl pkcs8 -topk8 -inform PEM -outform PEM -in saml.pem -out key.pem -nocrypt |
| − | |||
| − | |||
</source> | </source> | ||
Once you have created the two PEM files perform the following steps: | Once you have created the two PEM files perform the following steps: | ||
| Line 83: | Line 87: | ||
</source> | </source> | ||
</li> | </li> | ||
| − | <li>Encrypt the | + | <li>Encrypt the key.pem using a password that you specify |
<source lang="text"> | <source lang="text"> | ||
| − | openssl rsa -in | + | openssl rsa -in key.pem -out key.pem.enc -aes256 |
</source> | </source> | ||
| − | ( | + | </li> |
| + | <li>Encode the resulting content into a base64 string (=>’key.pem.enc.b64’) using this command: | ||
<source lang="text"> | <source lang="text"> | ||
| − | openssl base64 -in | + | openssl base64 -in key.pem.enc -out key.pem.enc.b64 |
</source> | </source> | ||
</li> | </li> | ||
| Line 102: | Line 107: | ||
"name": "PureEngage", | "name": "PureEngage", | ||
"autoProvisionUsers": true, | "autoProvisionUsers": true, | ||
| − | "certificate": " | + | "certificate": "Content of the saml.pem file", |
"issuerURI": "http://www.genesys.com/pureengage", | "issuerURI": "http://www.genesys.com/pureengage", | ||
"ssoTargetURI": "http://example.com/target", | "ssoTargetURI": "http://example.com/target", | ||
| Line 131: | Line 136: | ||
</ul> | </ul> | ||
</li> | </li> | ||
| − | <li> | + | <li>By default, Altocloud permissions are included in the Admin and AI Agent roles. As auto-provisioned users are created with the '''employee''' role, which does not include Altocloud permissions. You must grant the [[https://help.mypurecloud.com/articles/altocloud-permissions-overview/ Altocloud permissions] to the employee role. You may grant Altocloud permissions to additional roles as needed.</li> |
| − | |||
| − | |||
| − | |||
| − | |||
| − | |||
| − | |||
| − | |||
| − | |||
| − | |||
| − | |||
| − | |||
| − | |||
| − | |||
| − | |||
| − | |||
| − | |||
| − | |||
| − | |||
| − | |||
| − | |||
| − | |||
| − | |||
| − | |||
| − | |||
| − | |||
| − | |||
| − | |||
| − | |||
| − | |||
| − | |||
| − | |||
| − | |||
| − | |||
| − | |||
| − | |||
| − | |||
| − | |||
| − | |||
| − | |||
| − | |||
| − | |||
| − | |||
| − | |||
| − | |||
| − | |||
| − | |||
| − | |||
| − | |||
| − | |||
| − | |||
| − | |||
| − | |||
| − | |||
| − | |||
| − | |||
| − | |||
| − | |||
| − | |||
| − | |||
| − | |||
| − | |||
| − | |||
| − | |||
| − | |||
| − | |||
| − | |||
| − | |||
| − | |||
| − | |||
| − | |||
| − | |||
| − | |||
| − | |||
| − | |||
| − | |||
| − | |||
| − | |||
| − | |||
| − | |||
| − | |||
| − | |||
| − | |||
| − | |||
| − | |||
| − | |||
| − | |||
| − | |||
| − | |||
| − | |||
| − | |||
| − | |||
| − | |||
| − | |||
| − | |||
| − | |||
| − | |||
| − | |||
| − | |||
| − | |||
| − | |||
| − | |||
| − | |||
| − | |||
| − | |||
| − | |||
| − | |||
| − | |||
| − | |||
| − | |||
| − | |||
| − | |||
| − | |||
| − | |||
| − | |||
| − | |||
| − | |||
| − | |||
| − | </li> | ||
<li>(Optional as needed) Create additional Admin accounts by [https://help.mypurecloud.com/articles/add-people-organization/ adding people to your organization] and [https://help.mypurecloud.com/articles/assign-roles-divisions-licenses-and-add-ons/ assigning them] to the Admin role.</li> | <li>(Optional as needed) Create additional Admin accounts by [https://help.mypurecloud.com/articles/add-people-organization/ adding people to your organization] and [https://help.mypurecloud.com/articles/assign-roles-divisions-licenses-and-add-ons/ assigning them] to the Admin role.</li> | ||
</ol> | </ol> | ||
Revision as of 16:11, June 4, 2019
{{Article |Standalone=Yes |DisplayName=Provisioning PureEngage Hybrid Integrations |Platform=PureEngage |TocName=Provisioning |ComingSoon=No |Context=This article describes the essential provisioning steps to enable a hybrid integration between PureEngage On-Prem deployments and Genesys PureCloud services. |Section=
Contents
Supported Services
About Provisioning
{{Section
|sectionHeading=PureCloud Provisioning Steps |Type=Unstructured |freetext=Perform the following steps using the PureCloud Admin UI or the PureCloud API.
- To allow for better control and monitoring of the components using PureCloud Services, for each PureEngage Service that uses a common service you must create an OAuth client to allow for better control and monitoring of the components using the PureCloud Services and for different rate limiting per client. This does not mean that if you have n number of components on premises that are associated with one another, they cannot share a given client id.
Genesys recommends that you consult architecture before performing this step.
- Create a SAML2 Bearer OAuth Client for the client, such as PureEngage Workspace Desktop Edition, that needs to send a SAMLResponse to exchange for a PureCloud Access Token:
- As necessary, for each on-premises service, like the "Agent Pacing Service" (ewt), create OAuth Client Credentials grants:
- Using the UI, follow these steps,
- Or using the API, reference these endpoints.
For more information about Permissions for Altocloud, see the Altocloud permissions overview.
- Create your SAML Cert and key. Certificate is base64 string created from PEM file by using this command:
openssl req -new -x509 -days 3652 -nodes -out saml.crt -keyout saml.pem
Pkey is also based64 string but requires additional command to create encrypted private key:
openssl pkcs8 -topk8 -inform PEM -outform PEM -in saml.pem -out key.pem -nocrypt
Once you have created the two PEM files perform the following steps:
- Encode saml.pem into a base64 string (=>’saml.pem.b64’) using this command:
openssl base64 -in saml.pem -out saml.pem.b64
- Encrypt the key.pem using a password that you specify
openssl rsa -in key.pem -out key.pem.enc -aes256
- Encode the resulting content into a base64 string (=>’key.pem.enc.b64’) using this command:
openssl base64 -in key.pem.enc -out key.pem.enc.b64
- Encode saml.pem into a base64 string (=>’saml.pem.b64’) using this command:
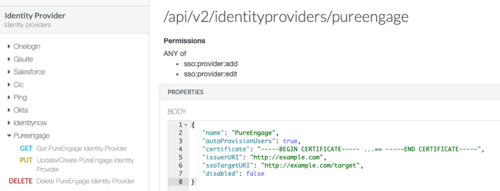
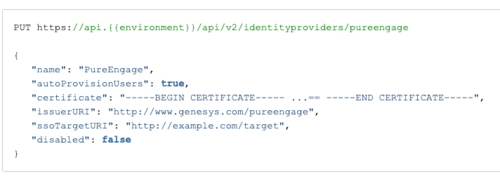
- Create a PureEngage Identity Provider (IDP). You can use the Identity Provider API via the PureCloud Developer Tools, SDKs, or Platform API.
Sample Request:
PUT https://api.{{environment}}/api/v2/identityproviders/pureengage { "name": "PureEngage", "autoProvisionUsers": true, "certificate": "Content of the saml.pem file", "issuerURI": "http://www.genesys.com/pureengage", "ssoTargetURI": "http://example.com/target", "disabled": false }Troubleshooting:
- Ensure that the IDP is set with "autoProvisionUsers" = "true"
- Ensure that the issuer URI in your SAML assertion is the same as the issuer URI for the IDP.
- Ensure that you don't have multiple issuers with the same URI.
- By default, Altocloud permissions are included in the Admin and AI Agent roles. As auto-provisioned users are created with the employee role, which does not include Altocloud permissions. You must grant the [Altocloud permissions to the employee role. You may grant Altocloud permissions to additional roles as needed.
- (Optional as needed) Create additional Admin accounts by adding people to your organization and assigning them to the Admin role.
|Status=No }}
PureEngage On Premises: Transaction object for hybrid integrations
Opening Your Network
}}


