
Salesforce lead creation and campaign attribution
Prerequisites
- Configure the following permissions in Genesys Cloud CX:
- Architect > Flow > All
- Architect > UI > All
- Integrations > Integration > All
- Integrations > Action > All
- Journey > Action Map > All
- Journey > Event Type > View (to configure an action map with an event trigger)
- Journey > Report > View
- Scripter > Published Script > Add, View (to add agent-facing scripts)
- Scripter > Script > All (to create agent-facing scripts)
- Deploy one of the following:
- For Genesys Cloud CX customers using web messaging, configure and deploy Genesys Messenger.
- For all other customers, deploy the tracking snippet on the website to track so that you can trigger the action map based on pageview events. To trigger an action map based on other events, use ac(‘record’) to send Genesys Predictive Engagement data about the events to track.
Configuration overview
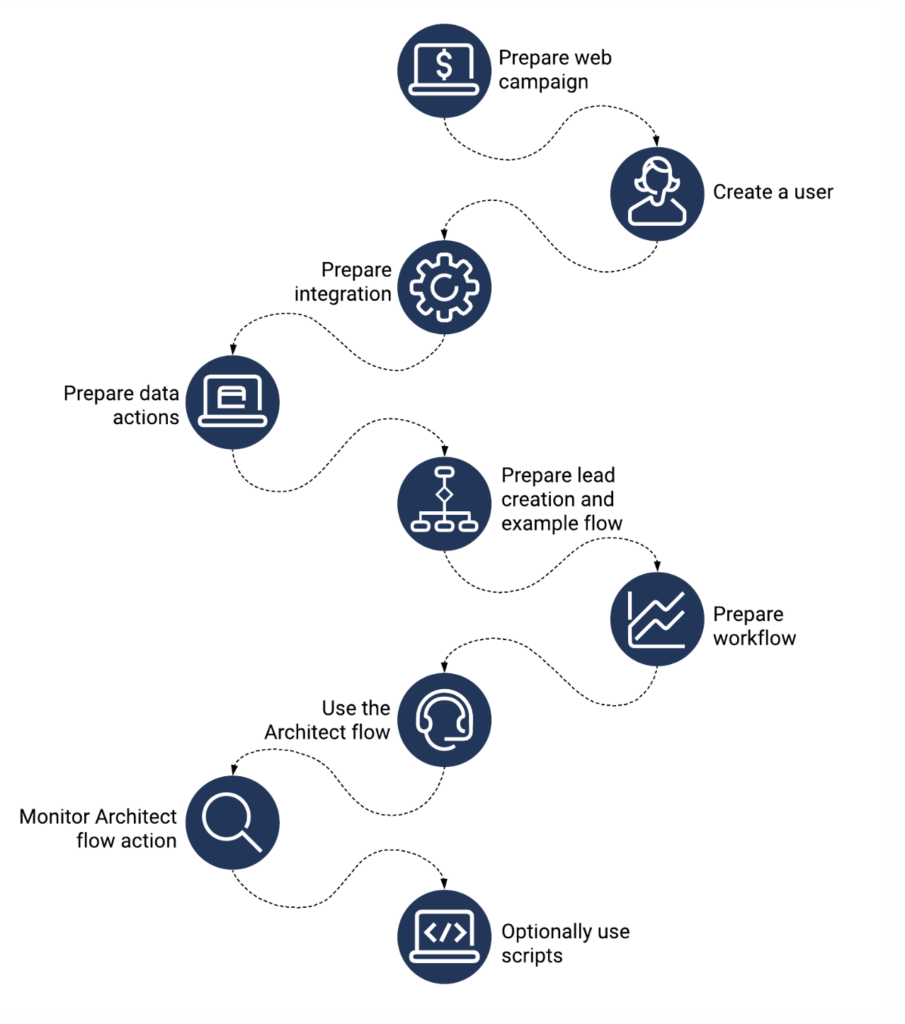
- Prepare your web campaign.
- Create a dedicated Salesforce user.
- Prepare the Salesforce data actions integration.
- Prepare the Salesforce data actions.
- Get the Salesforce Lead Creation and Campaign Attribution example workflow.
- In Genesys Cloud CX Architect, prepare a workflow.
- Prepare an action map to use the Architect flow action.
- Monitor your Architect flow action with a report.
- Genesys Cloud CX users: (Optional) Use scripts to help agents view and create a Salesforce lead:
- Learn about the Salesforce Lead Creation and Campaign Attribution script
- Download the Salesforce Lead Creation and Campaign Attribution script
- Configure agent accounts
- Communicate with agents about how to access and use the Salesforce Lead Creation and Campaign Attribution script
Prepare your web campaign with UTM parameters
Use the following UTM parameters to track campaign-related activity on your website:
- Campaign ID
- Last name
- First name
For more information about configuring UTM parameters, see Campaign attributes.
Create a dedicated Salesforce user
In Salesforce, create a dedicated user account with the appropriate rights to use the Salesforce data action integration on behalf of Genesys Predictive Engagement. This user account acts on behalf of your entire organization to perform the data actions needed for the Salesforce integration.
Prepare the Salesforce integration and data actions
Prepare the Salesforce data actions integration
- In Genesys Cloud CX, go to Admin > Integrations > Integrations.
- Click + Integrations.
- Install a Salesforce data actions integration.
- On the Configuration tab, configure the credentials to use the dedicated Salesforce user account that you created in your Salesforce organization.
Prepare the Salesforce data actions
- Download the required Salesforce data actions. For download links and descriptions, see the table that follows these instructions.
- Import the data actions and associate them with the Salesforce data actions integration.
- (Optional) test the setup of your contract.
- Save and publish the data actions.
Salesforce data actions download links
| Download link | When you pass this information to the data action… | The data action… |
|---|---|---|
| Salesforce-Associate-With-Campaign.json | Campaign ID and a lead ID | Calls the Salesforce API to include the lead in the campaign. |
| Salesforce-Check-if-Lead-is-Associated-With-Campaign.json | Campaign ID and an email | If the member is part of the campaign, returns a lead ID. |
| Salesforce-Create-Lead-By-Email.json | Lead information | Creates a lead in Salesforce with the attributes that you specify. |
| Salesforce-Get-Campaign-Id-From-Campaign-Name.json | Campaign name | Returns the campaign ID that matches the name. |
| Salesforce-Get-Lead-By-Email.json | Email address | Retrieves the lead attributes associated with the email address. |
Prepare the Salesforce Lead Creation and Campaign Attribution example workflow
The Salesforce Lead Generation example workflow associates a lead with a specified campaign in Salesforce.
- If the lead exists, the workflow associates it with the campaign.
- If the lead does not exist, the workflow creates the lead and associates it with the campaign.
You can provide the campaign ID to the workflow directly. If you do not provide the campaign ID, the workflow attempts to extract the UTM campaign from the session ID to complete the association.
- Download the Salesforce-Lead-Creation-And-Campaign-Attribution.i3WorkFlow
- Associate the data actions.
- Publish the workflow.
- Switch to Architect to prepare the workflow.
Prepare an action map to use an Architect flow action
Create the action map
Follow these instructions to create an action map that uses the Architect flow action.Override the default variable values
To create the new Salesforce lead with a richer set of journey data, override the default settings of these variables and tell Genesys Predictive Engagement where to obtain the user-specific values.
- Next to the variable to override, under Action click Edit.
- Select the Override the initial value for this action map check box.
- From the New value list, select the value to send to the data action.
- Static value: Unique identifier that Genesys Predictive Engagement creates for every user.
- Session: Unique identifier that helps track user activity over time. For more information about using the session ID with Architect, see Get Journey Session action.
- External Contact ID: Unique identifier that maps a user across the Genesys suite of products.
- Other values:
- Event attribute: If you trigger the action map based on a form_submitted event, the form fields appear here.
- If a second list appears, select the source of the value.
- Click Override.
- Repeat these steps for all the variables to override.
Scripting: Use a script to help agents view, create, and update a Salesforce lead

For more information about scripts, see:
Download the Salesforce Lead Generation script template and data actions
- Click here to download the Genesys Predictive Engagement-Salesforce-View-Create-Update-Lead-Script.script
- Download the required data actions. For more information, see the following table.
| Download link | When you pass this information to the data action… | The data action… |
|---|---|---|
| Salesforce-Create-Lead-By-Email.json | Lead information | Creates a lead in Salesforce with the attributes that you specify. |
| Salesforce-Get-Lead-By-Email.json | Email address | Retrieves the lead attributes associated with the email address. |
| Salesforce-Update-Lead-By-Id.json | Lead information | Updates an existing lead in Salesforce with the specified attributes. |
Configure agent accounts
To allow an agent to use the Salesforce script, configure the agent’s account with the following permissions:
- Integrations> Action > Execute permission
- Scripter > Published Script > View (to view agent-facing scripts)
Agents use the same dedicated Salesforce user account that Genesys Predictive Engagement uses to view and update leads in Salesforce.
How agents access and use the Salesforce Lead Generation script
Scripts appear in the Interaction panel for voice interactions.
To access a script, an agent clicks the following icon:

When the script opens, the agent can see whether the user is an existing lead. The agent can then complete the form to create or update the lead as necessary.