Managing overlays and events
Contents
Create and manage overlays and overlay events.
Workforce Management (WFM) makes it easy to forecast and manage overlays and events in the Forecast > Overlays view, by enabling you to:
- Create and delete overlays
- View and edit overlay data
- Add and delete overlay events
- View and edit event data
- Select overlay data to copy and paste
- Calculate the distribution in overlays
Creating overlays
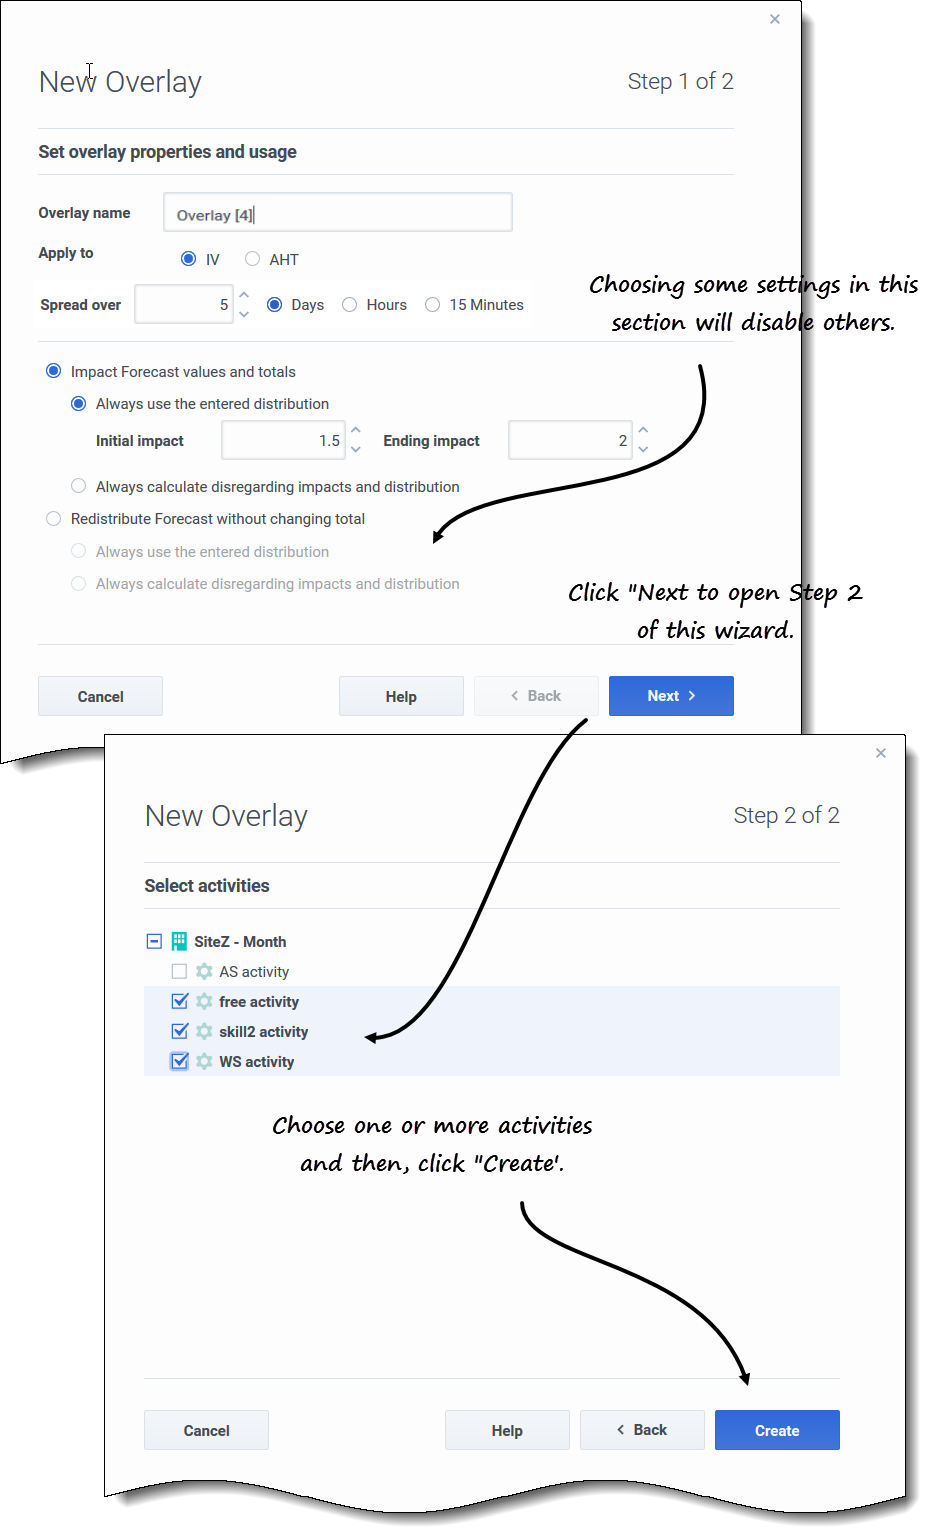
Use the New Overlay wizard to guide you through a simple two-step process.
Creating an overlay
- In the Forecast > Overlays view, select a business unit or site.
- In the toolbar, click New overlay.
- The New Overlay dialog opens.
- In the Overlay name field, enter a name for the overlay (limited to 127 characters).
- Choose the statistic for this overlay: IV or AHT.
- In the Spread over field, enter a value, specifying either Days, Hours, or 15 Minutes.
- Valid values are between 1 (default) and 999.
- Next, choose one of the following settings (choosing some settings in this section, will disable others):
- Select Impact Forecast values and totals (default), if you want this overlay to change the forecast's values and totals. Then, choose one of the following:
- Always use the entered distribution
- Always calculate disregarding impacts and distribution
- Select Redistribute Forecast without changing total, if you want this overlay to preserve the forecast's totals for a specific period, while changing the distribution of values inside that period. Then, choose one of the following:
- Always use the entered distribution
- Always calculate disregarding impacts and distribution
- Select Impact Forecast values and totals (default), if you want this overlay to change the forecast's values and totals. Then, choose one of the following:
If you choose Impact Forecast values and totals and then, Always use the entered distribution in step 6, enter values for Initial impact and Ending impact. Click Next.
Wizard step 2
- In the Select activities dialog, expand the business units or sites to select activities and/or multi-site activities for this overlay.
- Click Create.
- Click OK in the confirmation dialog.
You can click Cancel at any time to discard the settings and close the New Overlay wizard. Clicking Cancel in the progress dialog, causes WFM to close the dialog and refresh the grid.
Rules for initial and ending impact
Keep the following information in mind when entering values for initial and ending impact in the procedure Creating overlays:
- The Initial impact and Ending impact fields accept values from
-100to9999. - If you do not enter a value for both initial and ending impact, WFM creates 0.00 values in the Distribution grid.
- If you enter a value in only one of the impact fields and the spread over value is 1, WFM creates the distribution with the specified value.
- If you enter a value in only one of the impact fields and the spread over value is greater than 1, a validation message appears.
- If you enter different values in the impact fields and spread over is 1, a validation message appears.
- If you enter the values in both impact fields and spread over is 2, WFM creates the distribution with the specified values.
- If you enter the values in both impact fields and spread over is greater than 2, WFM creates the distribution by specifying the impact field values for the first and last timestep and calculates the remaining timesteps values by using a formula.
Editing overlays
In the Overlay Distribution grid, you can move from cell to cell by using the Enter or Shift+Enter keys on the keyboard.
Click a cell in the grid and on the keyboard, press:
- Enter to move the focus to the cell below the one selected.
- Shift+Enter to move the focus to the cell above the one selected.
If you select a cell in the Average or Total row, you can use Enter to move down one cell, but you cannot use Shift+Enter to move up one cell.
Editing an overlay
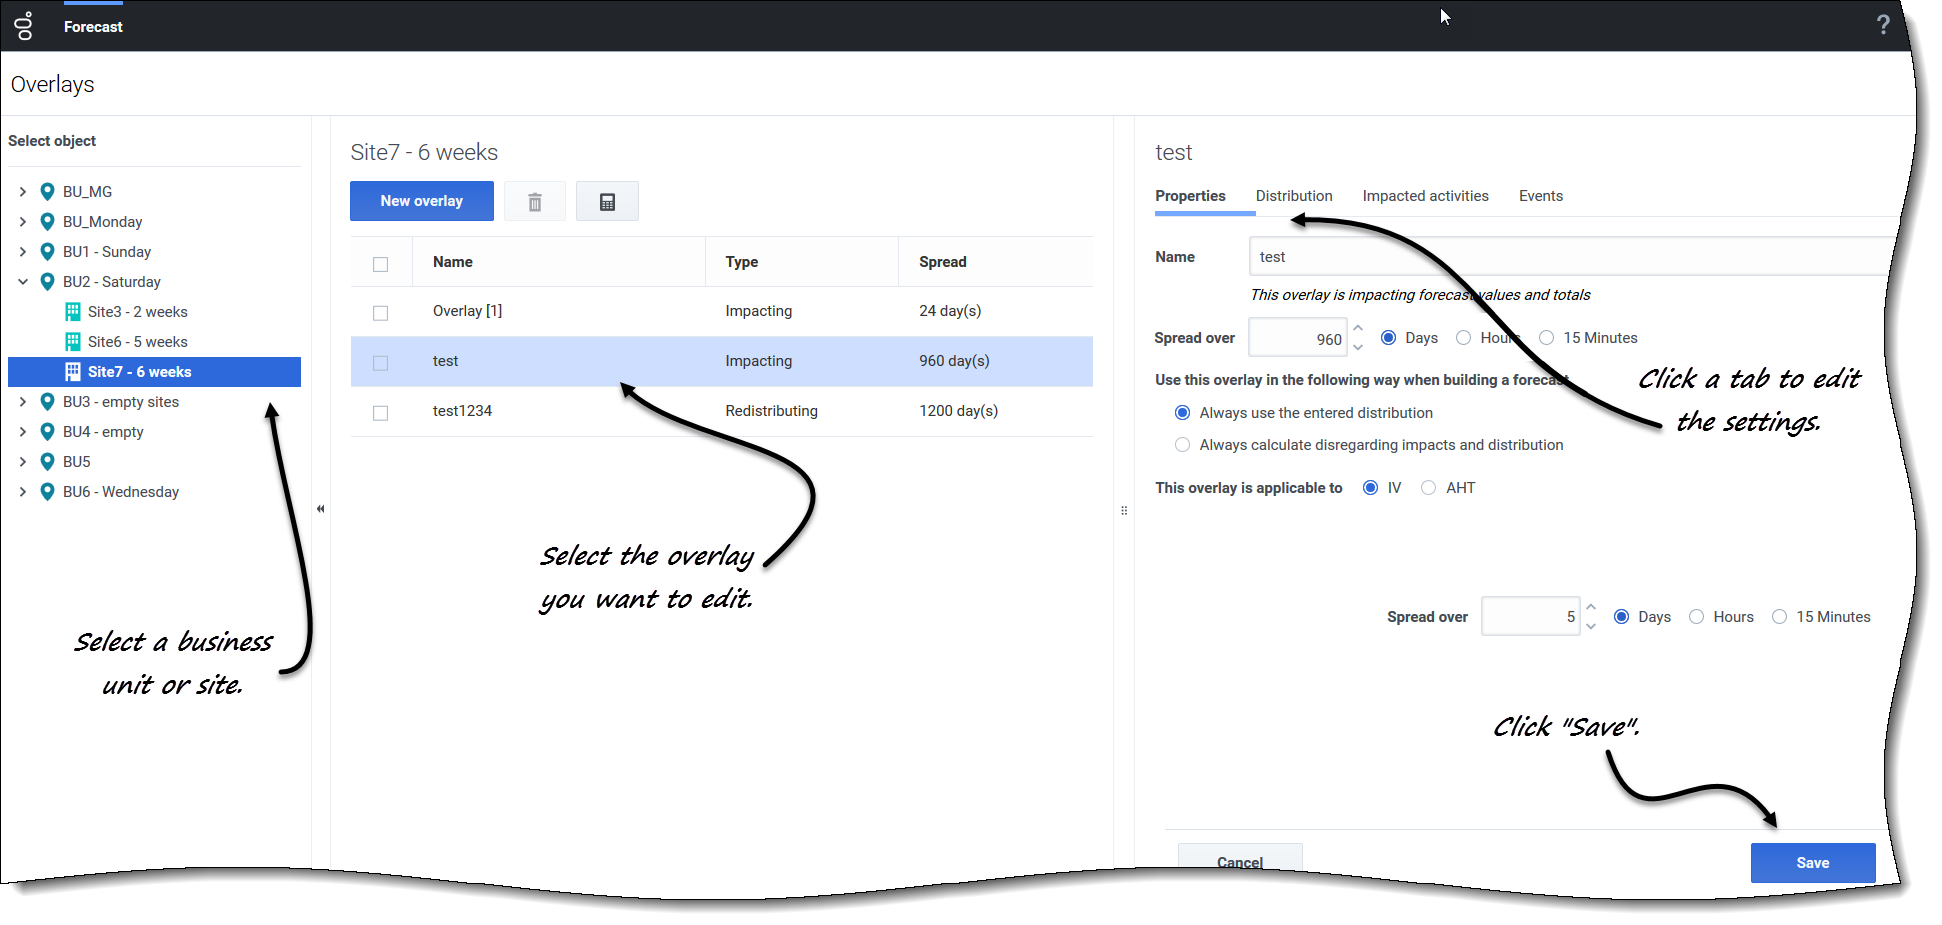
- In the Forecast > Overlays view, select a business unit or site.
- The overlays for this object are displayed in a table.
- In the Overlays table, select the overlay you want to edit.
- The Data pane opens, displaying four tabs.
- Click a tab to change its settings.
- Edit one or more of the tabs and click Save.
- Alternatively, click Cancel at any time to discard any changes you've made.
Editing the Spread over value in the Properties tab
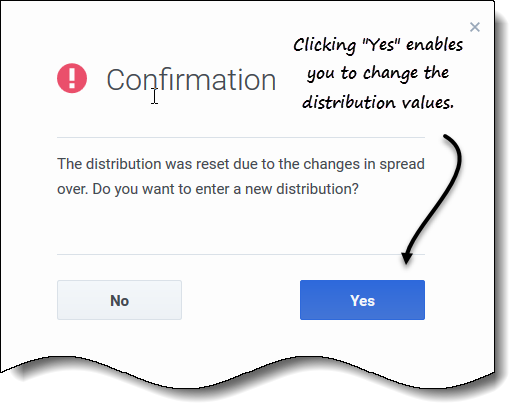
If you change the Spread over value in the Properties tab WFM enables you to update the distribution values directly.
After verifying the change to Spread over and clicking Save, you'll see the following message in the Confirmation dialog: The distribution was reset due to the changes in spread over. Do you want to enter a new distribution?
Changing the distribution
- Click Yes.
- The distribution tab opens enabling you to proceed.
- When you are finished making changes, click Save.
- WFM verifies that the new spread over and distribution values were successfully saved.
Deleting overlays
Deleting an overlay
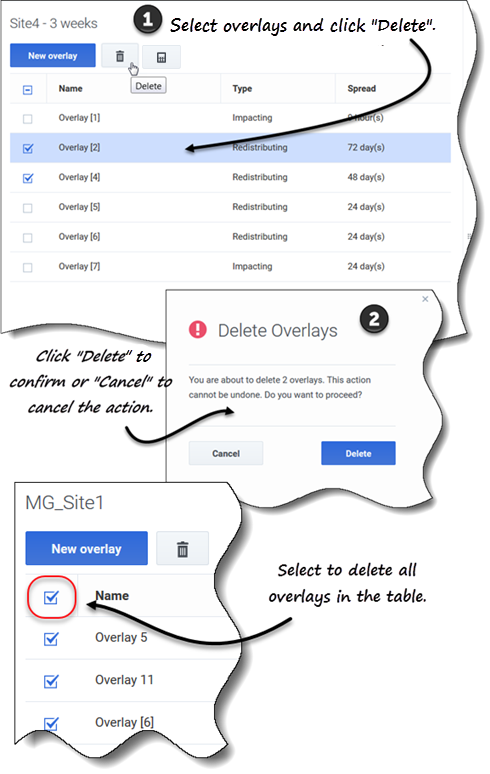
- In the Forecast > Overlays view, select a business unit or site.
- The overlays for this object are displayed in a table.
- In the table, select the overlay that you want to delete.
- In the toolbar, click Delete
 .
. - When the confirmation dialog opens, click Delete to proceed or Cancel to cancel the action.
Deleting multiple overlays
- Select the overlays you want to delete (using the check box beside each overlay).
- Complete steps 3 and 4 in Deleting an overlay.
Deleting all overlays in the table
- Select the top-most check box in the column header (near the Name column header).
- Complete steps 3 and 4 in Deleting an overlay.
Adding overlay events
Use the selected overlay's Events tab to add and manage overlays events.
Adding an overlay event
- In the Forecast > Overlays view, select a business unit or site.
- The overlays for this object are displayed in a table.
- In the Overlays table, select an overlay.
- In the Data pane, click the Events tab.
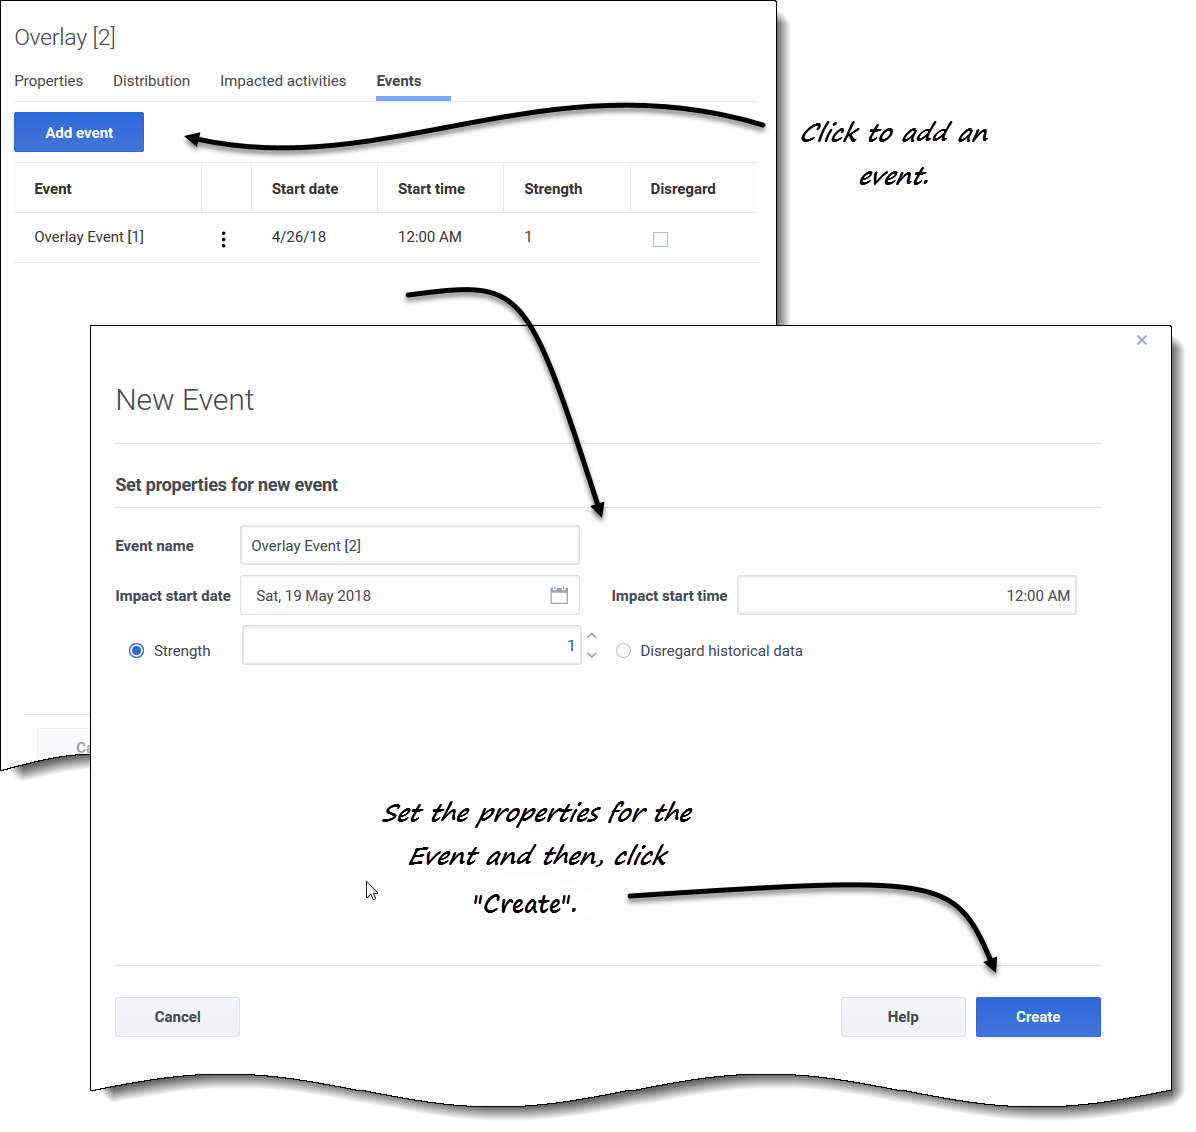
- Click Add event.
- The New Event dialog opens.
- In the Event name field, enter a name for the event.
- In the Impact start date and Impact start time fields, enter the date and time, or keep the default date and time.
- In the Strength field, you can enter a value or keep the default. The range is 0 to 999999999.99.
- Alternatively, you can disable the value in the Strength field by selecting Disregard historical data.
- If Disregard historical data is not selected, WFM considers historical data when processing events.
- Click Create.
- When the confirmation dialog opens, click OK.
- Alternatively, click Cancel at any time to cancel the action.
Editing events
Editing an overlay event
- In the Forecast > Overlays view, select a business unit or site.
- The overlays for this object are displayed in a table.
- In the Overlays table, select an overlay.
- In the Data pane, click the Events tab.
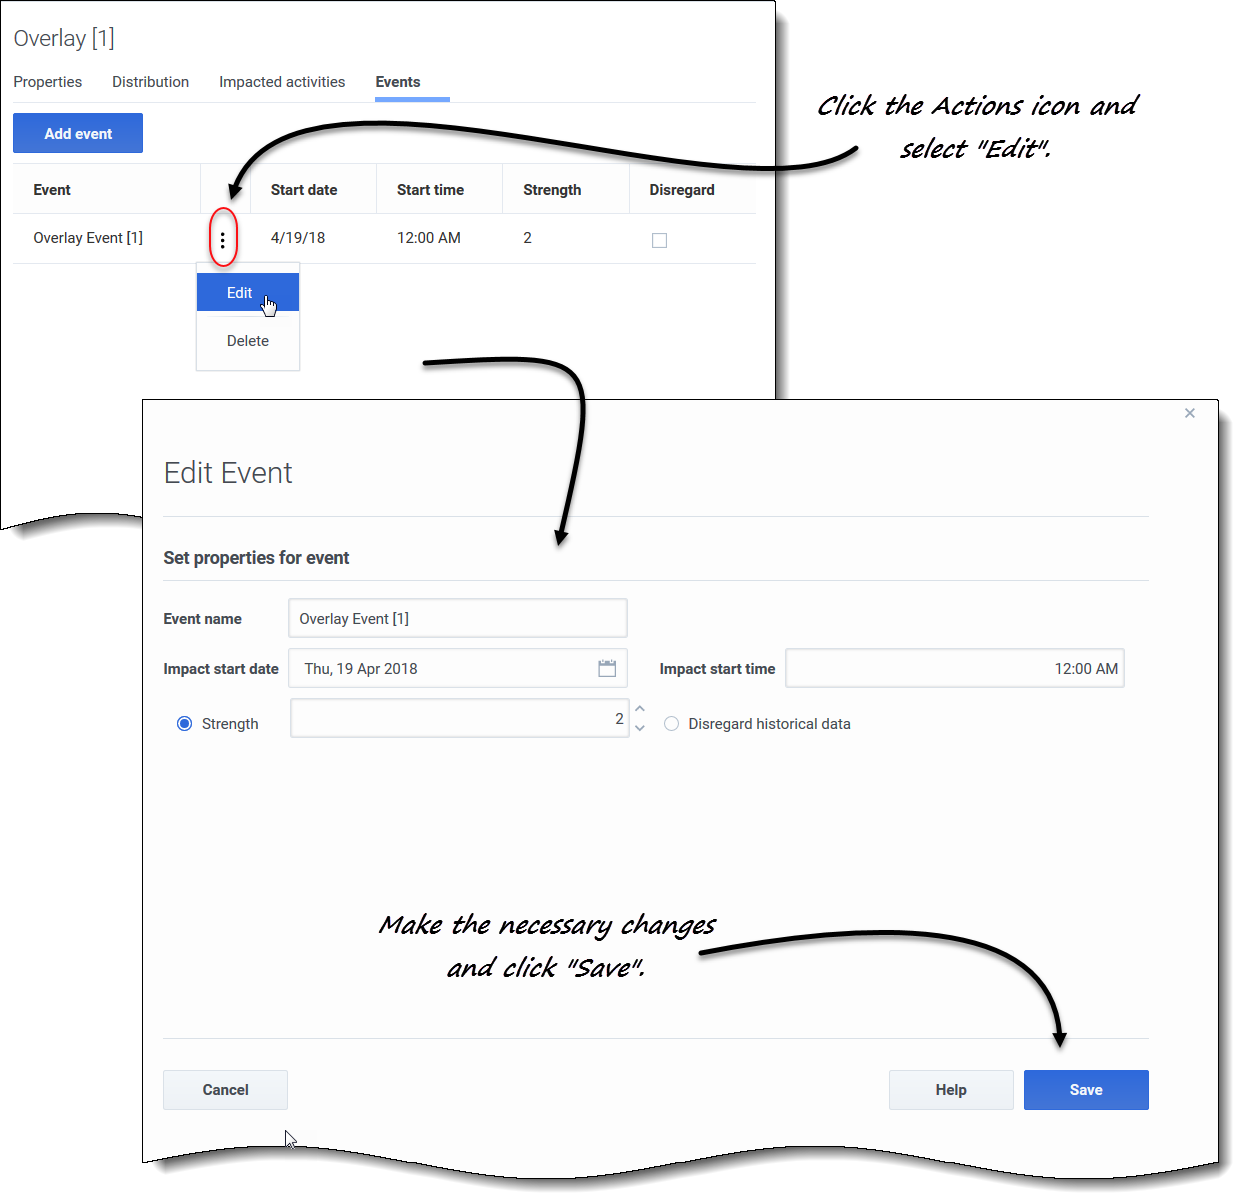
- In the row of the event you want to edit, click Actions and select Edit.
- The Edit Event dialog opens.
- Make the necessary changes and then, click Save.
- When the confirmation dialog opens, click OK.
- Alternatively, click Cancel at any time, if you want to cancel the action and discard the changes.
Deleting events
Deleting an overlay event
- In the Forecast > Overlays view, select a business unit or site.
- The overlays for this object are displayed in a table.
- In the table, select an overlay.
- In the Data pane, click the Events tab.
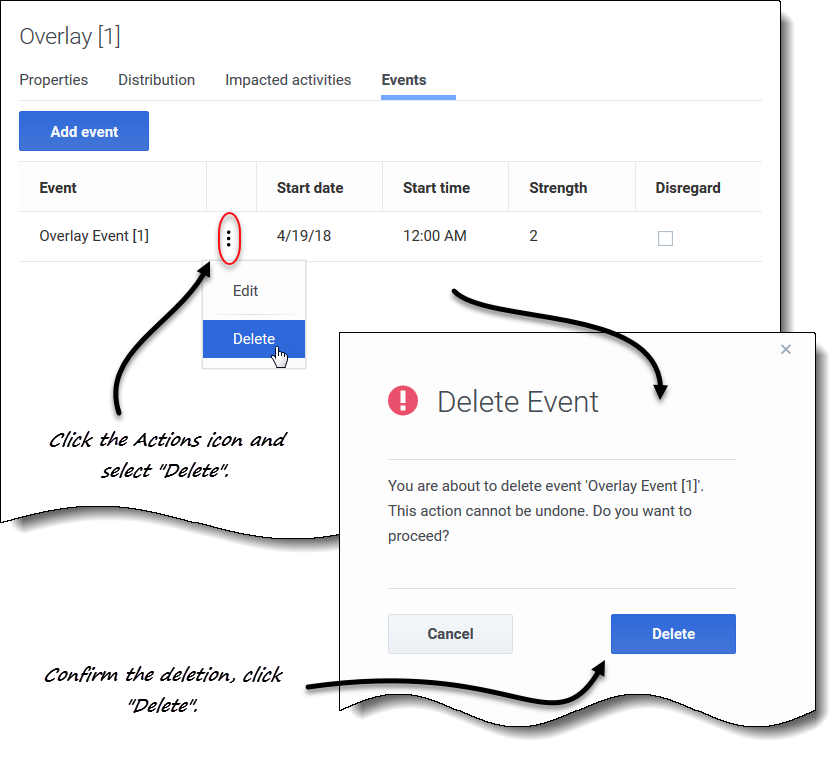
- In the row of the event you want to edit, click Actions and select Delete.
- When the Delete Event confirmation dialog opens, click Delete to proceed or Cancel to cancel the action.
Calculating distribution in overlays
This procedure describes how to use the wizard to calculate an overlay's distribution. The wizard icon is enabled only if Always use the entered distribution is selected in the overlay's properties. See Creating overlays.
Calculating an overlay's distribution using the wizard
- In the Forecast > Overlays view, select a business unit or site.
- The overlays for this object are displayed in a table.
- In the Overlays table, select an overlay (that has Always use the entered distribution selected).
- Click Calculate Distribution
 .
.
- The wizard open at Step 1.
- Select an activity or multi-site activity and then, click Next.
- Step 2 of the wizard opens.
Wizard step 2
- Enter the Start and End date for the historical date range (use the up/down arrows or click the calendar to select a date).
- By default, WFM displays the start and end date of the historical date range for the selected activity.
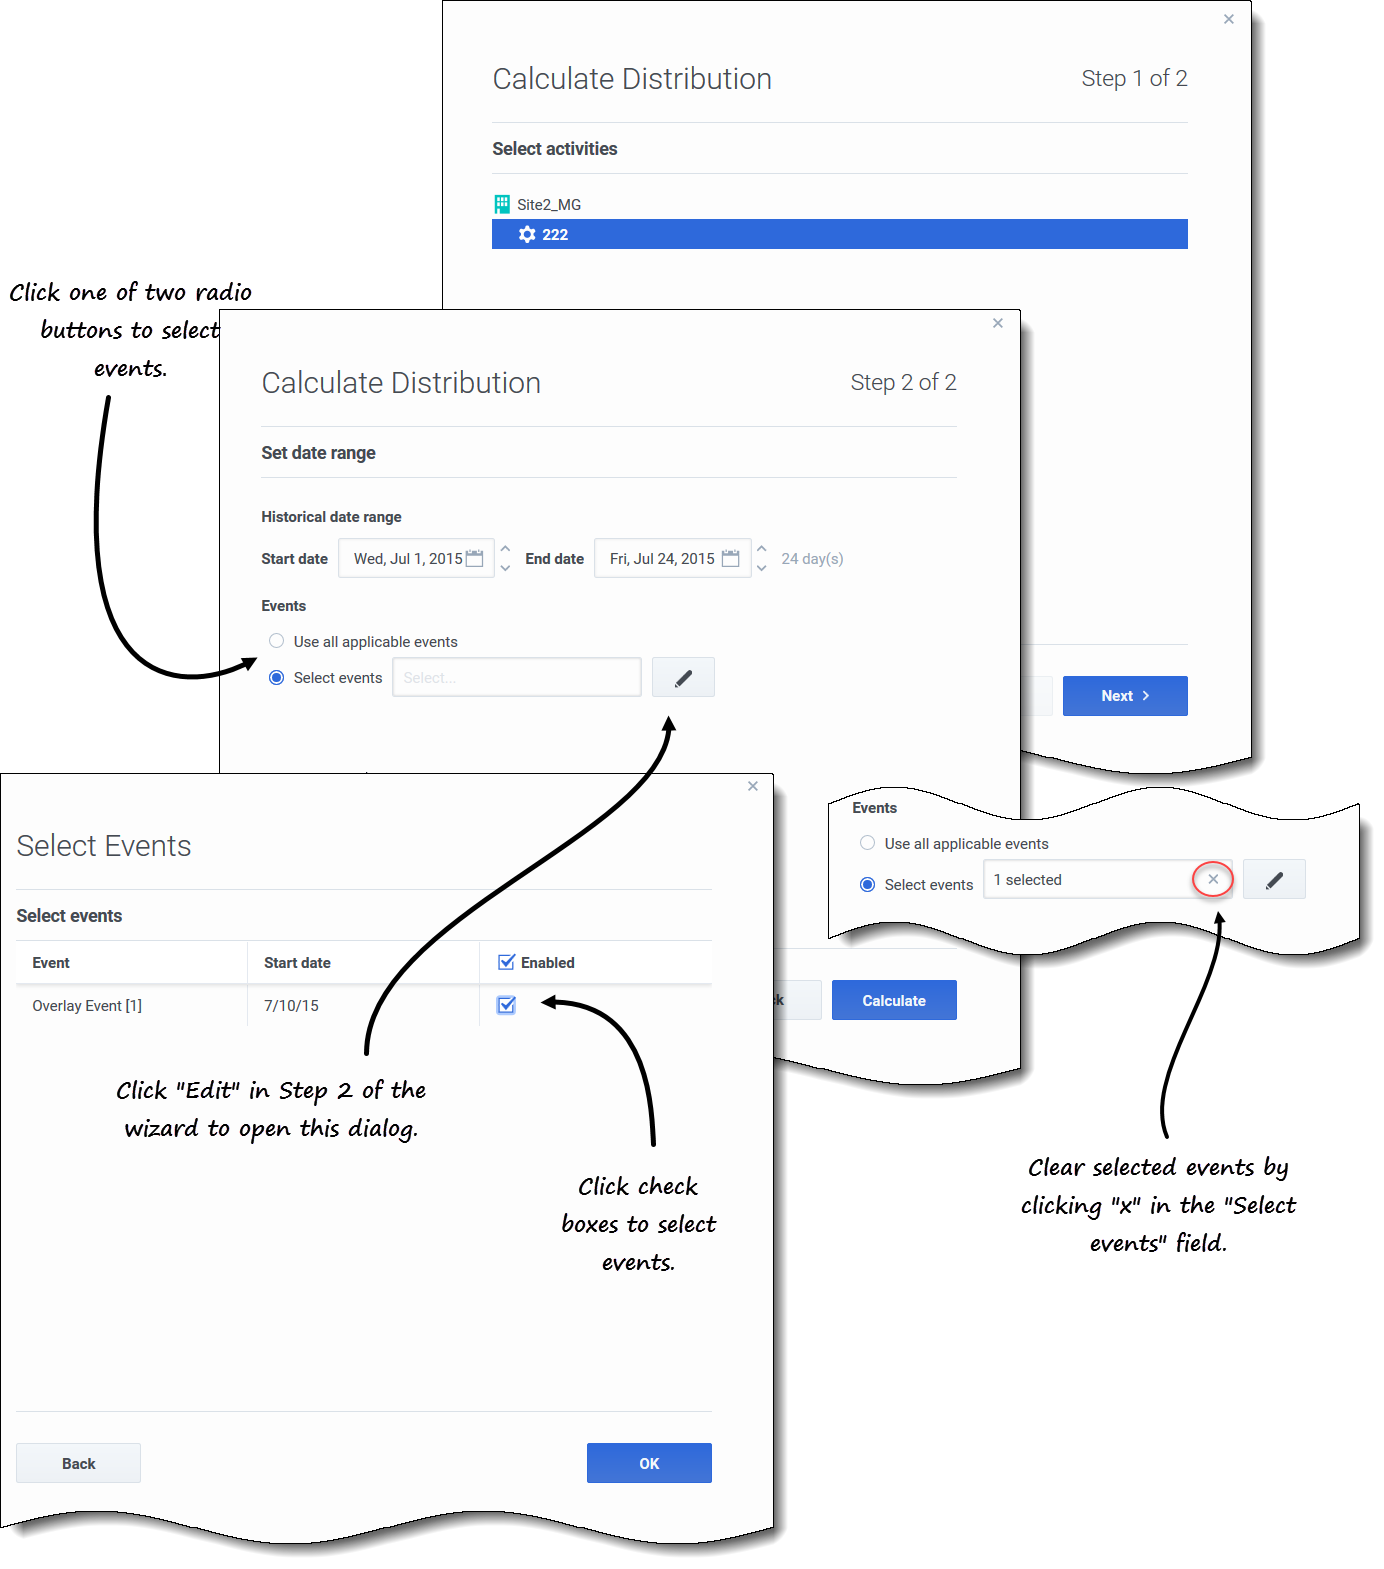
- To select events, choose one of two radio buttons:
- Use all applicable events—Do nothing if you want all events to be considered when distribution is calculated. This button is selected by default.
- Select events—Click this button if you want to select specific events.
- Click Edit
 .
.
- The Select Events dialog opens.
- Click the check box beside an event if it should be considered for calculations and then, click OK.
- Clicking the top-most check box selects all events in the list.
- Click Edit
- The wizard returns to Step 2 and the Select events field shows the number of events you selected.
- Click Calculate.
- When processing is complete, the Distribution tab shows the distribution for this overlay.
Click Cancel at any time in the wizard to cancel all actions and close the wizard dialog.
Selecting overlay events in the wizard
When selecting events in the Calculate Distribution wizard:
- If the selected activity does not have overlay events, you'll see the message You do not have any overlay events.
- The dialog displays only events that fall within the selected historical date range.
- You can clear the events you selected in the Select Events dialog, by clicking x in the Select events field when the wizard returns to Step 2.
Selecting data to copy and paste
In the Overlays Distribution grid, WFM enables you to use key combinations on the keyboard to select data for copying and pasting. You can copy/paste within the grid and to/from a document (for example, Excel or NotePad).
Shift+arrow keys
Click a cell in the grid and press:
- Shift+up arrow key to select additional cells above the selected cell.
- Shift+down arrow key to select additional cells below the selected cell.
- Shift+right arrow key to select additional cells to the right of the selected cell.
- Shift+left arrow key to select additional cells to the left of the selected cell.
You must select the Total/Average row and the Time step column separately. They cannot be selected with other rows or columns in the grid.
Shift+Page Up, Shift+Page Down
Click a cell in the grid and press:
- Shift+Page Up to select all cells above the selected cell.
- Shift+Page Down to select all cells below the selected cell.
Ctrl+A
- Click any cell in the grid and press Ctrl+A—All cells in the grid are selected.
- Click any cell in the Time step column and press Ctrl+A—All cells in the column are selected.
- Click anywhere in the Total/Average row and press Ctrl+A—The entire row is selected.
Drag mouse or touch pad
- Click any cell in the grid and hold down the right mouse key while dragging the mouse right, left, up, down, or any combination of directions. The range of cells is selected.
- Click any cell in the Time step column and hold down the right mouse key while dragging the mouse up or down. The range of cells in the column is selected.
- Click anywhere in the Total/Average row and hold down the right mouse key while dragging the mouse left or right. The entire row is selected.
You must select the Total/Average row and the Time step column separately. They cannot be selected with other rows or columns in the grid.
Shift+ mouse-click
- Hold down the Shift key and click any cell in the grid. Using the mouse, click anywhere in the grid up or down. The range of cells is selected.
- Hold down the Shift key and click any cell in the Time step column. Using the mouse, click anywhere in the column, up or down. The range of cells is selected.
- Hold down the Shift key and click anywhere in the Total/Average row. Using the mouse, click anywhere in the column, right or left. The entire row is selected.
You must select the Total/Average row and the Time step column separately. They cannot be selected with other rows or columns in the grid.
Ctrl+C, Ctrl+V
Select cells in the grid, and press:
- Ctrl+C to copy values in the grid. The message Copied to clipboard appears. Click X to close it.
- Crtl+V to paste values in an Excel spreadsheet or a text editor such as, NotePad.
If more cells are copied than there are cells to paste into, WFM extends the number of cells/column/rows to accommodate the data being pasted.

