Scenarios
Contents
Learn how to perform all of the basic tasks to help you manage forecast scenarios.
A forecast scenario is a prediction of activity workloads for one or more sites. You might create many scenarios before defining the optimal one that will be used as the Master Forecast.
Open this view by selecting Forecast > Scenarios in the navigation bar. Now you can:
- View a list of forecast scenarios, including the owner's name, start and end dates, comments, and shared status.
- Filter the list of scenarios.
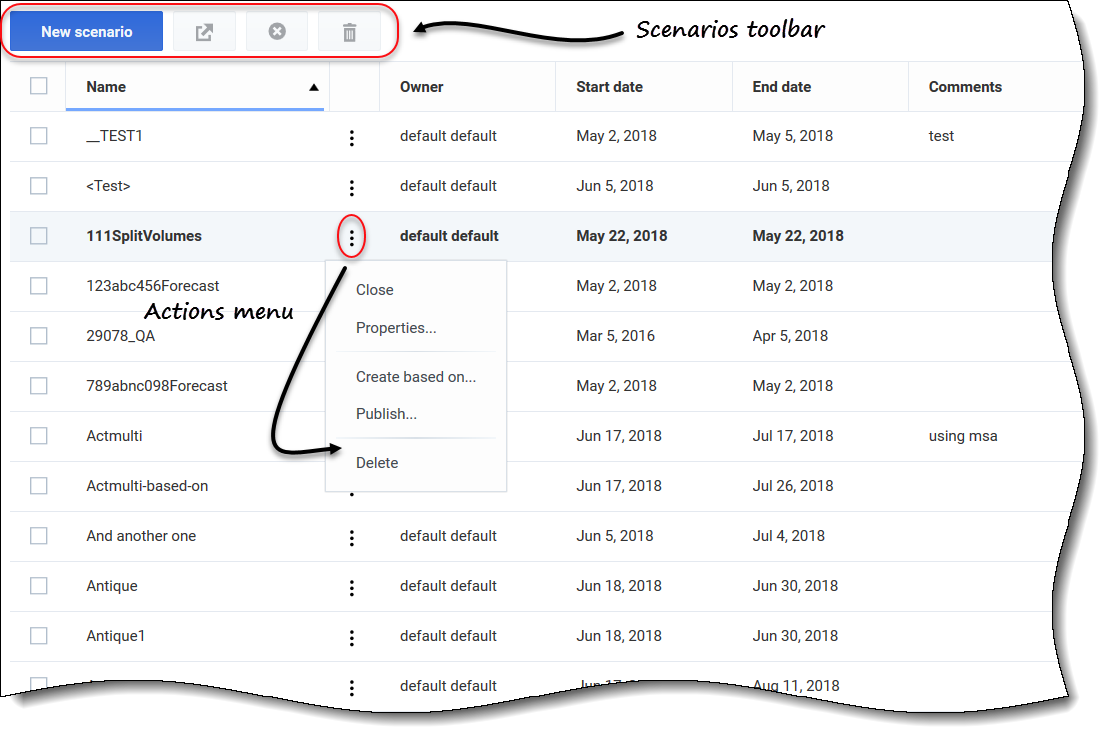
- Use the Actions menu and toolbar to complete other tasks.
Working in the Scenarios view
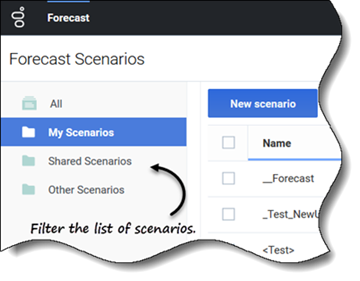
The Scenarios view displays scenarios in a table format that you can filter by selecting:
- All—Displays all scenarios.
- My Scenarios—Displays only the scenarios you have created. This view opens by default when you select the Scenarios view.
- Shared Scenarios—Displays only the shared scenarios created by other users.
- Other Scenarios—Displays only the unshared scenarios created by other users .This folder is only accessible to users that have the appropriate privileges.
If there are no scenarios in any one of these views, you'll see this message in the middle of the scenarios pane: There are no forecast scenarios to display. If there are no scenarios in the My Scenarios view, you'll see this message: You do not have any forecast scenarios together with the New scenario button. Click this button to create a scenario, if desired.
Restrictions: Viewing and deleting forecast scenarios
Some restrictions apply when viewing or deleting forecast scenarios. Users must have access permission to:
- At least one activity or multi-site activity in the forecast scenario to see it.
- All activities and multi-site activities in the forecast scenario to delete it.
Contact center administrators determine the level of access to multi-site activities in Forecast Scenarios, as described above. If you cannot access activities or multi-site activities in scenarios, contact your administrator for assistance.
Finding scenarios quickly
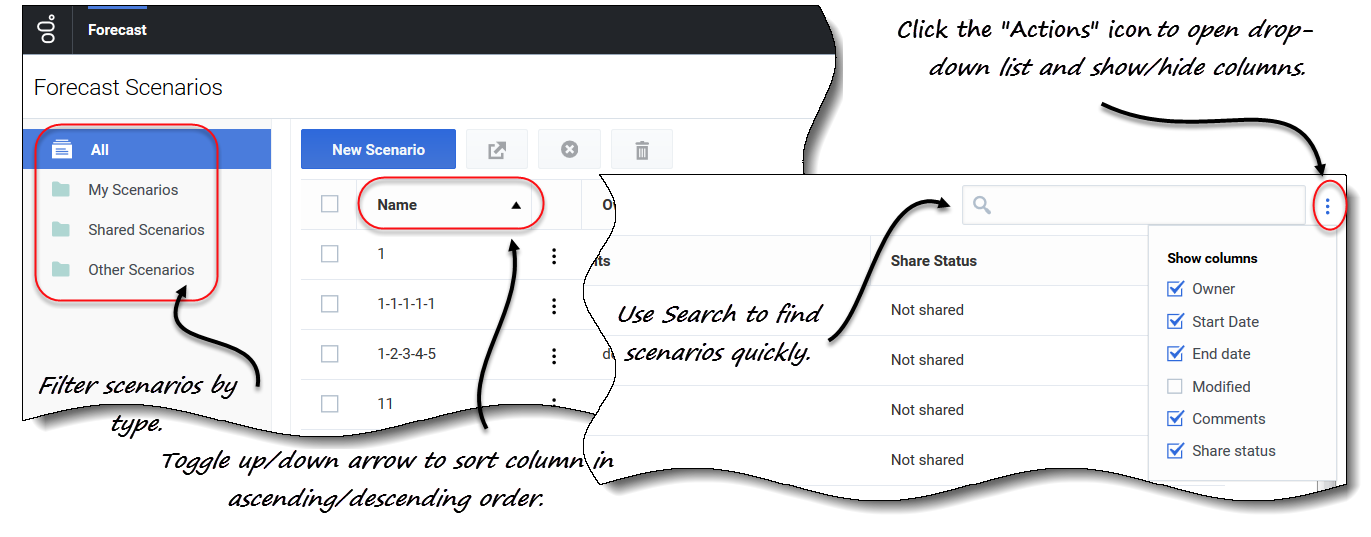
To quickly find a scenario in the table, click the up/down arrow in the Name column to toggle the list in ascending or descending order, or enter the name into the Search field.
Choose the columns you want to display in the table by clicking Actions ![]() . The Show columns drop-down list opens containing the following columns: Owner, Start date, End date, Modified, Comments, and Share status.
. The Show columns drop-down list opens containing the following columns: Owner, Start date, End date, Modified, Comments, and Share status.
To sort the scenarios in ascending and descending order, click the arrow in the Name (see graphic), Owner, Start date, Modified, or Share status column header.
Using the Actions menu and toolbar
Use the toolbar buttons and the settings in the Actions menu to:
- Create scenarios.
- Open, close, and delete scenarios in the list.
- View the scenarios' properties and add comments.
- Create scenarios, based on existing scenarios.
- Publish scenarios to Master Forecasts.
- Extract data from Master Forecasts to put into scenarios.
Creating scenarios
Use the New Scenario wizard to create a new forecast scenario. Defining a forecast scenario involves naming the forecast scenario, defining a date range, adding comments (optional), and selecting the activities the forecast will cover. You can also create the scenario based on an existing forecast or build the scenario numbers later.
Creating new scenarios
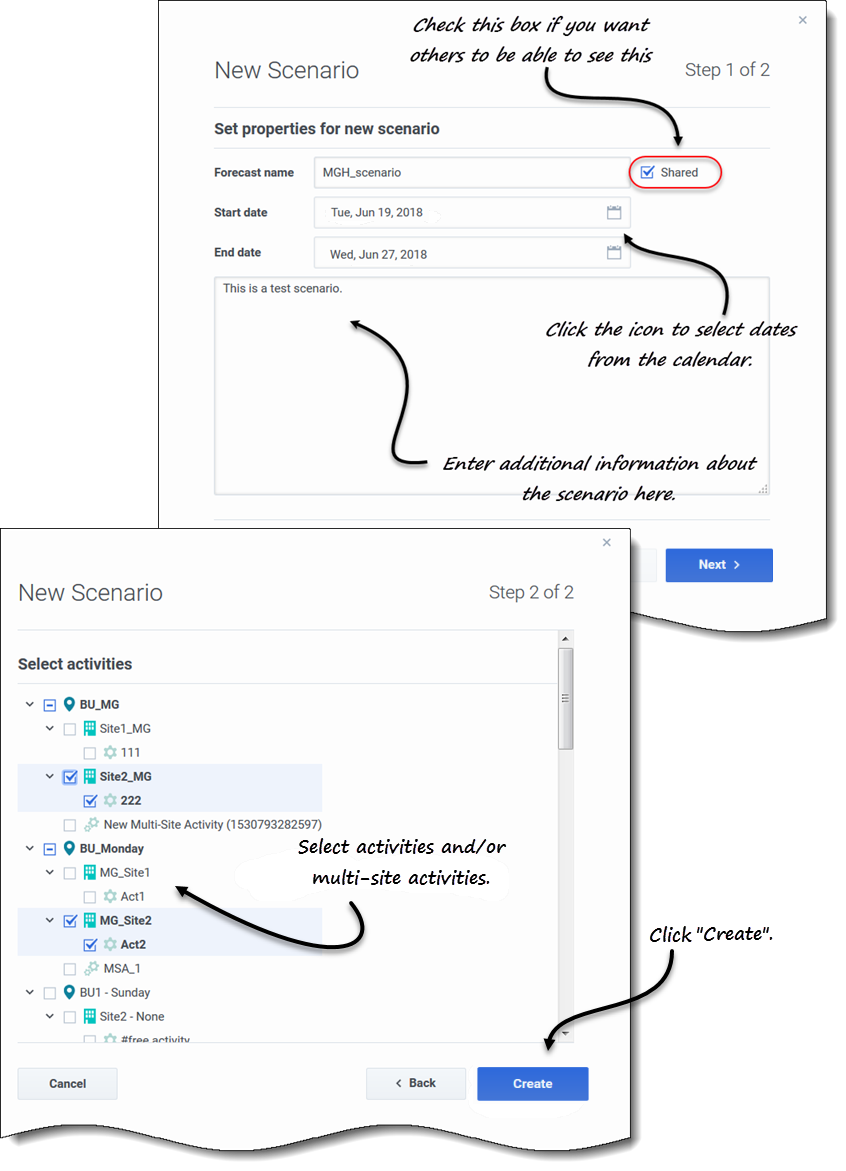
- In the toolbar, click New scenario.
- The New Scenario wizard dialog opens at step 1 of 2.
- Enter the Forecast name (limited to 127 characters).
- Enter the Start date, and End date.
- You can enter start and end dates or click the Calendar icon within these fields to select the date from the calendar. The scenario's date range can be up to ten years.
- If you want others to be able to see this scenario, select Shared.
- In the text box, enter any helpful or relevant information about this scenario.
- Click Next.
- In the Select activities dialog, select one or more activities or multi-site activities.
- You can also add activities to the forecast after it has been created.
- Click Create.
- When the success dialog opens, click OK.
Next steps:
- Build interaction volume and/or AHT into the scenario. For details, see Building volumes data.
- Build staffing into the scenario. For details, see Building staffing data.
- Publish the scenario to the Master Forecast. For details, see Publishing the forecast scenario.
Opening and closing scenarios
Opening scenarios
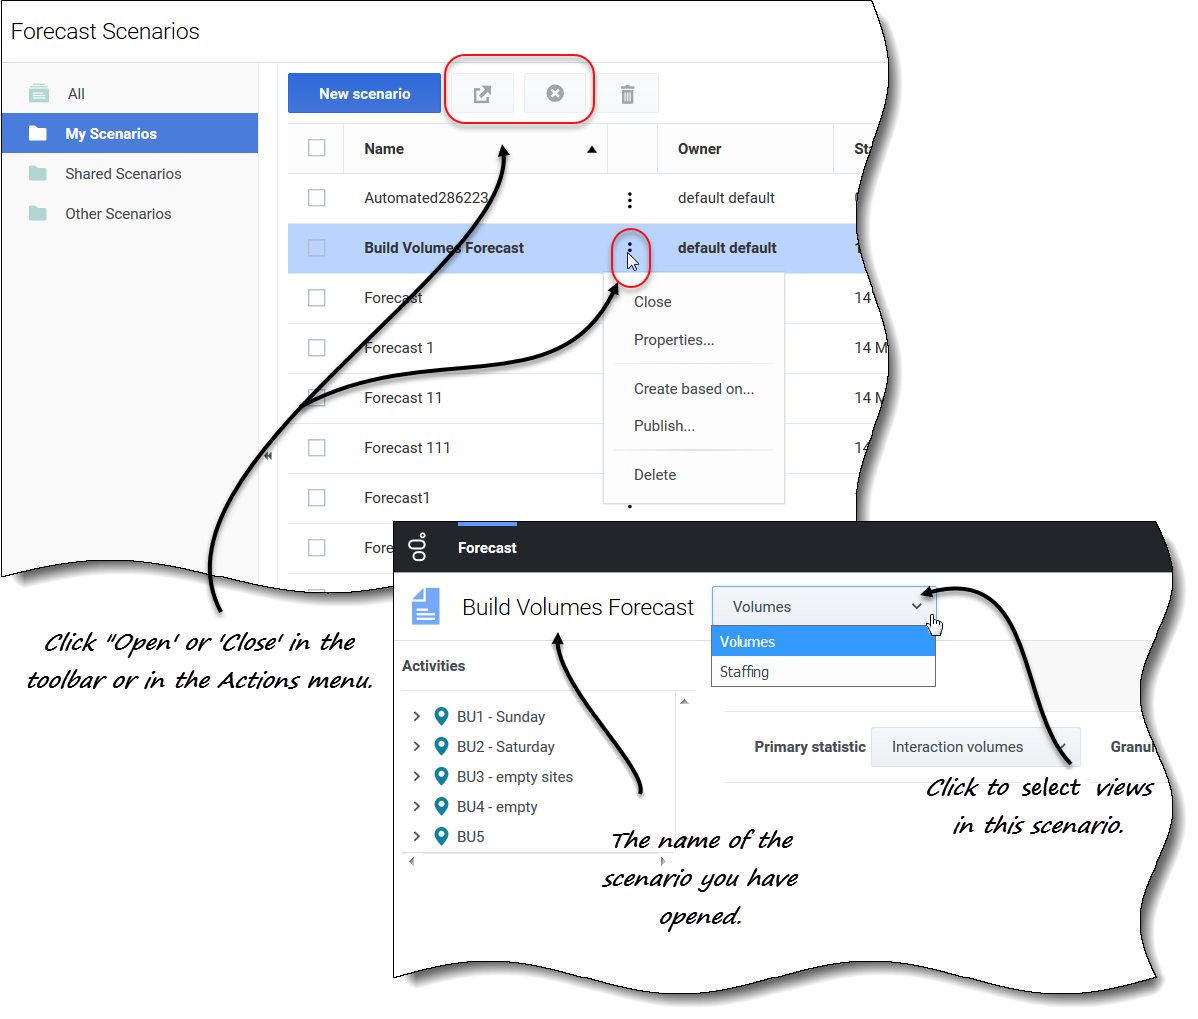
Open scenarios appear in bold in the Scenarios view. The Forecast menu retains a list of the 10 most recently opened scenarios, making it convenient for you to switch between them.Closing scenarios
- In the in the Scenarios view, select the check box for the scenario.
- Click Close
 in the toolbar, or click Actions.
 - In the drop-down menu that appears, select Close.
To edit the scenario properties, see Viewing and editing scenario properties.
Creating scenarios based on existing forecasts
Basing a new scenario on an existing forecast is a convenient way to build forecasts with frequently used settings. The wizard takes the dates and activities from the source scenario, and applies them to the new scenario, but you can change these settings, if you wish.
Creating scenarios, based on existing scenarios
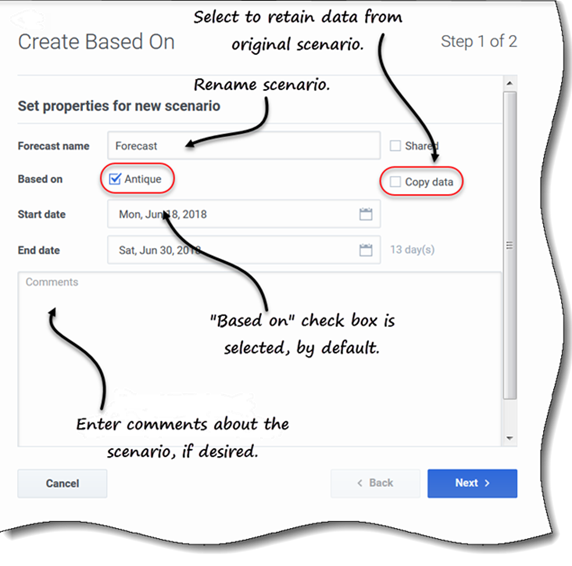
- In the row of the existing scenario, click the Actions drop-down menu and select Create based on....
- The Created Based On dialog opens with the Based on check box selected.
- If you want to retain the properties of the Based on scenario, check the Copy data check box.
- Otherwise, set the properties for this scenario, by following steps 2 - 6 in procedure Creating scenarios.
- Click Create.
To customize the forecast scenario, change the dates, select additional activities, or clear the selected ones. You can also add activities to a scenario after its been created.
Click Cancel or X at any time to cancel all actions and close the dialog.
Viewing and editing scenario properties
Viewing scenario properties
- In the Scenarios view, find the scenario you want to view and click the Actions
 menu.
menu. - In the drop-down list, select Properties.
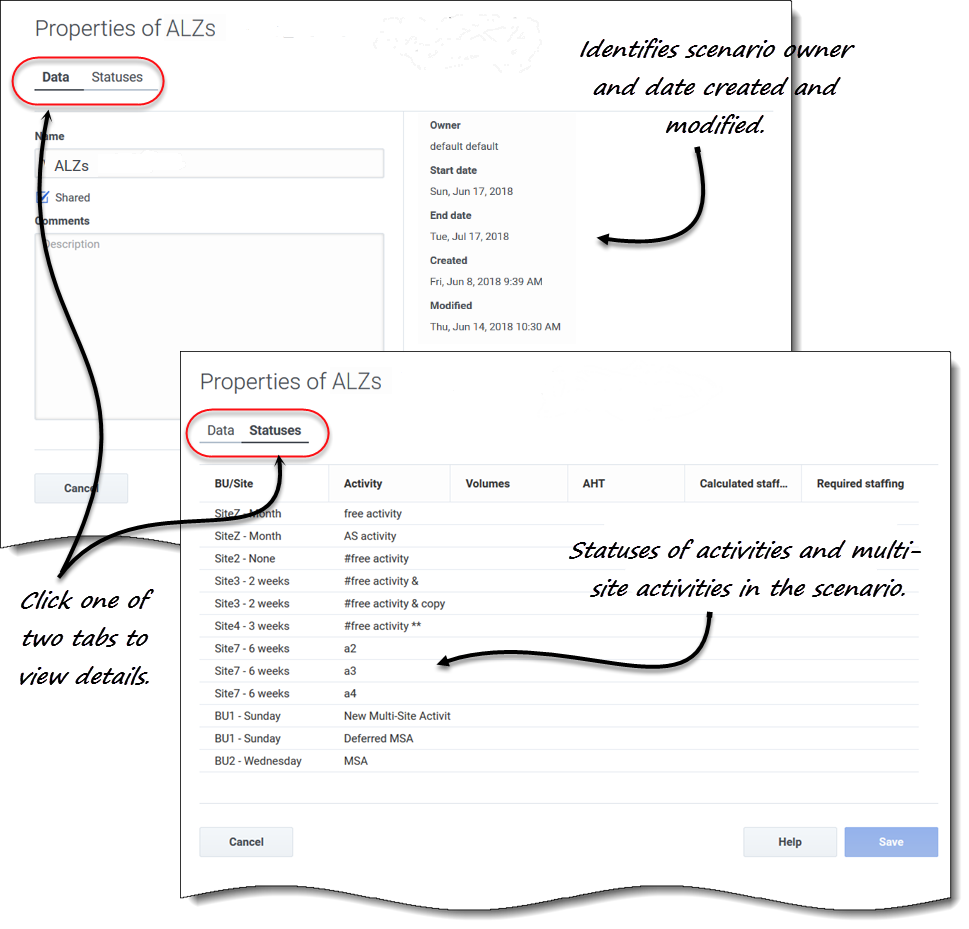
- The scenario properties dialog opens to the Data tab, by default.
- Click Statuses to view the information in that tab.
- To close the Properties dialog, click X in the upper-right corner or Cancel.
Editing scenario properties
- In the Scenarios view, find the scenario you want to edit and click the Actions menu.
- In the drop-down list, select Properties.
- The scenario properties dialog opens to the Data tab, by default.
- Edit the scenario name, shared status, and/or comments.
- Click Save if you have made changes in the Data tab, or Cancel if you want to discard all changes.
You cannot change any of the information in the Statuses tab. The fields, controls, and columns in both tabs are described below.
Scenario properties—Data tab
In the Scenario Properties dialog, click Data to display the information that pertains to this scenario. The Name, Shared, and Comments fields are editable. You cannot edit the name of the person who created the scenario, or the date the scenario was created or last modified.
Click Save if you make changes to the scenario's name, shared check box, and/or comments. Click Cancel if you want to discard any changes you make.
Scenario properties—Statuses tab
In the Scenario Properties dialog, click Statuses to display the status of the activities, or multi-site activity in the scenario and their associated business unit or site. A check mark in the Volumes, AHT, Calculated staffing, or Required staffing column indicates that this statistic was built for this activity.
Deleting scenarios
If you are unable to view or delete scenarios, you might not have the proper access priviliges. See Restrictions: Viewing and deleting forecast scenarios.
Deleting scenarios
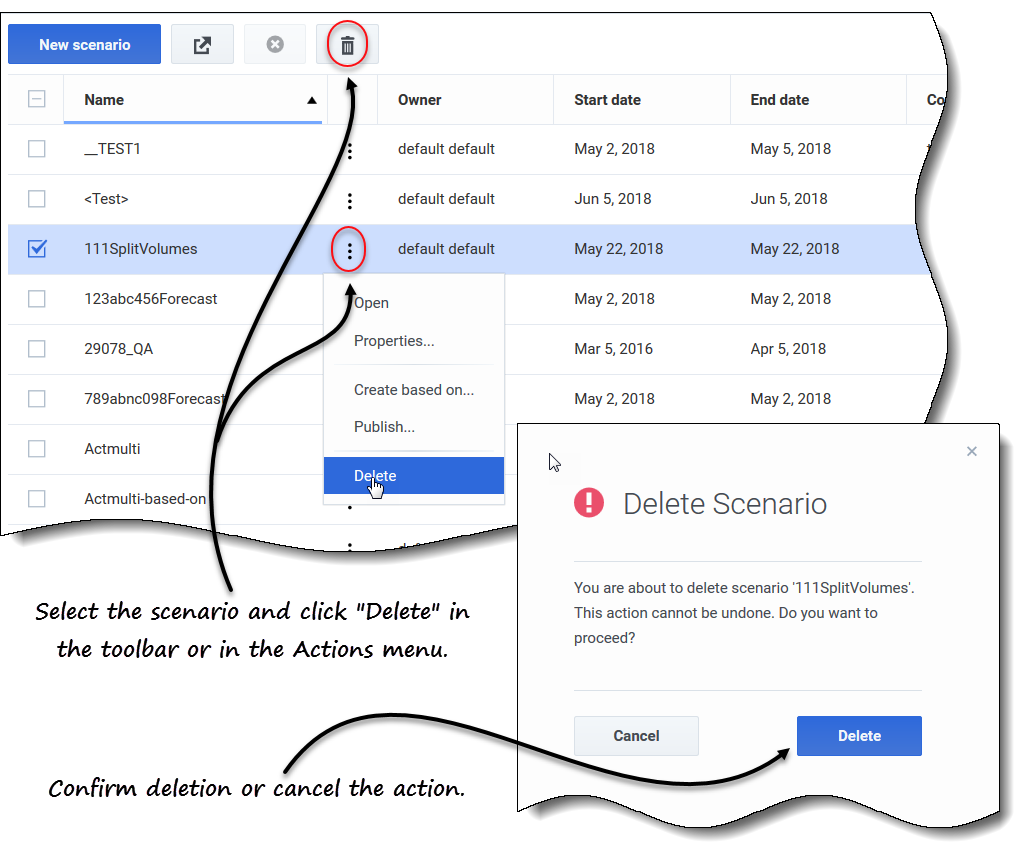
- In the Scenarios view, select the scenario you want to delete.
- Click Delete
 in the toolbar or select Delete in the Actions
  drop-down menu.
 - When the confirmation dialog opens, select Delete to proceed or Cancel to cancel the action.
Deleting multiple scenarios
- Select all of the scenarios you want to delete (using the check box beside each scenario).
- Complete steps 2 and 3 in the procedure Deleting scenarios.
Deleting all scenarios in the table
- Select the top-most check box in the column header (near the Name column header).
- Complete steps 2 and 3 in the procedure Deleting scenarios.
If you are deleting a single scenario, the confirmation dialog contains the scenario name. If you are deleting multiple scenarios, the confirmation dialog states the number of scenarios being deleted.
Publishing and extracting forecast data
Use the Publish or Extract wizard to transfer or publish the forecast scenarios data to Workforce Management database's Master Forecast, or to extract the data in the Master Forecast to forecast scenarios.
Why publish forecasts?
Publishing a forecast means that the forecast is final. Schedules for a particular date range are based on the published (Master) forecast for those dates. Until a forecast is published, you cannot calculate certain performance data.
Publishing the forecast scenario
Publishing forecast scenarios to master forecasts
- In the Forecast Scenarios view, click Actions
 next to the scenario that you want to publish, and select Publish.
- The Publish or Extract dialog opens.
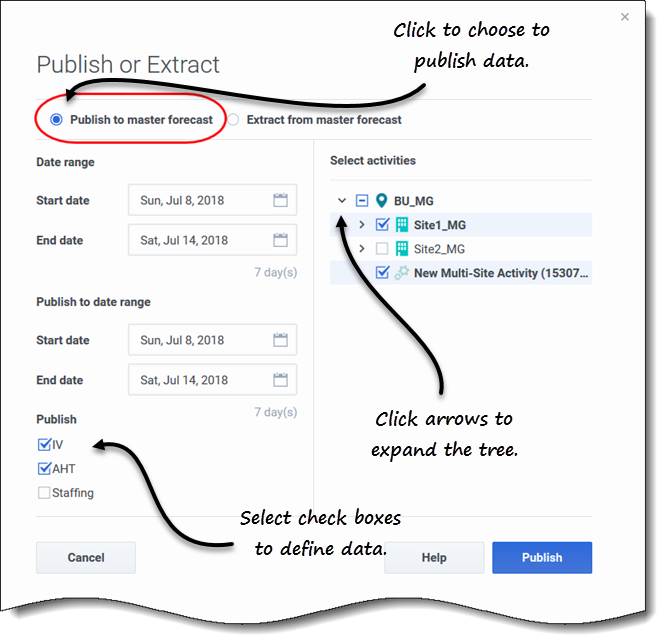
- Click Publish to master forecast.
- Select or enter a start and end date for the Date range.
- Select or enter a start and end date for the Publish to date range.
- Select one or more check boxes: IV, AHT, Staffing.
- These check boxes are not visible if you do not have the proper WFM role privileges.
- Expand the business units and sites to select the activities you want to publish.
- Click Publish.
- When publishing is complete, click OK.
- Alternatively, click Cancel at any time to discard the settings and close the dialog.
The tree shows all activities for which the selected scenario contains data, enabling you to select multiple activities from different sites.
Defining start and end dates when publishing data
When publishing data, the start and end date values in the Date range section define the date range for which you want to publish information from the selected scenario. By default, the selected scenario's own start and end dates appear in these text boxes, and you cannot select dates outside the original scenario dates.
The start and end date values in the Publish to date range section define the date range for which you want to update information in the Master Forecast. By default, these fields' entries match those in the Date range section. Data from a specific weekday is copied only to the same weekday. That is, forecast information for a Monday is copied to one or more Mondays, depending on the target date range that you select. Monday's data is not copied to every other day within the target date range.
The start date in each date range in the Publish or Extract dialog occur on the same day of the week. The dialog shows the number of days in each date range below the End date field.
Viewing Review messages
If you have entered invalid data when completing the Publish or Extract wizard, after clicking Finish the Review Messages dialog opens containing a list of errors:
- Click Back to return to the Publish or Extract dialog and make the necessary changes.
- Click Cancel to close the wizard and discard the previous settings. The scenario will not be published.
If you enter invalid values in the wizard, validation messages will appear below the respective fields, prompting you to enter valid values.
Extracting the Master Forecast data
Transferring data from master forecasts to forecast scenarios
- In the Forecast Scenarios view, click Actions
 next to the scenario for which you want to extract data, and select Publish.
- The Publish or Extract dialog opens.
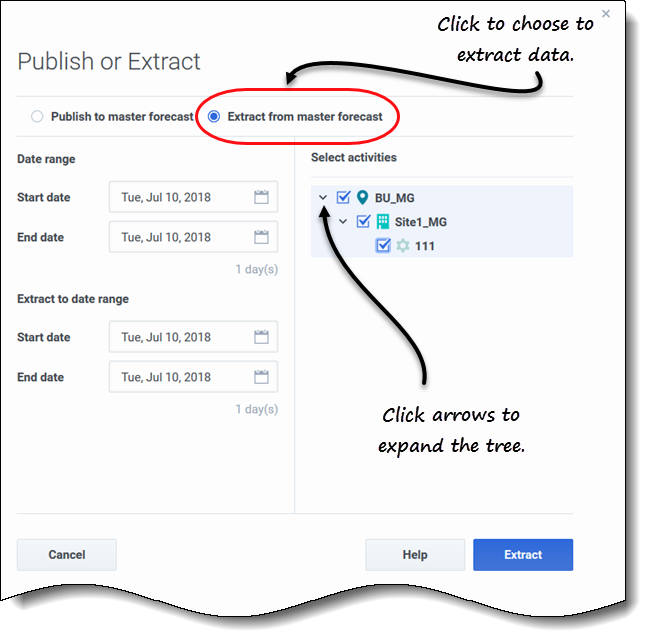
- Click Extract from master forecast.
- Select or enter a start and end date for the Date range.
- Select or enter a start and end date for the Extract to date range.
- Expand the business units and sites to select the activities you want to extract to the target scenario.
- Click Extract.
- When extraction is complete, click OK.
- Alternatively, click Cancel at any time to discard the settings and close the dialog.
The tree shows only those activities that are included in the forecast scenario. Expand business units and sites to display activities.
Defining start and end dates when extracting data
When extracting data, the start and end date values in the Date range section define the date range for which you want to extract information from the Master Forecast. By default, these values match those in the Extract to date range section.
The start and end date values in the Extract to date range section define the date range for which you want to update the information in the selected target scenario. By default, the scenario's own start and end dates appear in the text boxes, and you cannot select dates outside the scenario's original date range.

