Dialing Modes and IVR Modes
Contents
Dialing Modes
When you configure a campaign, you'll need to choose a dialing mode or an IVR mode that best suits your campaign. Your choice will depend on the type of campaign you're running, the number of agents, if any, assigned to the campaign, and compliance regulations.
The tables below provide a summary of each dialing mode and lists the available pacing options and optimization parameters for each. If a field is blank, it means those options do not apply for that dialing mode.
Dialing Modes for the Voice Channel
There are two types of dialing modes for the voice channel: automatic and manual.
For automatic dialing modes, a dialer automatically dials phone numbers and then bridges the answered calls to agents. The system refers to an advanced algorithm and pacing calculations to determine such things as the number of calls it should make and the rate at which those calls should be made.
In manual dialing, agents dial customers or contacts manually.
| Dialing Mode | Description | Pacing Options | Optimization Parameters |
|---|---|---|---|
| Predictive (Automatic) |
|
||
| Predictive with Seizing (Automatic) |
|
||
| Progressive (Automatic) |
|
||
| Progressive with Seizing (Automatic) |
|
||
| Pull Preview (Manual) |
|
||
| Push Preview (Manual) |
|
Dialing Modes for the SMS and Email Channels
The table below lists the dialing modes available for SMS and Email channels.
| Dialing Mode | Description | Pacing Options |
|---|---|---|
| Rate per Minute (default) | With this dialing mode, you can use the SMS per Minute or Email per Minute pacing option to define a precise number of text or email messages sent per minute. | SMS per Minute/Email per Minute |
| Auto Pacing | With Auto Pacing, the pace at which text or email messages are sent is automatically set and adjusted in order to spread delivery out as evenly as possible throughout the delivery window. | |
| Broadcast | Use this dialing mode when you want to broadcast as quickly as possible to all contacts in the contact list. |
Enabling Dialing Modes
Any dialing mode can be enabled at the Dialing Profile, Campaign Template, or Campaign Group level:
- Click the Dialing tab.
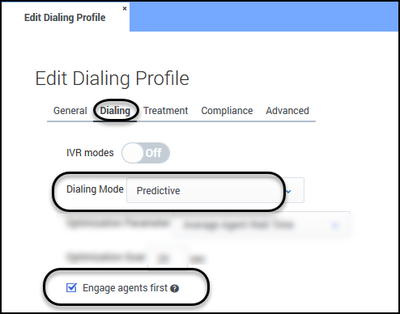
- From the Dialing Mode menu, select the dialing mode you want to enable.
- If applicable, select the pacing options or optimization parameters that will dictate the pacing for this campaign.
- If you are using either Predictive with Seizing or Progressive with Seizing, check the Engage agents first option.
Dialing Modes and Target Abandon Rate
If you have a campaign using Predictive dialing and the Abandoned Call Rate optimization parameter, the system can switch to Progressive dialing in the event the target abandon rate reaches your optimization goal (for example 3.1%) to eliminate the risk of further abandonment. The system can then switch back to Predictive once the call abandon rate returns to an acceptable level (for example 2.9%).
To enable this functionality, go to the Compliance tab for the campaign object and set the conditions in which the system should switch to Progressive, and then set the conditions in which it should return to Predictive.
- You cannot switch from Predictive to Pull Preview or Push Preview.
- You cannot switch from Progressive to Pull Preview or Push Preview.
- You cannot change the Engage agents first option for either the Progressive (with Seizing) or the Predictive (with Seizing) dialing mode.
To change any of these settings, you need to stop the campaign group, edit the settings, and then resume the campaign group.
LIFO Mode
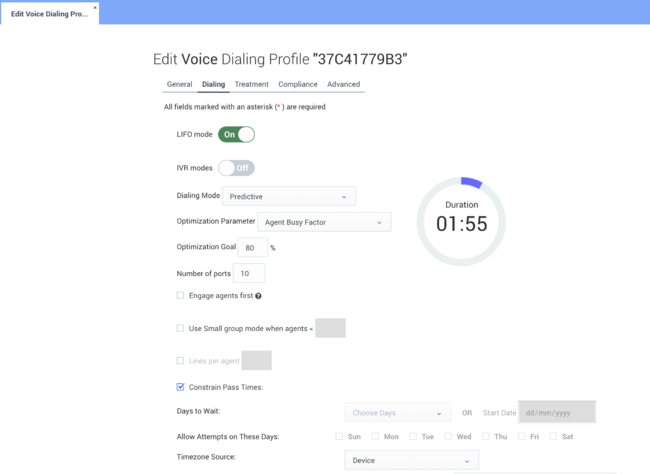
When creating/editing a Voice Profile, you can optionally enable LIFO (Last In First Out behavior) on the current dialing mode to support record insertion directly into the dialing buffer, as opposed to the calling list. Record insertion is only supported through the API. You may want to enable LIFO when you have time-sensitive contacts to dial. For example, a request for a contact (a sales lead) is initiated via a website visit. LIFO behavior works by prioritizing the most recent request for a contact (a record) by putting this request at the very top of the dialing buffer so that it is the next record accessed. This also includes being prioritized over other LIFO records that have not yet been attempted and are still in the dialing buffer.
Enabling LIFO
To enable LIFO behavior, turn on the LIFO mode switch in the Voice Profile > Dialing tab. You can enable LIFO behavior in any Voice Dialing mode.
IVR Modes
Use an IVR mode when you want to send personalized and/or interactive messages to your contacts.
| Use Cases |
|
The table below provides a summary of each IVR mode and lists the available pacing options and optimization parameters for each. If a field is blank, it means those options do not apply for that IVR mode.
| IVR Mode | Description | Pacing Options | Optimization Parameters |
|---|---|---|---|
| Predictive IVR | Calls can be connected to an agent. For example, Press 0 to speak to a customer service representative. The system bases pacing calculations on defined optimization parameters and pacing settings, just as it does when a campaign is running in the Predictive dialing mode. | ||
| Progressive IVR | Calls can be connected to an agent. For example, Press 0 to speak to a customer service representative. The system bases pacing calculations on the number of allocated IVR ports defined for that campaign group. | ||
| Power IVR | Agents are not involved in these campaigns, so contacts are never given the option to speak to one. When the message ends, the call ends. The system bases pacing calculations on the defined number of calls per minute value. |
Enabling IVR Modes
You first enable an IVR mode on the Dialing Profile page, as follows:
- Click the Dialing tab.
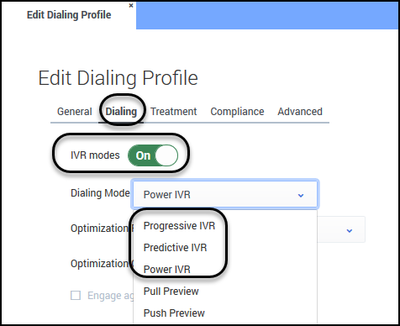
- Set the IVR modes option to On. All three IVR modes will now replace the automatic dialing modes in the Dialing Mode menu.
- From the Dialing Mode menu, select the IVR mode you want to enable.
- Select the pacing options or optimization parameters that will dictate the pacing for this campaign.
- Optional: Specify the number of IVR ports you want to allocate to that campaign group.
Predictive Dialing Mode
Predictive is the fastest among all the dialing modes because the automatic dialer uses an algorithm to predict agent availability and call results so that it can safely dial multiple phone numbers for each available agent.
Because of this constant rate of dialing and connecting, agent idle time is reduced, and the dialer can run through the contact list much quicker than it could in any other mode.
To minimize the risk of call abandonment, use Predictive only in high-volume campaigns with at least 15 agents.
Predictive with Seizing
In the Predictive with Seizing dialing mode, agents are reserved (seized) in advance of the call, meaning that they're expected to be on the line before the customer answers, resulting in little or no bridging delay. -->
Switching Modes: Transfer and ASM
If your campaign uses an automatic dialer - Predictive or Progressive - you have the option to use one of two switching modes: Transfer mode (default) or Active Switching Matrix (ASM) mode.
In Transfer mode, CX Contact waits until it has a contact on the line before it looks for an agent to take the call - it never reserves an agent before dialing a number. This often results in delayed bridging time.
In ASM mode, however, agents are reserved in advance, meaning they're on the line before a customer answers, resulting in little or no bridging delay.
The following distinctions exist between the two dialing modes running in ASM mode:
- In Progressive with ASM, the agent is already reserved for the call when it is dialed.
- In Predictive with ASM, the agent is predicted to be available when the dialer places the call.
Transfer is the default mode. To switch to ASM mode, click the Enable fast bridging option on the Dialing tab on the New Dialing Profile page or on the New Campaign Group page. -->


