
Contents
- 1 How do I handle an inbound email?
- 2 How do I expand or collapse panes to avoid scrolling?
- 3 How can I get help with an email?
- 4 How do I compose and send an email?
- 5 How do I embed an image in an email?
- 6 How do I reply multiple times to the same email?
- 7 How do I resend an email?
- 8 Forwarding an email as an attachment to an external resource
- 9 Forwarding an email inline to an external resource
- 10 Forwarding either inline or as an attachment
- 11 How do I print an email?
- 12 How does email quality assurance work?
- 13 What next?
- 14 Top 5 topics
Email is a Genesys Digital channel. The email interaction window enables you to view all of the information necessary to handle inbound and outbound email interactions with a contact.
- Some Workspace Agent Desktop features are available only for PureEngage Cloud users.
- Some Workspace Agent Desktop features are available only for PureEngage On-Premises users.
How do I handle an inbound email?
Typical actions you can take with an email are:
 to reply to the email, using your own message or a standard response.
 to reply all.
 to transfer the email to another agent.
 to save it in your workbin.
 forward to an external resource.
 to print the email.
- View the associated case data.
- Add a note or disposition code.
- Mark it as done.
Watch the video to see what happens when an email arrives at a workstation.
Sometimes Workspace is unable to assign a call to a contact or it assigns the call to the wrong contact. Your account might be set up to let you assign or change a contact in the Contact tab.How do I expand or collapse panes to avoid scrolling?
![]()
How can I get help with an email?

- Check the case data at the top of the email for information that might help you.
- Call the contact. Click the Party Action menu to see if their number is available.
 to start a consultation with a team member.
How do I compose and send an email?

There are four ways to compose and send an email in Workspace:
- Reply to an active interaction.
- Find a contact (using your internal team or contacts directory) and select the email option from their contact details.
- During a call, click the Party Action menu and select Email.
- During a chat, click an email address in the chat transcript.
While the outbound email window is open, you can compose a message, and as needed, add:
- A note
- A disposition
 attachments (your account might be restricted to attachments below a certain size, both per file and total size of all attachments and also to only certain file types)
- Recipients using To, Cc, and Bcc
Then send ![]() the email.
the email.
Use the From drop-down to choose a different 'from' email address. Your administrator sets the default 'from' address and the other addresses from which you are allowed to send an email.
If you are not yet ready to send it, you can save itHow do I embed an image in an email?

You might be allowed to insert embedded images (pictures) into email interactions by clicking Insert Image (![]() ) or by dragging and dropping an image from a folder or other document into the body of the email interaction.
) or by dragging and dropping an image from a folder or other document into the body of the email interaction.
After you have inserted an image, you can resize it by dragging on the corners or edges. Dragging on the corners maintains the relative width and height of the image. Dragging on the edges distorts the image. If you make an image larger, the quality of the image will degrade.
You might also be able to insert a Standard Response that contains an image.
You can delete an embedded image by pressing the delete or backspace keys.How do I reply multiple times to the same email?

Sometimes you are required to reply to an inbound email more than once. For example, you might send an immediate reply acknowledging that you have received the email and will start working on it. Later, when you have the information your contact is requesting, you must reply a second time to the inbound email. If you just reply to the inbound email and then click Send, the inbound email closes and is marked as Done. To keep the inbound email active use the Interim Send feature.
Interim Send sends your response, closes the outbound Email Interaction view and reopens the inbound email interaction in the same view. You can create a second reply email message, you can transfer the email, or you can consult about the email with another party. If you close the inbound Email Interaction view, you can re-open it from your In-Progress workbin.
To access the Interim Send feature, click the down arrow next to the Send button

Forwarding an email as an attachment to an external resource
To send a copy of an email interaction as an attachment to an external resource (someone in your company directory that is outside of the control of the Genesys environment, that is, someone not available in Team Communicator — for example, your back office).
A forwarded inbound email is copied as an attachment to a new email interaction from you. You are still responsible for responding to the original inbound email interaction. You might or might not be required to wait for an answer to this forward, depending upon your corporate policies and processes.
Forwarding an email inline to an external resource
To forward the email, click Forward (![]() ) on the active inbound email window toolbar. Usually this feature is available only for current email interactions; however, some contact centers might give you the ability to forward email interactions from the Interaction History that have already been closed.
) on the active inbound email window toolbar. Usually this feature is available only for current email interactions; however, some contact centers might give you the ability to forward email interactions from the Interaction History that have already been closed.
To add a target to the To address field, do one of two things:
- Type an email address in the address field. Click Add Email Address to enter the email address of the target in the address field. If your environment is set up to let you add multiple addresses, you can click in the address field and enter additional email addresses.
- Click the To... button beside the To address field to display the Contact Search view. You can use this view to perform a search of the Contact Directory for targets. The Contact Search view can also be used to add Cc targets (if Cc is available in your environment).
To display the Cc address field, click Add Cc. The Cc address field is displayed below the To address field. You add target email addresses to the Cc field in the same way that you add addresses to the To address field. Click X to remove the Cc address field.
To add a comment, information, or instructions to the forwarded email interaction for the target, enter your message above the original email that you are forwarding.
To send the forwarded inbound email to the targets, click (![]() ) Complete Forward.
) Complete Forward.
When you forward an email, it is temporarily stored in your In-Progress workbin until the forward is completed, then it is removed from the workbin.
Forwarding from History
You can inline forward from the Interaction History. In the following windows, select an interaction and click ![]() :
:
- Interaction History
- Contact History
- My History
Forwarding either inline or as an attachment
Click Forward to open the menu.
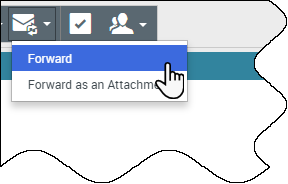
Choose one of the following options:
- Forward
- Forward as an Attachment
Follow the steps in the sections above, depending on which way you are forwarding your email.
How do I print an email?

If your account is set up for printing, you can print an email from any of the following views:
- My History
- My Workbin
- Contact History in the Contact Directory
- Interaction Search
- Email Interaction view
If you are allowed to print from the Email Interaction view, the print button is available in the toolbar: ![]()
If you are allowed to print from the history and interactions views, the print button becomes active when you select a single email interaction (printing multiple email interactions at the same time is not possible): ![]()
Your administrator decides which parts of an email you are allowed to print. One or more parts might be enabled for you: From, To, Cc, Subject, Body, Date, Attachment, Case Data, Note, and/or Disposition.
Clicking the Print button opens your browser Print window. The email is displayed in the preview area. Use your browser print controls to select a printer and format your print job.How does email quality assurance work?
 Workspace lets you and your team lead or supervisor work together to perform a Quality Assurance (QA) review of outbound emails. If your contact center is set up for email QA, any emails that you send are first sent to a reviewer for approval.
Here's an example of how a typical email QA review cycle might work:
- A customer sends an email to an agent.
- The agent sends a reply, which is directed to a reviewer.
- The reviewer either approves the email (sends it to the customer) or rejects it (holds it back for changes). The reviewer might make the updates themselves, or send it back to the agent with notes or instructions. The Case Information for the interaction might also show a Rejected status.
- After the changes are made, the review process repeats.
What next?
Top 5 topics