Difference between revisions of "PE-GPR/9.0.0/Help/cfgCustomers"
(Published) |
|||
| Line 9: | Line 9: | ||
|sectionHeading=Create a Customer Profile | |sectionHeading=Create a Customer Profile | ||
|FAQHeading=How do I upload customer data from a CSV file? | |FAQHeading=How do I upload customer data from a CSV file? | ||
| − | | | + | |Standalone=No |
| + | |ComingSoon=No | ||
| + | |alignment=Vertical | ||
|anchor=newCustProfile | |anchor=newCustProfile | ||
| − | | | + | |structuredtext=[[File:newCustProf.png|left|thumb|Select CSV file to upload data]] |
#Click the '''Settings''' gear icon [[File:GPMsettingsGear.png|50px]], located on the right side of the top menu bar, to open the '''Settings''' menu (appears on the left side of the window). | #Click the '''Settings''' gear icon [[File:GPMsettingsGear.png|50px]], located on the right side of the top menu bar, to open the '''Settings''' menu (appears on the left side of the window). | ||
| Line 23: | Line 25: | ||
}}{{Section | }}{{Section | ||
|sectionHeading=Verify the Schema | |sectionHeading=Verify the Schema | ||
| − | | | + | |Standalone=No |
| + | |ComingSoon=No | ||
| + | |alignment=Vertical | ||
|anchor=verifyCustProf | |anchor=verifyCustProf | ||
| − | | | + | |structuredtext=At this stage, before the data is uploaded, review and configure your Customer Profile. |
[[File:CustProfSetID.png|left|thumb|Verify Customer Profile Schema and Set ID]] | [[File:CustProfSetID.png|left|thumb|Verify Customer Profile Schema and Set ID]] | ||
| Line 43: | Line 47: | ||
}}{{Section | }}{{Section | ||
|sectionHeading=View The Customer Profile Schema | |sectionHeading=View The Customer Profile Schema | ||
| − | | | + | |Standalone=No |
| + | |ComingSoon=No | ||
| + | |alignment=Vertical | ||
|anchor=viewCustProfSchema | |anchor=viewCustProfSchema | ||
| − | | | + | |structuredtext=After you create the Customer Profile, the Customer Profile schema appears. It shows all of the columns in your schema and includes the following information: |
*'''Label''' and '''Type''' - The ''Label'' is the name of the column in the Customer Profile and the ''Type'' is the datatype for that field. You can adjust the datatype, if necessary. | *'''Label''' and '''Type''' - The ''Label'' is the name of the column in the Customer Profile and the ''Type'' is the datatype for that field. You can adjust the datatype, if necessary. | ||
| Line 58: | Line 64: | ||
|sectionHeading=Add Data to the Customer Profile | |sectionHeading=Add Data to the Customer Profile | ||
|FAQHeading=How do I add data to the Customer Profile? | |FAQHeading=How do I add data to the Customer Profile? | ||
| − | | | + | |Standalone=No |
| + | |ComingSoon=No | ||
| + | |alignment=Vertical | ||
|anchor=appendCustProf | |anchor=appendCustProf | ||
| − | | | + | |structuredtext=You can add data to the Customer Profile in either of two ways, by adding single fields, or by uploading additional CSV files. You can also create a custom field that is a expression built from existing Customer Profile fields. |
To add single fields: | To add single fields: | ||
Revision as of 13:47, January 17, 2020
Contents
Use the sections and options in the Data Loader Application object to configure the Customer Profile schema and to import customer-related data that you can then use to create Predictors. For upload, you must gather the desired data into a CSV file having with a consistent schema. After import, you can append data or update the data.
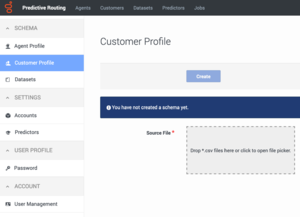
Create a Customer Profile
- Click the Settings gear icon
 , located on the right side of the top menu bar, to open the Settings menu (appears on the left side of the window).
 - Click the Customer Profile tab to open the Customer Profile window.
- Click the Source File text box to browse for your CSV file, or drag and drop it into the text box.
The Predictive Routing application automatically determines the separator type. It reads the schema from the configuration you specified in the Data Loader Application object. See Configure Data Loader to upload data for details.
NOTE: You must reload this page to view updates made using the Predictive Routing API, such as appending data to the Customer Profile.
Verify the Schema
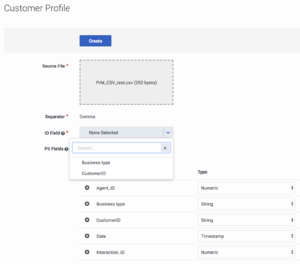
At this stage, before the data is uploaded, review and configure your Customer Profile.
- GPR automatically identifies the correct field separator in your CSV file.
- Scroll down the list of fields and ensure that the datatypes have been discovered correctly. If any are incorrect, select the correct datatype from the Type drop-down list.
- GPR supports the following datatypes: Boolean, Numeric, List, String, Timestamp, and Dict. See Setting Up a CSV File - Requirements and Limitations for how to correctly prepare your data, including characters that are unsupported or need special handling.
- Click the X in a row to remove it from the Customer Profile. If you change your mind before you upload your data (that is, before you click the Create button on the window), scroll to the bottom of the list of fields and click in the None Selected text box. Choose the field to be restored, and click Add Back.
- Set the ID Field, which is used as a key when joining customer with interaction data. The drop-down list contains all fields with the String datatype.
NOTE: ID Fields with a numeric datatype are not supported. - (Optional) Click in the PII Fields text box to select the fields that contain personally identifiable or sensitive information, such as Social Security numbers, passwords, names and addresses, phone numbers, and so on. Data in these fields is anonymized when you create the Customer Profile. See Data Anonymization for important information about how data is anonymized. Note that you cannot anonymize the ID Field.
- Click Create to upload the data.
- If you try to upload a file that contains more than 100 columns, GPR generates an error message. Cancel out of the upload procedure, edit your CSV file to reduce the number of columns, and then repeat the upload procedure.
- If you try to upload a file with too many columns using the GPR API, the error message appears in the Customer Profile Description field in the GPR application.
- If you try to upload more than 2.5 million rows to a Customer Profile, only the first 2.5 million rows are stored and the rest are discarded. A warning message appears on the Customer Profile Uploads tab specifying how many rows were discarded. The Append button is disabled until you delete some rows from the Customer Profile.
View The Customer Profile Schema
After you create the Customer Profile, the Customer Profile schema appears. It shows all of the columns in your schema and includes the following information:
- Label and Type - The Label is the name of the column in the Customer Profile and the Type is the datatype for that field. You can adjust the datatype, if necessary.
- The field specified as the ID Field field is marked with a dot in the radio button for that row.
- Visible and Indexed - Visible fields appear in the display on the Customers tab (accessed from the top navigation bar). Indexing speeds access to values in that field. You can have up to 20 indexed fields.
- Cardinality - the number of unique values that occur in that column. If there are more than 1000, this field shows the value as 1000+. Click the cardinality value to open a pop-up window that displays the first 1000 unique values that occur in the field.
- Expression - If you created a custom field (as described in Append Data to the Customer Profile) the expression you used is indicated in this column.
You can sort the table by clicking any column header.
Add Data to the Customer Profile
You can add data to the Customer Profile in either of two ways, by adding single fields, or by uploading additional CSV files. You can also create a custom field that is a expression built from existing Customer Profile fields.
To add single fields:
- Scroll to the bottom of the list of Customer Profile fields and click Add New Field.
- If you click in the text box, any fields you previously removed are listed. You can select them to be added back into the Customer Profile.
- To add an entirely new field, type a new field name and press Enter. The custom field value must be an expression constructed from arithmetic operations, Python 3 built-in functions, and fields already included in the Customer Profile.
- To access the built-in functions, press the SHIFT+@ shortcut.
- Configure the desired field parameters, then click Save Schema (at the bottom of the window).
To add data using a CSV file:
- On the Settings menu Customer Profile tab, click Upload Data. The Append Data pop-up window opens.
- Select the desired CSV file. It must comply with the schema for the Customer Profile.
- If you append a CSV file containing more columns than appear in the original schema, the extra columns are automatically discarded.


