
Difference between revisions of "VM/Current/VMPEGuide/Deploy"
(Published) |
|||
| Line 1: | Line 1: | ||
| − | {{ | + | {{ArticlePEServiceDeploy |
| − | | | + | |ServiceId=4d384b74-f61d-48f7-bace-30048213bf99 |
| − | | | + | |IncludeAssumptions=Yes |
| − | |||
| − | |||
|Section={{Section | |Section={{Section | ||
|alignment=Vertical | |alignment=Vertical | ||
| Line 9: | Line 7: | ||
<br/> | <br/> | ||
To deploy the Tenant service, see the ''{{Link-AnywhereElse|product=PrivateEdition|version=Current|manual=TenantPEGuide|display text=Tenant Service Private Edition Guide}}''.|}} | To deploy the Tenant service, see the ''{{Link-AnywhereElse|product=PrivateEdition|version=Current|manual=TenantPEGuide|display text=Tenant Service Private Edition Guide}}''.|}} | ||
| − | |||
<!--For solution-level deployment information, see {{SuiteLevelLink|openshift}}.--> | <!--For solution-level deployment information, see {{SuiteLevelLink|openshift}}.--> | ||
|Status=No | |Status=No | ||
| Line 374: | Line 371: | ||
|anchor=Validate | |anchor=Validate | ||
|alignment=Vertical | |alignment=Vertical | ||
| − | |structuredtext= | + | |structuredtext=Follow the steps below to validate the successful deployment of voice microservices. |
| + | |||
| + | #Verify the helm deployments using the following command. | ||
| + | #:<source>helm list -n voice</source> | ||
| + | #:Sample output: | ||
| + | #:<source>NAME NAMESPACE REVISION UPDATED STATUS CHART | ||
| + | APP VERSION | ||
| + | voice-agent-latest voice 4 2022-08-18 13:22:12.355810905 +0000 UTC deployed voice-agent-100.0.1000006 1.0 | ||
| + | voice-callthread-latest voice 70 2022-08-18 09:44:07.078583581 +0000 UTC deployed voice-callthread-100.0.1000006 1.0 | ||
| + | voice-config-latest voice 61 2022-08-19 01:33:02.039668264 +0000 UTC deployed voice-config-100.0.1000006 1.0 | ||
| + | voice-dialplan-latest voice 5 2022-08-18 12:33:31.223393121 +0000 UTC deployed voice-dialplan-100.0.1000009 1.0 | ||
| + | voice-ors-latest voice 1 2022-08-15 21:40:32.013855856 +0000 UTC deployed voice-ors-100.0.1000018 1.0 | ||
| + | voice-registrar-latest voice 108 2022-08-18 13:41:26.37007884 +0000 UTC deployed voice-registrar-100.0.1000007 latest-aa9f28a | ||
| + | voice-rq-latest voice 14 2022-08-18 13:44:07.187279228 +0000 UTC deployed voice-rq-100.0.1000004 1.0 | ||
| + | voice-sip-latest voice 193 2022-08-10 23:06:05.057511521 +0000 UTC deployed voice-sip-100.0.1000018 1.0 | ||
| + | voice-sipfe-latest voice 73 2022-08-10 23:49:45.166013304 +0000 UTC deployed voice-sipfe-100.0.1000006 1.0 | ||
| + | voice-sipproxy-latest voice 5 2022-08-11 17:13:30.894221491 +0000 UTC deployed voice-sipproxy-100.0.1000007 1.0 | ||
| + | voice-voicemail-latest voice 67 2022-08-18 15:18:47.347509225 +0000 UTC deployed voice-voicemail-100.0.1000015 1.0 | ||
| + | </source> | ||
| + | #Verify readiness state of Kubernetes objects using the kubectl commands. | ||
| + | ##Run the following command to check the deployments: | ||
| + | ##:<source>kubectl get deployments -n voice</source> | ||
| + | ##:Sample output: | ||
| + | ##:<source>NAME READY UP-TO-DATE AVAILABLE AGE | ||
| + | voice-agent 2/2 2 2 40d | ||
| + | voice-callthread 3/3 3 3 704d | ||
| + | voice-config 1/1 1 1 704d | ||
| + | voice-dialplan 1/1 1 1 41d | ||
| + | voice-registrar 1/1 1 1 703d | ||
| + | voice-sip-debug-kpan 2/2 2 2 68d | ||
| + | voice-sipfe 3/3 3 3 727d | ||
| + | voice-voicemail 1/1 1 1 87d</source> | ||
| + | ##Run the following command to check the Statefulsets: | ||
| + | ##:<source>kubectl get statefulset -n voice</source> | ||
| + | ##:Sample output: | ||
| + | ##:<source>NAME READY AGE | ||
| + | voice-ors 50/50 40d | ||
| + | voice-rq 20/20 40d | ||
| + | voice-sip 30/30 703d | ||
| + | voice-sipproxy 5/5 40d</source> | ||
| + | #Check if all the pods are running and in Ready state. | ||
| + | ##Run the following command to check the readiness of the pods. | ||
| + | ##:<source>kubectl get pods -n voice</source> | ||
| + | ##:Sample output: | ||
| + | ##:<source>NAME READY STATUS RESTARTS AGE | ||
| + | t2100-0 3/3 Running 0 4d23h | ||
| + | voice-agent-55dc97685b-pnfxr 2/2 Running 0 170m | ||
| + | voice-callthread-75984d848b-bm8q7 2/2 Running 0 170m | ||
| + | voice-callthread-75984d848b-kqv4t 2/2 Running 0 170m | ||
| + | voice-config-7666dd56cf-sf69f 2/2 Running 0 39h | ||
| + | voice-dialplan-788d84d766-8z8d4 2/2 Running 0 37h | ||
| + | voice-ors-0 2/2 Running 0 18h | ||
| + | voice-ors-1 2/2 Running 0 6d5h | ||
| + | voice-registrar-6c54c6bc9-tkvk2 2/2 Running 0 39h | ||
| + | voice-rq-0 2/2 Running 0 38h | ||
| + | voice-rq-1 2/2 Running 0 4d17h | ||
| + | voice-sip-0 3/3 Running 0 39h | ||
| + | voice-sip-1 3/3 Running 0 11d | ||
| + | voice-sipfe-56c7bc77dd-7fpkh 2/2 Running 0 170m | ||
| + | voice-sipproxy-0 2/2 Running 0 11d | ||
| + | voice-voicemail-66f745448b-wqmfc 2/2 Running 0 4d20h</source> | ||
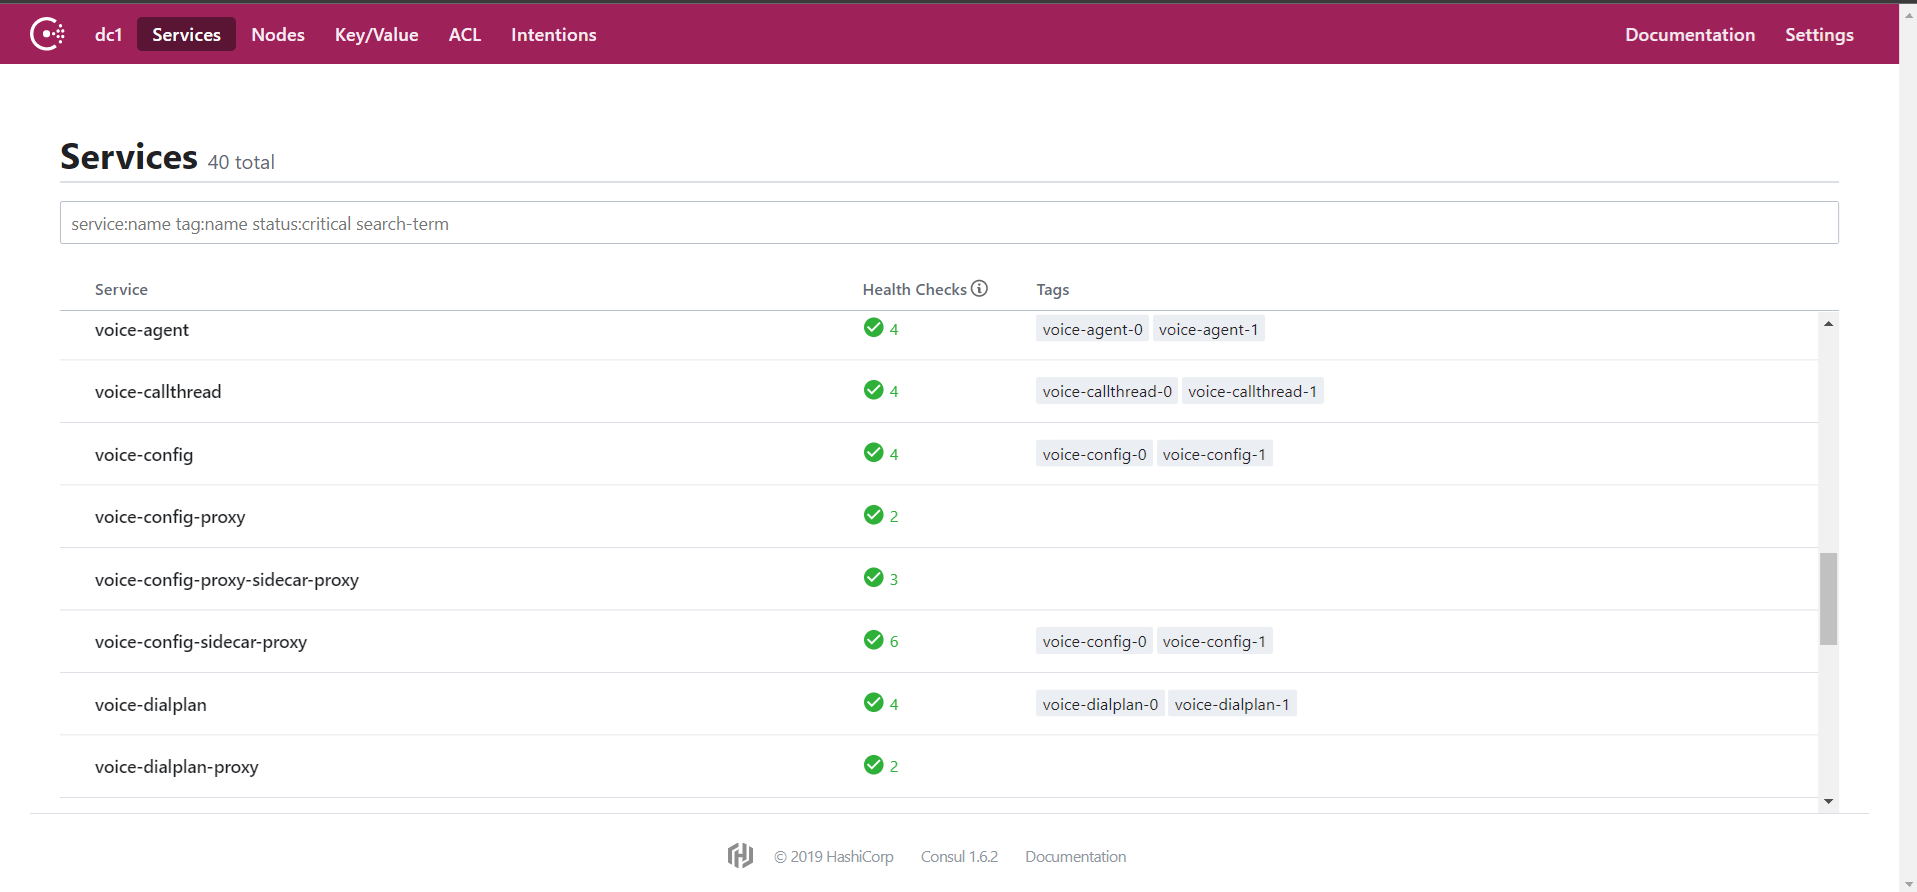
| + | #Verify the health status of the pods in Consul dashboard. | ||
| + | #:If the services are running and in Ready state, the health check will be marked as Green in Consul dashboard. | ||
| + | #:[[File:Voicemcs deploy validate consul.png]] | ||
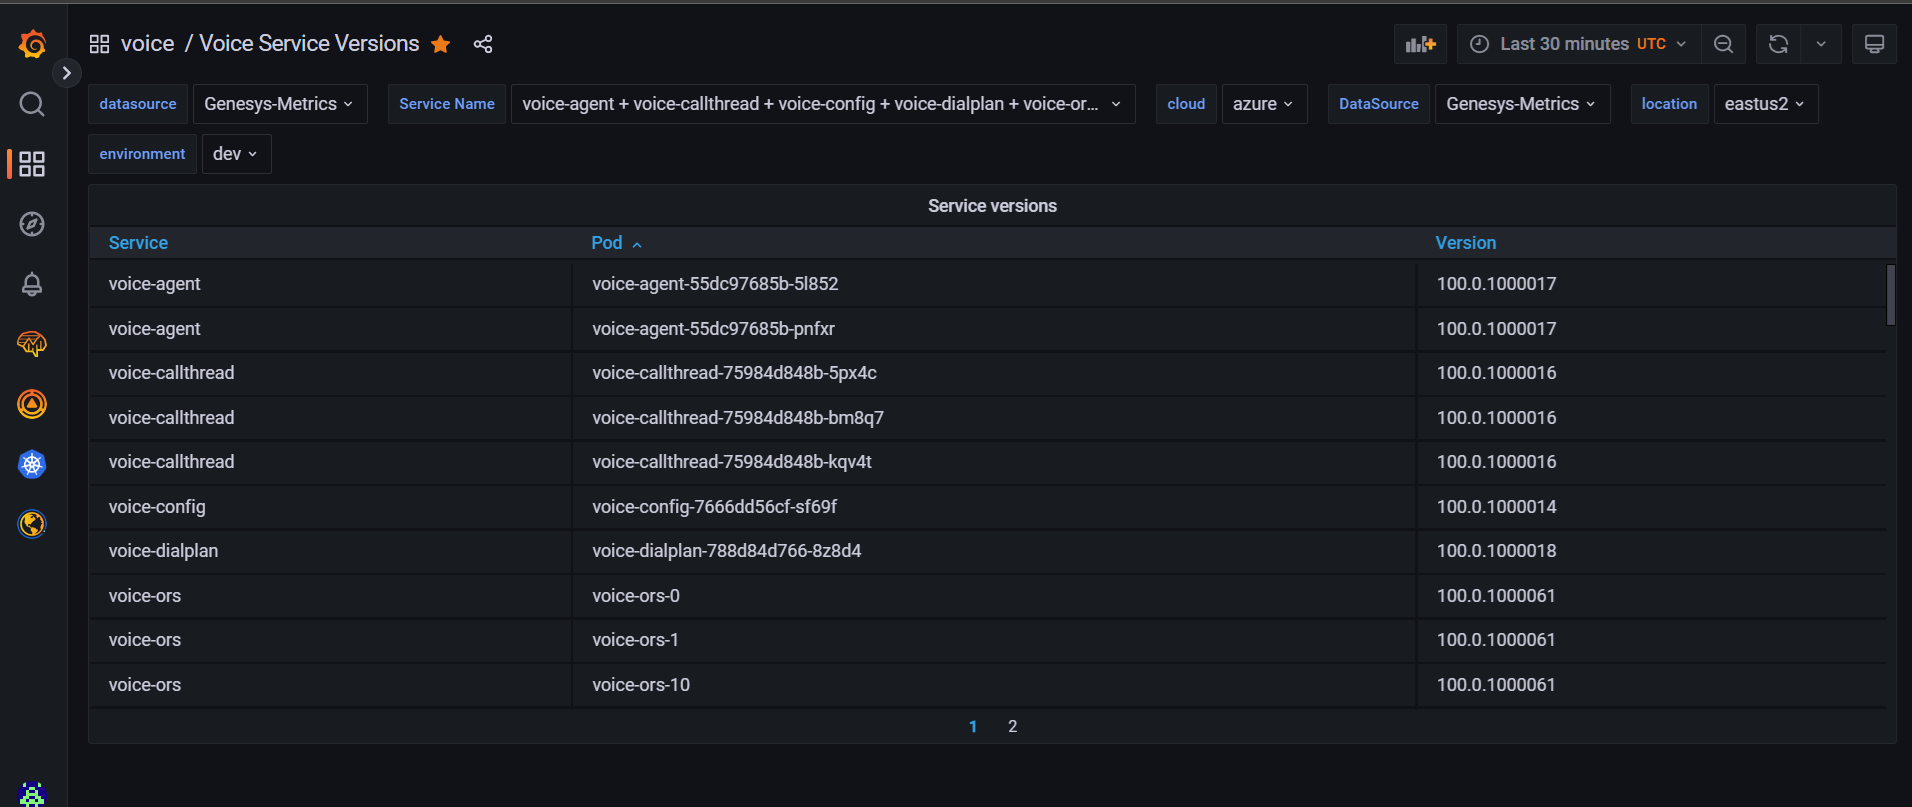
| + | #Check the versions of microservices in Grafana dashboard. | ||
| + | #:Only if voice-dashboards are deployed in the voice namespace, you can perform this check in the dashboard. | ||
| + | #:[[File:Voicemcs deploy validate grafana.png]] | ||
| + | #Check for any crash, KafkaJS or Redis connection errors in Prometheus, Grafana dashboards and/or logs of the respective microservices. | ||
| + | |||
| + | From a functional point of view, you can validate the voice microservices deployment by performing the following steps. | ||
| + | |||
| + | #Before you can validate the voice microservices, you must create few objects in the Tenant configdb to start the verification. | ||
| + | ##Port forward the Tenant instance at 8888 port and access the tenant objects through Configuration Manager application. | ||
| + | ##:<source>kubectl port forward t2100-0 8888:8888 -n voice</source> | ||
| + | ##Create a few Directory Numbers (DNs) under the Sip_Cluster switch with the following options: | ||
| + | ##:<source>[TServer] | ||
| + | contact=* | ||
| + | dual-dialog-enabled=false | ||
| + | infra-class=2 | ||
| + | make-call-rfc3725-flow=1 | ||
| + | refer-enabled=false | ||
| + | sip-cti-control=talk,hold | ||
| + | sip-ring-tone-mode=1 | ||
| + | use-contact-as-dn=true | ||
| + | use-register-for-service-state=false</source> | ||
| + | ##Create a Place object and map the DNs created. | ||
| + | ##Create new Agents with username and password, under the "Persons" section. | ||
| + | ##Map the Place to the agent. | ||
| + | #Once the objects are created successfully, follow the steps below to validate the voice microservices deployment.. | ||
| + | ##Register the DNs from Endpoints. | ||
| + | ##Login/Logout the Agents from Workspace Web Edition or a similar application and change the states - Ready, Not Ready and Logout. | ||
| + | ##Make few test calls between the agents. | ||
| + | ##Perform other call functionalities like - hold/retrieve, conference, transfer, after call work, and so on. | ||
| + | ##If Designer is available, load different strategies onto route points (external facing SBC Numbers) and validate if the inbound call made from PSTN is being routed to the agent/skill group configured. | ||
| + | #Additionally, you can also check the below after the deployment of voice microservices. | ||
| + | ##Verify whether the Grafana dashboards of the voice microservices are updated with relevant data and they reflect the status of the services correctly. | ||
| + | ##Check if the alerts and alarms are configured for the voice microservices and are active. | ||
|Status=No | |Status=No | ||
}} | }} | ||
| + | |Standalone=No | ||
| + | |DisplayName=Deploy Voice Microservices | ||
| + | |Context=Learn how to deploy Voice Microservices. | ||
| + | |ComingSoon=No | ||
|PEPageType=45d1441f-dc69-4a17-bd47-af5d811ce167 | |PEPageType=45d1441f-dc69-4a17-bd47-af5d811ce167 | ||
}} | }} | ||
Revision as of 14:46, September 8, 2022
Contents
Learn how to deploy Voice Microservices into a private edition environment.
Assumptions
- The instructions on this page assume you are deploying the service in a service-specific namespace, named in accordance with the requirements on Creating namespaces. If you are using a single namespace for all private edition services, replace the namespace element in the commands on this page with the name of your single namespace or project.
- Similarly, the configuration and environment setup instructions assume you need to create namespace-specific (in other words, service-specific) secrets. If you are using a single namespace for all private edition services, you might not need to create separate secrets for each service, depending on your credentials management requirements. However, if you do create service-specific secrets in a single namespace, be sure to avoid naming conflicts.
General deployment prerequisites
Before you deploy the Voice Services, you must deploy the infrastructure services. See Third-party prerequisites for the list of required infrastructure services.
To override values for both the infrastructure services and voice services, see Override Helm chart values.
Genesys recommends the following order of deployment for the Voice Microservices:
Deploy Consul
Consul is required for multiple services in the Genesys package.
In addition to any other Consul configuration, the following Consul features are required for Voice Services:
- connectinject – To deploy sidecar containers in Voice pods.
- controller – To provide service intention functionality.
- openshift – To set OpenShift-specific permissions.
- syncCatalog – To sync Kubernetes services to Consul. Set toK8S: false and addK8SNamespaceSuffix: false for syncing services from Kubernetes to Consul.
- AccessControlList – To enable ACL, set manageSystemACLs: true.
- storageclass – To set the storage class to a predefined storage class.
- TLS – To enable TLS, set enabled: true and follow the steps/commands described below to set up TLS.
The file content for the Consul configuration is the following:
# config.yaml
global:
  name: consul
  tls:
    enabled: true
    caCert:
      secretName: consul-ca-cert
      # The key of the Kubernetes secret.
      secretKey: tls.crt
    caKey:
      # The name of the Kubernetes secret.
      secretName: consul-ca-key
      # The key of the Kubernetes secret.
      secretKey: tls.key
  acls:
    manageSystemACLs: true
  openshift:
    enabled: true
connectInject:
  enabled: true
controller:
  enabled: true
syncCatalog:
  enabled: true
  toConsul: true
  toK8S: false
  addK8SNamespaceSuffix: false
Creation of the Consul bootstrap token
When you enable an Access Control List in Consul, you must ensure that Voice services have access to read and write to Consul. To provide access, you create a token for Voice services in the Consul UI. You can create the necessary Consul bootstrap token when you deploy Consul, although it is possible to do this configuration later, as part of the Voice Services deployment.
When Access Control List (ACL) is enabled in Consul, the Voice services must have the required access for reading and writing into Consul. For that, you must create a token in the Consul UI with the following permissions for the Voice services.
service_prefix "" {
  policy = "read"
  intentions = "read"
}
service_prefix "" {
  policy = "write"
  intentions = "write"
}
node_prefix "" {
  policy = "read"
}
node_prefix "" {
  policy = "write"
}
agent_prefix "" {
  policy = "read"
}
agent_prefix "" {
  policy = "write"
}
session_prefix "" {
  policy = "write"
}
session_prefix "" {
  policy = "read"
}
namespace_prefix "" {
 key_prefix "" {
  policy = "write"
 }
 session_prefix "" {
  policy = "write"
 }
}
key_prefix "" {
  policy = "read"
 }
key_prefix "" {
  policy = "write"
 }
To log into the Consul UI and to create a new ACL, you use a bootstrap token. Use the following command to get the bootstrap token:
kubectl get secret consul-bootstrap-acl-token -n <consul namespace> -o go-template='{{.data.token | base64decode}}Create a new token and create a policy (voice-policy) with the preceding list of permissions and assign it to this token. For example a token is created with a value of a7529f8a-1146-e398-8bd7-367894c4b37b. We can create a Kubernetes secret with this token as shown below:
kubectl create secret generic consul-voice-token -n voice --from-literal='consul-consul-voice-token=a7529f8a-1146-e398-8bd7-367894c4b37b'Creating Intentions in the Consul UI
Voice services use the Consul service mesh to connect between services. Consul has provision to either allow or deny the connection between services. This is done using intentions. Log into the Intentions tab using the bootstrap token and create a new intention to allow all source services to all destination services as shown in the following screenshot.

Create the Voice namespace
Before deploying Voice Services and their dependencies, create a namespace using the following command:
kubectl create ns voiceIn all Voice Services and the configuration files of their dependencies, the namespace is voice. If you want a specific, custom namespace, create the namespace (using the preceding command) and remember to change the namespace in files, as required.
Deploy Voice Services
Register the Redis service in Consul
After the creation of the Redis cluster, the Redis IP address should be registered with Consul. Cluster information needs to be created for the Kubernetes services and endpoints with Redis. Once they are created, Consul will automatically sync those Kubernetes services and register them in Consul.
Kubernetes Service and endpoint creation
The Redis registration should be done for all of the following Redis service names. The Voice services use these service names for connecting to the Redis cluster.
redis-agent-state
redis-call-state
redis-config-state
redis-ors-state
redis-ors-stream
redis-registrar-state
redis-rq-state
redis-sip-state
redis-tenant-stream
Manifest file
For all the preceding Redis service names, create a separate service and endpoint using the following example:
apiVersion: v1
kind: Service
metadata:
  name: <redis-service-name> (ex, redis-agent-state)
  namespace: <namespace> (ex, voice)
  annotations:
    "consul.hashicorp.com/service-sync": "true"
spec:
  clusterIP: None
---
apiVersion: v1
kind: Endpoints
metadata:
  name: <redis-service-name> (ex, redis-agent-state)
  namespace: <namespace> (ex, voice)
subsets:
  - addresses:
      - ip: <redis Cluster IP> (ex, 51.143.122.147)
    ports:
      - port: <redis port> (ex, 6379)
        name: redisport
        protocol: <redis transport> (ex, TCP)
In addition, get the Redis primary IP using the following command:
kubectl get service infra-redis-redis-cluster -n infra -o jsonpath='{.spec.clusterIP}' (get Cluster IP of the Redis Service)Deploy the Voice Services
Voice Services require a Persistent Volume Claim (PVC); the Voice SIP Cluster Service uses a persistent volume to store traditional SIP Server logs. Before deploying Voice Services, create the PVC.
Storage class and Claim name
The created persistent volume must be configured in the sip_node_override_values.yaml file as shown below:
# pvc will be created for logs
volumes:
  pvcLog:
    create: true
    claim: sip-log-pvc
    storageClass: voice
    volumeName: <pv name> (ex sip-log-pv)

  pvcJsonLog:
    create: true
    claim: sip-json-log-pvc
    storageClass: voice
    volumeName: <pv name> (ex sip-log-pv)
Configure the DNS Server for voice-sip
The Voice SIP Cluster Service requires the DNS server to be configured in its sip_node_override_values.yaml file. Follow the steps in the Kubernetes documentation to install a dnsutils pod. Using the dnsutils pod, get the dnsserver that's used in the environment.
The default value in the SIP Helm chart is 10.0.0.10. If the dnsserver address is different, update it in the sip_node_override_values.yaml file as shown below:
# update dns server ipaddress
  context:
    envs:
      dnsServer: "10.202.0.10"
Voice Service Helm chart deployment
helm upgrade --install --force --wait --timeout 300s -n voice -f ./voice_helm_values/agent_override_values.yaml voice-agent <helm-repo>/voice-agent-<helmchart-version>.tgz --set version=<container-version> --username "$JFROG_USER" --password "$JFROG_PASSWORD"

helm upgrade --install --force --wait --timeout 300s -n voice -f ./voice_helm_values/callthread_override_values.yaml voice-callthread <helm-repo>/voice-callthread-<helmchart-version>.tgz --set version=<container-version> --username "$JFROG_USER" --password "$JFROG_PASSWORD"

helm upgrade --install --force --wait --timeout 200s -n voice -f ./voice_helm_values/config_override_values.yaml voice-config <helm-repo>/voice-config-<helmchart-version>.tgz --set version=<container-version> --username "$JFROG_USER" --password "$JFROG_PASSWORD"

helm upgrade --install --force --wait --timeout 300s -n voice -f ./voice_helm_values/dialplan_override_values.yaml voice-dialplan <helm-repo>/voice-dialplan-<helmchart-version>.tgz --set version=<container-version> --username "$JFROG_USER" --password "$JFROG_PASSWORD"

helm upgrade --install --force --wait --timeout 200s -n voice -f ./voice_helm_values/ors_node_override_values.yaml voice-ors <helm-repo>/voice-ors-<helmchart-version>.tgz --set version=<container-version> --username "$JFROG_USER" --password "$JFROG_PASSWORD"

helm upgrade --install --force --wait --timeout 300s -n voice -f ./voice_helm_values/registrar_override_values.yaml voice-registrar <helm-repo>/voice-registrar-<helmchart-version>.tgz --set version=<container-version> --username "$JFROG_USER" --password "$JFROG_PASSWORD"

helm upgrade --install --force --wait --timeout 200s -n voice -f ./voice_helm_values/rq_node_override_values.yaml voice-rq <helm-repo>/voice-rq-<helmchart-version>.tgz --set version=<container-version> --username "$JFROG_USER" --password "$JFROG_PASSWORD"

helm upgrade --install --force --wait --timeout 200s -n voice -f ./voice_helm_values/sip_node_override_values.yaml voice-sip <helm-repo>/voice-sip-<helmchart-version>.tgz --set version=<container-version> --username "$JFROG_USER" --password "$JFROG_PASSWORD"

helm upgrade --install --force --wait --timeout 300s -n voice -f ./voice_helm_values/sipfe_override_values.yaml voice-sipfe <helm-repo>/voice-sipfe-<helmchart-version>.tgz --set version=<container-version> --username "$JFROG_USER" --password "$JFROG_PASSWORD"

helm upgrade --install --force --wait --timeout 300s -n voice -f ./voice_helm_values/sipproxy_override_values.yaml voice-sipproxy <helm-repo>/voice-sipproxy-<helmchart-version>.tgz --set version=<container-version> --username "$JFROG_USER" --password "$JFROG_PASSWORD"| Service name | Helm chart version |
|---|---|
| voice-config | voice-config-9.0.11.tgz |
| voice-dialplan | voice-dialplan-9.0.08.tgz |
| voice-registrar | voice-registrar-9.0.14.tgz |
| voice-agent | voice-agent-9.0.10.tgz |
| voice-callthread | voice-callthread-9.0.12.tgz |
| voice-sip | voice-sip-9.0.22.tgz |
| voice-sipfe | voice-sipfe-9.0.06.tgz |
| voice-sipproxy | voice-sipproxy-9.0.09.tgz |
| voice-rq | voice-rq-9.0.08.tgz |
| voice-ors | voice-ors-9.0.08.tgz |
Deploy in OpenShift
Add a rule for Consul DNS forwarding
In the OpenShift Container Platform (OCP), as part of the general deployment prerequisites, you must add a rule for Consul DNS forwarding. OpenShift sends DNS requests to the DNS server in the openshift-dns namespace. To forward Consul FQDN resolution to a Consul DNS server, add the forwarding rule to the configmap of the default DNS operator. Save the Consul DNS IP address using the following command:
kubectl get svc consul-dns -n <consul namespace> -o jsonpath={.spec.clusterIP} (Internal IP of consul-dns service)
> oc edit dns.operator/default
Add the below specs:
spec:
servers:
- name: consul-dns
zones:
- consul
forwardPlugin:
upstreams:
- <Internal IP of consul-dns service>
Persistent volumes
The general Voice Services deployment is described in Deploy Voice Services. There are some differences when creating PVCs in the OpenShift Container Platform (OCP). This section describes the configuration for OCP.
Persistent Volume in OCS Storage Type
A Storage Class might have been created already in the OCP. This Storage Class is used for creating PVCs and must be set in the override values of the sip_node_override_values.yaml file.
For an OpenShift cluster with OpenShift Container Storage (OCS), configure the Storage Class to be used for creating the persistent volume. In the case of OCS, the PV is created automatically when the PVC is claimed. For such clusters, the volumeName parameter in the sip_node_override_values.yaml file must be empty.
#  PVC's section
## This section defines about creating PVCs
volumes:
  pvcLog:
    create: true                                    # create defines whether a PVC needs to be created with the chart.
    claim: sip-log-pvc                              # Name of PVC
    volumeName:                                     # To bind this PVC to specified Persistent Volume.In case of Openshift, this is required only for NFS mounting and not needed for OCS.
    claimSize: 10Gi                                 # This field sets the storage size requested by PVC
    storageClass: voice                             # This field sets the storage class requested by PVC
    mountPath: /opt/genesys/logs/volume             # Volume mount path for PV

  pvcJsonLog:
    create: true                                    # create defines whether a PVC needs to be created with the chart.
    claim: sip-json-log-pvc                         # Name of PVC
    volumeName:                                     # To bind this PVC to specified Persistent Volume.In case of Openshift, this is required only for NFS mounting and not needed for OCS.
    claimSize: 10Gi                                 # This field sets the storage size requested by PVC
    storageClass: voice                             # This field sets the storage class requested by PVC
    mountPath: /opt/genesys/logs/sip_node/JSON      # Volume mount path for PV
Configure the DNS Server for voice-sip
The Voice SIP Cluster Service requires the DNS server to be configured in its sip_node_override_values.yaml file.
In the OCP environment, you can find the Kubernetes DNS server name using the following command:
oc get dns.operator/default -o jsonpath={.status.clusterIP}The default value in the SIP Helm chart is "10.0.0.10"; if the DNS server address is different, update it in the sip_node_override_values.yaml file as shown below:
# update dns server ipaddress
  context:
    envs:
      dnsServer: "10.202.0.10"
Deploy the Tenant service
The Tenant Service is included with the Voice Microservices, but has its own deployment procedure. To deploy the Tenant Service, see Deploy the Tenant Service.
Validate the deployment
Follow the steps below to validate the successful deployment of voice microservices.
- Verify the helm deployments using the following command.
helm list -n voice
- Sample output:
NAME                                            NAMESPACE       REVISION        UPDATED                                 STATUS          CHART
                                                                                                                                                                             APP VERSION
voice-agent-latest                              voice           4               2022-08-18 13:22:12.355810905 +0000 UTC deployed        voice-agent-100.0.1000006           1.0
voice-callthread-latest                         voice           70              2022-08-18 09:44:07.078583581 +0000 UTC deployed        voice-callthread-100.0.1000006      1.0
voice-config-latest                             voice           61              2022-08-19 01:33:02.039668264 +0000 UTC deployed        voice-config-100.0.1000006          1.0
voice-dialplan-latest                           voice           5               2022-08-18 12:33:31.223393121 +0000 UTC deployed        voice-dialplan-100.0.1000009        1.0
voice-ors-latest                                voice           1               2022-08-15 21:40:32.013855856 +0000 UTC deployed        voice-ors-100.0.1000018             1.0
voice-registrar-latest                          voice           108             2022-08-18 13:41:26.37007884 +0000 UTC  deployed        voice-registrar-100.0.1000007       latest-aa9f28a
voice-rq-latest                                 voice           14              2022-08-18 13:44:07.187279228 +0000 UTC deployed        voice-rq-100.0.1000004              1.0
voice-sip-latest                                voice           193             2022-08-10 23:06:05.057511521 +0000 UTC deployed        voice-sip-100.0.1000018             1.0
voice-sipfe-latest                              voice           73              2022-08-10 23:49:45.166013304 +0000 UTC deployed        voice-sipfe-100.0.1000006           1.0
voice-sipproxy-latest                           voice           5               2022-08-11 17:13:30.894221491 +0000 UTC deployed        voice-sipproxy-100.0.1000007        1.0
voice-voicemail-latest                          voice           67              2022-08-18 15:18:47.347509225 +0000 UTC deployed        voice-voicemail-100.0.1000015       1.0
- Verify readiness state of Kubernetes objects using the kubectl commands.
- Run the following command to check the deployments:
kubectl get deployments -n voice
- Sample output:
NAME                   READY   UP-TO-DATE   AVAILABLE   AGE
voice-agent            2/2     2            2           40d
voice-callthread       3/3     3            3           704d
voice-config           1/1     1            1           704d
voice-dialplan         1/1     1            1           41d
voice-registrar        1/1     1            1           703d
voice-sip-debug-kpan   2/2     2            2           68d
voice-sipfe            3/3     3            3           727d
voice-voicemail        1/1     1            1           87d
- Run the following command to check the Statefulsets:
kubectl get statefulset -n voice
- Sample output:
NAME              READY   AGE
voice-ors         50/50   40d
voice-rq          20/20   40d
voice-sip         30/30   703d
voice-sipproxy    5/5     40d
- Run the following command to check the deployments:
- Check if all the pods are running and in Ready state.
- Run the following command to check the readiness of the pods.
kubectl get pods -n voice
- Sample output:
NAME                                    READY   STATUS        RESTARTS         AGE
t2100-0                                 3/3     Running       0                4d23h
voice-agent-55dc97685b-pnfxr            2/2     Running       0                170m
voice-callthread-75984d848b-bm8q7       2/2     Running       0                170m
voice-callthread-75984d848b-kqv4t       2/2     Running       0                170m
voice-config-7666dd56cf-sf69f           2/2     Running       0                39h
voice-dialplan-788d84d766-8z8d4         2/2     Running       0                37h
voice-ors-0                             2/2     Running       0                18h
voice-ors-1                             2/2     Running       0                6d5h
voice-registrar-6c54c6bc9-tkvk2         2/2     Running       0                39h
voice-rq-0                              2/2     Running       0                38h
voice-rq-1                              2/2     Running       0                4d17h
voice-sip-0                             3/3     Running       0                39h
voice-sip-1                             3/3     Running       0                11d
voice-sipfe-56c7bc77dd-7fpkh            2/2     Running       0                170m
voice-sipproxy-0                        2/2     Running       0                11d
voice-voicemail-66f745448b-wqmfc        2/2     Running       0                4d20h
- Run the following command to check the readiness of the pods.
- Verify the health status of the pods in Consul dashboard.
- If the services are running and in Ready state, the health check will be marked as Green in Consul dashboard.
- Check the versions of microservices in Grafana dashboard.
- Only if voice-dashboards are deployed in the voice namespace, you can perform this check in the dashboard.
- Check for any crash, KafkaJS or Redis connection errors in Prometheus, Grafana dashboards and/or logs of the respective microservices.


From a functional point of view, you can validate the voice microservices deployment by performing the following steps.
- Before you can validate the voice microservices, you must create few objects in the Tenant configdb to start the verification.
- Port forward the Tenant instance at 8888 port and access the tenant objects through Configuration Manager application.
kubectl port forward t2100-0 8888:8888 -n voice
- Create a few Directory Numbers (DNs) under the Sip_Cluster switch with the following options:
[TServer]
	contact=*
	dual-dialog-enabled=false
	infra-class=2
	make-call-rfc3725-flow=1
	refer-enabled=false
	sip-cti-control=talk,hold
	sip-ring-tone-mode=1
	use-contact-as-dn=true
	use-register-for-service-state=false
- Create a Place object and map the DNs created.
- Create new Agents with username and password, under the "Persons" section.
- Map the Place to the agent.
- Port forward the Tenant instance at 8888 port and access the tenant objects through Configuration Manager application.
- Once the objects are created successfully, follow the steps below to validate the voice microservices deployment..
- Register the DNs from Endpoints.
- Login/Logout the Agents from Workspace Web Edition or a similar application and change the states - Ready, Not Ready and Logout.
- Make few test calls between the agents.
- Perform other call functionalities like - hold/retrieve, conference, transfer, after call work, and so on.
- If Designer is available, load different strategies onto route points (external facing SBC Numbers) and validate if the inbound call made from PSTN is being routed to the agent/skill group configured.
- Additionally, you can also check the below after the deployment of voice microservices.
- Verify whether the Grafana dashboards of the voice microservices are updated with relevant data and they reflect the status of the services correctly.
- Check if the alerts and alarms are configured for the voice microservices and are active.